
TL;DR:
- Choosing layered reflective materials, including tape, fabric, and paint, maximizes cyclist visibility from all angles. Combining static and dynamic reflection zones creates overlapping coverage, reducing dangerous blind spots during night rides. A multi-material approach, tailored to your riding style, ensures safer, more confident cycling in low-light conditions.
Picking the right reflective material for your bike sounds simple until you’re staring at a wall of tapes, sprays, jackets, and sticker kits online, each one claiming to make you impossible to miss. The truth is, not all reflective products work the same way, and the wrong choice could leave dangerous gaps in your visibility. Whether you commute through city streets every morning or ride gravel trails at dusk, this guide breaks down the top types of cycling reflective materials, how they compare on real-world criteria, and which combination works best for your riding style.
Table of Contents
- Key criteria for choosing reflective materials
- Retroreflective tapes and stickers
- Reflective fabrics and yarns
- Reflective paints and sprays
- Comparison of top reflective materials
- Our take: Layering materials is the best strategy
- Equip yourself with top reflective gear
- Frequently asked questions
Key Takeaways
| Point | Details |
|---|---|
| Layer materials | Using multiple types of reflective materials together provides full-coverage visibility for cyclists. |
| Tapes for hard surfaces | Retroreflective tape is best for bike frames, wheels, and pedals due to its durability and brightness. |
| Fabrics boost clothing safety | Reflective textiles in gear and apparel improve visibility and are comfortable for riders. |
| Paints for customization | Reflective sprays and paints offer creative and flexible ways to enhance visibility on tricky surfaces. |
| No substitute for lights | Reflective materials pair with but do not replace legal, active bike lighting. |
Key criteria for choosing reflective materials
Now that you’re thinking about why visibility matters, let’s break down what to look for when choosing reflective materials for your cycling setup.
The first thing to consider is visibility range, meaning the distance at which a driver’s headlights can pick you up. Cheap reflective stickers might only return light from 50 feet, while high-grade retroreflective tape can alert drivers from several hundred feet away. That difference can be life-saving on a dark rural road.
Durability is the second major factor. Reflective materials face rain, mud, road grit, UV exposure, and repeated washing if they’re on clothing. A tape that peels after two rainy commutes is worse than useless because it gives you false confidence.
Here are the core criteria to run every reflective product through before you buy:
- Visibility range: How far back does the material reflect headlights toward a driver?
- Weather durability: Can it handle rain, cold, heat, and UV without fading or peeling?
- Placement options: Does it work on a frame tube, wheel rim, helmet, pedal, or jacket?
- Ease of application and maintenance: Is it a peel-and-stick solution or does it require prep work?
- Aesthetics: Does it blend with your gear or look like an afterthought?
- Cost and availability: Is it reasonably priced and easy to reorder or replace?
Reflective tape used on bikes is typically retroreflective and acts as an always-on visibility cue, meaning it works the moment a driver’s light hits it, with no batteries required. That passive reliability is part of what makes it so useful. For a full breakdown of how these materials fit into a complete safety setup, the cycling safety gear guide on our site is a great starting point.
Pro Tip: Layering multiple reflective materials increases your visibility from all angles. Tape covers your bike frame, fabric covers your body, and painted accents fill the gaps. No single product achieves 360-degree coverage alone.
Retroreflective tapes and stickers
With your selection criteria in mind, let’s explore the most versatile and widely used cycling reflective material: retroreflective tape and stickers.
Retroreflective means the material bounces light directly back toward its source. When a car’s headlight hits retroreflective tape on your bike, the light travels back to the driver’s eyes instead of scattering in random directions. This is fundamentally different from standard reflective surfaces you’d find on a road sign. The effect is a bright, attention-grabbing glow that works at long distances.
Retroreflective tape bounces headlight beams back to drivers and can be applied to frame tubes, wheels, pedals, crank arms, and more. Here’s how to get the most from it:
- Frame tubes: Apply strips along the top tube, down tube, and seat tube for side visibility. Cut tape to match tube length for a clean finish.
- Wheel rims: Rim tape creates a spinning circle of light that catches the eye from a distance. It’s particularly effective because moving reflective elements are processed faster by the human brain.
- Pedals and crank arms: Feet move up and down in a rhythmic pattern that drivers recognize as a cyclist. Adding reflective tape here creates a distinctive motion signature.
- Helmet: The highest point on your profile. A strip of tape on the back or sides of your helmet is visible above any obstruction.
- Seatpost and saddle rails: Often overlooked, but directly in the line of sight of a car approaching from behind.
“A typical frame can be outfitted with about 3–5 feet of 1-inch tape. For a complete setup including rims, helmet, and accessories, budget around 8–12 feet.”
One of the best things about retroreflective tape is the price-to-performance ratio. A roll costs a few dollars, takes minutes to apply, and requires almost no maintenance. Check the edges periodically for lifting and press them back down or replace short sections as needed. For more on how bike reflectors for night safety fit into a broader urban riding strategy, we’ve covered the topic in depth.
Reflective fabrics and yarns
After tapes and stickers, another effective category is reflective fabric and yarns, found in much of today’s cycling apparel.
Reflective textiles work through tiny glass beads or metallic threads woven or bonded into the fabric. When light hits them, the same retroreflective principle applies: light bounces back toward the driver. What makes fabric different from tape is how it conforms to a moving human body. A reflective jacket flexes with your arms, a reflective vest moves with your breathing, and reflective shoe covers rotate with every pedal stroke.
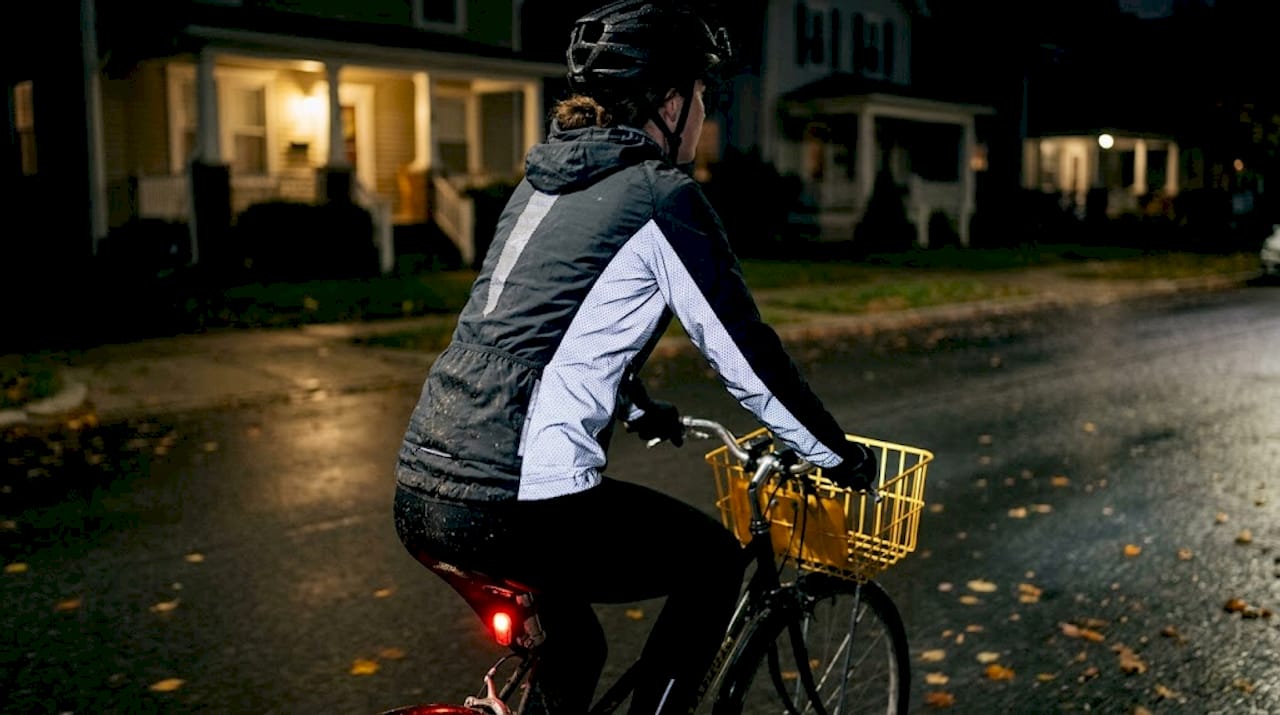
Many cycling accessories such as bags, vests, and jackets use reflective fabrics for visibility in all lighting conditions, including overcast daytime rides where colors wash out and you need passive visibility working for you.
Key advantages of reflective fabrics:
- Washable and long-lasting: Quality reflective garments maintain their reflectivity through dozens of wash cycles when cared for correctly.
- Body-conforming coverage: Fabric covers your torso, arms, and legs, the largest surfaces on a moving cyclist.
- Subtle integration: Many modern cycling brands weave reflective threads into standard-looking designs. You get safety without looking like a construction worker.
- Dynamic motion visibility: A reflective arm or leg moving in a pedaling rhythm creates a highly recognizable pattern for drivers.
- Versatility across conditions: Wind jackets and rain covers with reflective panels work in wet weather where adhesive tapes might struggle.
The best candidates for reflective fabric are commuters who ride in street clothes and need versatility, night riders who do long distances, and anyone who rides in rain or low-light conditions regularly. Exploring cycling visibility reflectors paired with reflective clothing gives you a complete body-and-bike system.
Pro Tip: Mixing reflective fabrics like vests and arm bands with retroreflective tape on your bike gives you both static coverage on the frame and dynamic movement recognition from your body. This combination is recognized faster by drivers than either approach alone.
Reflective paints and sprays
If you want even more flexibility or custom looks, reflective paints and sprays are increasingly popular for DIY visibility.
Reflective paint works by suspending tiny glass microspheres in a paint or spray base. When dry, those microspheres catch light and send it back toward the source, much like tape but in any shape or pattern you choose. Reflective paint provides a flexible, customizable way to add visibility cues to almost any surface, which is why it’s gained popularity among cyclists who want to maintain a specific aesthetic.
Here’s what you need to know before reaching for the spray can:
- Coverage flexibility: You can coat curved surfaces, tight corners around cable guides, fork crowns, and anywhere tape won’t lay flat.
- Custom patterns: Apply reflective paint through a stencil for logos, stripes, or geometric patterns that blend with your bike’s look.
- Temporary vs. permanent options: Some spray versions are designed to wash off, which is useful if you’re renting a bike or want seasonal application.
- Compatibility check: Always test on a hidden area first. Some paints react with certain clear coats or anodized finishes. Check your bike manufacturer’s guidance before full application.
- Reapplication over time: Paint and spray solutions generally don’t last as long as high-quality tape. High-contact areas like the chainstay will wear faster. Budget for seasonal reapplication if you ride frequently.
- Layering potential: Spraying a base of reflective paint and then applying tape on top can create redundant coverage, useful on frame sections that take the most impact.
Reflective paints suit cyclists who want a polished or personalized look, riders with unusual frame geometries where tape doesn’t work well, and those who enjoy the customization process itself. For context on how passive reflectors and reflectors and cyclist safety work together in traffic, we’ve dedicated a full article to the topic.
Comparison of top reflective materials
You’ve learned about each main material. Now see how they stack up and which is best for you.
Reflective tape, fabrics, and paints all provide “always-on” visibility enhancements. Tapes cover more curved surfaces while fabrics fit apparel; paints offer the most customization but require more maintenance. Here’s a side-by-side breakdown:
| Material | Visibility range | Durability | Installation | Comfort | Cost |
|---|---|---|---|---|---|
| Retroreflective tape | High (200+ feet) | Ausgezeichnet | Very easy | N/A (on bike) | Low ($5–$20) |
| Reflective fabric | High (100–200 feet) | Good (washable) | Wear it | Ausgezeichnet | Medium ($30–$100) |
| Reflective paint/spray | Medium (50–150 feet) | Fair (reapply needed) | Moderate | N/A (on bike) | Low ($10–$30) |
Who should prioritize which material?
- Commuters in cities: Reflective fabric as a primary (vest, jacket, bands) plus tape on the frame. You blend in during the day and stand out at night.
- Road and gravel racers: Tape on the frame and wheels for low-weight passive visibility, plus reflective elements integrated into your kit.
- Family riders and e-bikers: Full tape coverage on the bike, reflective vest for the rider, and reflective accessories on cargo bags or child seats.
- DIY customizers: Reflective spray for the frame aesthetics, tape for high-visibility zones.
Key insight: Covering both your bike and your body increases all-direction visibility more than any single material alone. Drivers approach from the front, side, and rear. Only a layered setup addresses every angle.
For a deeper look at how reflective elements combine with active lighting in a full safety plan, the high-visibility gear guide walks through product categories and use cases in detail.
Our take: Layering materials is the best strategy
The comparison table above is useful, but here’s what years of real-world riding and product testing have taught us: the search for a single “best” reflective material is the wrong question entirely.
Most cyclists approach visibility as a checkbox. They buy a roll of tape or a reflective vest and consider the problem solved. But visibility has angles, and a driver behind you sees something completely different than a driver coming from your left. Tape on your seat tube helps the car behind you. A reflective jacket sleeve helps the car merging from the right. Rim tape helps every direction at once because wheels are always turning.
The cyclists we’ve spoken with who feel most confident riding at night are the ones who built their visibility in layers: tape on the frame, reflective accents on the helmet, a jacket or vest with woven reflective elements, and reflective bands on the ankles where the pedaling motion draws attention. None of these alone is sufficient. Together, they create what we call overlapping reflection zones, meaning there’s no dark angle from which a driver can’t see you.
Insider tip: Look for overlapping reflection zones on both your moving and stationary parts for ultimate visibility. Moving parts like wheels, pedals, and arms create motion signatures that human eyes detect faster. Stationary parts like the frame and helmet maintain your presence between movements.
You also don’t have to sacrifice style to achieve this. Today’s reflective fabrics are designed to look like normal cycling kit in daylight and transform under headlights. Precision-cut tape on a dark frame looks like a design detail during the day and a beacon at night. The old trade-off between looking good and being safe is increasingly a false choice.
If you want to understand how this layering concept applies specifically to urban night riding, the breakdown on boosting urban cyclist visibility covers specific placement strategies and product pairings that work in real traffic conditions.
Equip yourself with top reflective gear
With a layered visibility approach in mind, it’s easier than ever to enhance your safety with the right gear.
At THE BEAM, we design every product with real cyclists in mind, from urban commuters navigating evening traffic to gravel riders finishing rides after dark. Our reflective helmets are built to integrate passive retroreflective elements into a design you’ll actually want to wear. The VIRGO integral helmet with MIPS technology, for example, pairs certified protection with highly visible materials that work day and night.

Beyond helmets, our full line of cycling accessories includes high-visibility reflectors, rear-view mirrors, and connected safety products that complement any reflective material strategy you build. Whether you’re starting with tape and want to step up to a full system, or you’re looking to replace worn reflective gear before the darker months arrive, we’ve got options that match every riding style and budget.
Frequently asked questions
How do I choose the right type of reflective material for my bike?
Select based on surface and coverage needs: tape for frame and hard surfaces, fabric for clothing, and paint for custom shapes or awkward geometries.
Is reflective tape or fabric better for all-weather cycling?
Retroreflective tape holds up well on hard surfaces in rain and cold, while reflective fabrics offer weather-resistant visibility when worn as jackets, vests, or arm bands.
Do reflective paints really work for bicycles?
Yes, though they require periodic reapplication. Reflective paint provides a flexible, customizable way to add visibility cues, especially on curved surfaces or unique frame designs where tape doesn’t adhere well.
How much reflective tape do I need for my entire bike?
For a complete setup covering frame tubes, rims, helmet, and accessories, budget 8 to 12 feet of 1-inch wide retroreflective tape. A frame-only application needs roughly 3 to 5 feet.
Can reflective gear replace bike lights?
No. Reflective materials are passive and only work when another light source, like a car’s headlights, hits them. Active bike lights make you visible even when no other light is present, so both are necessary for safe night riding.


