
Ultracycling strips away every safety net. You’re managing sleep deprivation, mechanical failures, and weather swings across hundreds of miles, often alone, often at night. The margin for error is thin, and the consequences of a missing spare or a dead rear light can end your race before sunrise. This checklist pulls from expert-backed sources and real-world ultracyclist experience to give you a practical, prioritized safety system, covering tools, visibility, nutrition, rest, and personal care so you can ride farther with confidence.
Table of Contents
- Essential mechanical tools for self-sufficiency
- Night riding safety: lighting and visibility essentials
- Clothing layers and weather adaptation
- Nutrition and hydration: fueling for endurance
- Emergency bivouac, sleep, and rest protocols
- Bike bags, GPS tracking, and packing strategies
- Personal care and first aid essentials
- Checklist summary and comparison table
- Enhance your safety with premium gear
- Frequently asked questions
Key Takeaways
| Point | Details |
|---|---|
| Redundant lights essential | Double up on lights and reflective gear for night riding safety. |
| Layer for all weather | Clothing layers and quick adaptation prevent cold-related exhaustion. |
| Test gear before racing | Practice with all equipment during training to avoid surprises on the road. |
| Hydration and fueling matter | Monitor intake to prevent heatstroke and ensure digestion during endurance. |
| Self-sufficiency is key | Carry essential tools, first aid, and bivvy items to handle any roadside emergency. |
Essential mechanical tools for self-sufficiency
Your ability to fix problems roadside is what separates a DNF from a finish line. Every ultracyclist needs a core set of tools that handles the most common failures without requiring outside help.
Die race-defining packing list for ultracyclists confirms that puncture repair essentials include inner tubes, patches, and sealant, plus spare bolts for cleats and a spare derailleur hanger. These small items weigh almost nothing but can save your entire ride.
Here’s your mechanical toolkit checklist:
- 2x spare inner tubes (matching your tire size)
- Tire levers and patch kit
- Tubeless sealant (if running tubeless)
- Multi-tool with chain breaker
- Spare derailleur hanger
- Spare cleat bolts
- Chain quick links (2x)
- Mini pump or CO2 inflators
- Duct tape (wrapped around pump or bottle)
Beyond carrying the right tools, your pre-ride bike checks should cover tires, brakes, chain lube, and all spares, and a professional bike fit prevents numbness and overuse injuries before they start. A saddle that causes pain at mile 50 becomes unbearable at mile 300.
For a broader overview of what to carry, our cycling safety gear guide walks through the full spectrum of protective equipment worth considering.
Pro Tip: Never bring untested gear to a race. Every tool, every tube, every layer should be used in training first. Surprises on race day are almost always bad ones.
Also check your road cycling protection tips to make sure your overall setup is dialed before the start line.
Night riding safety: lighting and visibility essentials
Staying visible is a critical pillar of ultra ride safety, especially after dark. Most ultracycling accidents happen at night, and fatigue makes your reactions slower exactly when you need them most.
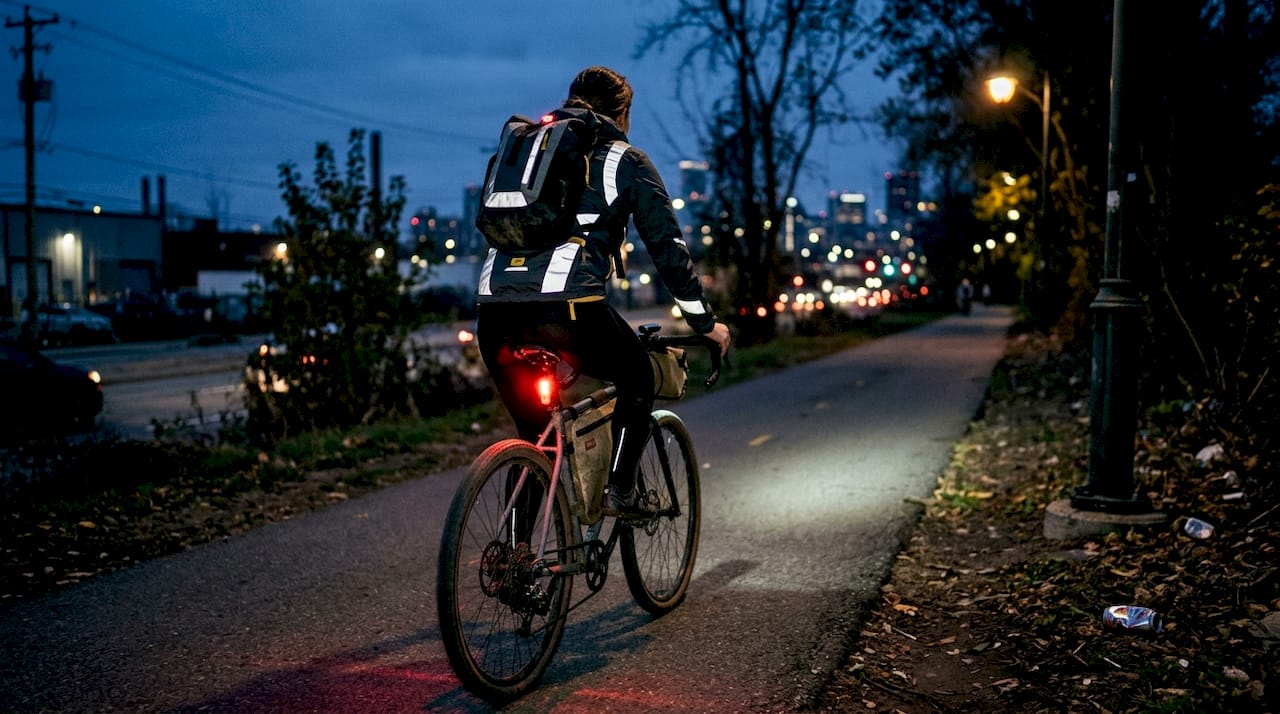
Multiple redundant lights are non-negotiable: 2x front lights, 2x rear lights, a high visibility strap, reflective gear, and battery packs to ensure you’re seen in every low-light condition common in ultras.
Your night visibility checklist:
- 2x front lights (one high-output, one backup)
- 2x rear lights (one permanently lit, one flashing)
- Portable battery pack (10,000mAh minimum)
- Reflective tape on frame and rims
- Hi-vis vest or gilet
- Rear-view mirror for traffic awareness
“Rear light permanently lit, reflective tape on frame and rims” is the baseline standard for most ultra events. Anything less puts you at serious risk.
Here’s a quick comparison of minimum versus recommended setups:
| Feature | Minimum setup | Recommended setup |
|---|---|---|
| Front lights | 1x (400 lumen) | 2x (800+ lumen each) |
| Rear lights | 1x flashing | 1x flashing + 1x steady |
| Reflective gear | Vest only | Vest + tape on frame/rims |
| Battery backup | None | 10,000mAh power bank |
| Rear-view mirror | No | Yes |
| Hi-vis gilet | Optional | Strongly recommended |
Our high visibility gear guide covers specific product choices for each category, and our cycling safety concepts page explains why layered visibility systems outperform single-light setups.
Pro Tip: Mount your backup rear light on your helmet or seat bag, not the same mount as your primary. If one mount fails, you still have coverage.
Clothing layers and weather adaptation
Equipping your bike is one piece, but protecting your body is every bit as crucial. Temperature swings of 30°F or more between day and night are common in ultras, and the wrong clothing choice costs you hours.
A solid layering system for variable weather includes leg and arm warmers, Sealskinz gloves plus fingerless gloves, 2 to 3 pairs of socks, 2 bib shorts with chamois cream, 2 jerseys, a base layer, and a thermal or rain jacket. Outdoor trousers round out the kit for extreme conditions.
Your clothing checklist:
- Lightweight base layer (moisture-wicking)
- 2x cycling jerseys
- 2x bib shorts
- Chamois cream (generous application)
- Arm and leg warmers
- Thermal or rain jacket (packable)
- Sealskinz waterproof gloves
- Fingerless gloves for warmer segments
- 2 to 3 pairs of cycling socks
- Outdoor trousers for rest stops
Chamois cream is not optional. At mile 400, even a small hot spot becomes a wound. Apply it every time you get back on the bike, not just at the start.
Pro Tip: Pack your warmers in an accessible jersey pocket, not buried in a bag. Weather changes fast, and stopping to dig through your frame bag wastes time and momentum.
For more on how clothing choices affect your overall safety, see our cycling safety clothing tips.
Nutrition and hydration: fueling for endurance
Staying protected goes beyond gear. Fueling your body right keeps you safe and strong across hundreds of miles.
The empirical benchmark is 100 to 150g carbs per hour, with British Cycling recommending roughly 1g per kilogram of body weight per hour. Practice this in training to avoid GI issues on race day, and remember that dehydration blocks food digestion entirely.
Here’s a practical fueling protocol:
- Set a timer to eat every 20 to 30 minutes, not when you feel hungry.
- Alternate between solid foods and gels to reduce GI fatigue.
- Drink 500 to 750ml of fluid per hour, adjusting for heat.
- Include electrolytes in at least one bottle per hour.
- Pre-test every food product in long training rides.
Stat to know: Riders who skip fueling in the first two hours of a long effort often hit a wall that no amount of late-stage eating can fix. Front-loading your nutrition is a race strategy, not just a health tip.
Heatstroke is a real threat. Early symptoms include headache, nausea, and shivers, and they can force a DNF if ignored. Monitor your body signals more closely than your pace.
Pro Tip: Keep two to three gels in your jersey pocket at all times. If you’re digging through bags to eat, you’re already behind on your fueling schedule.
Our hydration and fueling guide offers additional strategies for managing intake across different climates.
Emergency bivouac, sleep, and rest protocols
Sometimes, the safest choice is a timely stop. Planning for unscheduled rest is as important as planning your route.
Emergency bivy gear should include a bivvy bag, sleeping bag, earplugs, and an eye mask for unplanned stops, protecting you against hypothermia in edge cases like exhaustion or sudden weather changes.
Your rest kit checklist:
- Lightweight bivvy bag (under 400g)
- Compact sleeping bag rated for local low temperatures
- Earplugs and eye mask
- Emergency foil blanket (backup)
- Phone or GPS alarm for timed rest stops
Micro-sleeps of 20 minutes can restore alertness better than pushing through fatigue. Most experienced ultracyclists plan for at least one scheduled sleep stop per 24-hour block, even if conditions allow more riding.
Test your bivvy setup in training. Knowing how to deploy it quickly in the dark, while exhausted, is a skill that takes practice. See our cycling rest protocols for more on managing fatigue safely.
Bike bags, GPS tracking, and packing strategies
Smart packing sets the stage for a smooth, safe ride no matter the format.
A well-configured bag setup using a Tailfin aeropack and Restrap frame bag keeps weight low and aerodynamics reasonable. TT bars add a position option for flat sections, and a GPS tracker is mandatory in most organized ultra events for route verification and rider safety.
For mounting your devices securely, a weather resistant bike mount keeps your phone or GPS readable in rain without risking damage.
Self-supported bikepacking demands minimalist, dispersed camping gear, while crewed ultra races allow a follow vehicle and more backup. The basics, including lights, tools, and hydration, remain universal regardless of format.
| Bag type | Best use | Capacity |
|---|---|---|
| Tailfin aeropack | Main gear storage | 10 to 20L |
| Restrap frame bag | Tools and food | 4 to 6L |
| Top tube bag | Snacks and phone | 0.5 to 1L |
| Handlebar bag | Clothing layers | 8 to 15L |
| Seat bag (small) | Repair kit | 1 to 2L |
Packing priorities:
- Heaviest items closest to the bike’s center of gravity
- Frequently accessed items (food, tools) in reachable pockets
- Rain gear near the top of any bag
- GPS and lights charged and mounted before sleep stops
Personal care and first aid essentials
Proper personal care can make or break your riding resilience in ultra events. Long exposure to sun, sugar, and saddle pressure creates problems that compound fast if ignored.
Your personal care essentials include a toothbrush and toothpaste (critical for managing mouth issues from high sugar intake), plus sunscreen rated for desert or high-UV conditions.
First aid and hygiene protocol:
- Apply sunscreen every 3 to 4 hours on exposed skin.
- Brush teeth at every major rest stop to prevent sugar-related decay.
- Treat hot spots immediately with hydrocolloid patches before they blister.
- Change chamois and apply fresh cream at every sleep stop.
- Carry antihistamines and ibuprofen for inflammation and allergic reactions.
Your first aid kit should include:
- Hydrocolloid blister patches
- Antiseptic wipes and small bandages
- Ibuprofen and antihistamines
- Chamois cream (travel size for mid-ride reapplication)
- Sunscreen SPF 50+
- Lip balm with UV protection
A well-stocked first aid kit combined with body awareness prevents small issues from becoming race-ending problems. For more on managing skin and comfort, our cycling personal care tips go deeper on each category.
Checklist summary and comparison table
Let’s bring all the essentials together into a clear, actionable overview.
| Category | Must-have | Advanced upgrade |
|---|---|---|
| Mechanical | Tubes, patches, multi-tool | Tubeless kit, spare hanger |
| Beleuchtung | 1x front, 1x rear, hi-vis vest | 2x front, 2x rear, reflective tape |
| Clothing | Base layer, jersey, rain jacket | Full layering system, waterproof gloves |
| Nutrition | Gels, bars, electrolytes | Timed fueling plan, real food variety |
| Rest | Emergency foil blanket | Bivvy bag, sleeping bag, eye mask |
| Bags/GPS | Frame bag, GPS device | Tailfin aeropack, weather-resistant mount |
| Personal care | Sunscreen, blister patches | Full first aid kit, chamois cream rotation |
Key takeaways for your prep:
- Redundancy wins: Two of everything critical (lights, tubes, gloves) is the standard, not the exception.
- Test everything: No new gear on race day. Period.
- Fuel early: Don’t wait for hunger. Set a timer and eat on schedule.
- Plan your rest: A 20-minute sleep stop beats 3 hours of zombie riding.
- Stay visible: Reflective tape and a permanently lit rear light are your cheapest insurance.
Enhance your safety with premium gear
Your checklist is only as strong as the gear behind it. At THE BEAM, we design safety equipment specifically for cyclists who take protection seriously, from high-output lighting systems to helmets built for real-world conditions.

Our ultracycling helmets include the VIRGO integral helmet with MIPS technology, engineered for extended rides where protection and comfort both matter. For visibility, our high visibility bike reflectors add a lightweight, minimalist layer of protection that works day and night. Browse our full range of cycling accessories to fill the gaps in your current setup before your next ultra.
Frequently asked questions
What is the single most important safety item for ultracyclists?
Redundant lights and reflectives reduce collision risk more than any other single item, especially when fatigue sets in. A permanently lit rear light with reflective tape on your frame is the non-negotiable baseline.
How should I adapt my checklist for crewed vs. self-supported events?
Crewed races allow more backup gear and reduce the need for personal repair items, but lights, tools, and hydration basics remain universal across both formats.
What signs of heatstroke should I watch for during an ultra ride?
Early heatstroke symptoms include headache, nausea, and shivers. Stop immediately, hydrate, and cool down before continuing.
Should I test gear during training or only bring new items on race day?
Always test in training. Nothing new on race day is a rule every experienced ultracyclist follows without exception.
Do I need a GPS tracker for ultracycling races?
Yes. GPS tracking is mandatory in most organized ultra events for both route verification and rider safety.


