
TL;DR:
- Cyclists face the highest risks in urban areas, especially near intersections, with many fatalities preventable through safety habits.
- A quick pre-ride checklist focusing on tires, brakes, chain, and bike integrity, along with visible gear and proper behavior, reduces accident risks.
- Behavioral safety and infrastructure, like protective lanes and clear signaling, are essential to maximizing cyclist safety beyond just mechanical checks.
Urban roads are where cyclists face their greatest threat. In 2022, 1,105 US cyclists died on the road, a 13% jump from 2021, with 75% of those fatalities occurring in urban areas and 77% happening at or near intersections. Helmets were used in only 18% of fatal cases. Those numbers are not abstract: they point to a clear pattern of preventable deaths. A systematic safety workflow, practiced before every ride, is one of the most direct actions you can take to shift those odds in your favor. This guide walks you through every step.
Table of Contents
- What you need before you start: Tools and prerequisites
- Step-by-step pre-ride safety workflow: The ABC/ABCM method
- Adapting for urban commuters and e-bike riders: Expanded checklist
- Family and child safety: Workflow adaptation for multi-rider setups
- Advanced cyclist scenarios: Edge cases and workflow pitfalls
- What most guides miss: The real power of behavior and infrastructure
- Enhance your safety: Gear and checklists from The Beam
- Frequently asked questions
Key Takeaways
| Point | Details |
|---|---|
| Checklist prevents failures | Simple pre-ride workflows catch most mechanical problems before they become risks. |
| Urban and e-bike adaptions | Expanded safety steps are essential for traffic, speed, and electronics in city ride scenarios. |
| Family focus: helmets | Helmet use is the safest step for children and adults, cutting head injury risk nearly in half. |
| Real-world edge cases | Behaviors like avoiding the door zone and using bright lights at night matter as much as the checklist itself. |
| Habits and infrastructure | Your riding habits and protected lanes are fundamental to safety, beyond any checklist workflow. |
What you need before you start: Tools and prerequisites
Before you run any checklist, you need the right tools within arm’s reach. Think of this as setting up your workstation. Without the basics, a checklist is just words on a screen.
Here is what to keep near your bike before every ride:
- Tire gauge (floor pump with a gauge is ideal for road and e-bike tires)
- Multi-tool or wrench for quick bolt checks
- Chain lubricant appropriate to your riding conditions (wet or dry lube)
- Helmet fitted to your head, not hanging on a hook
- Front and rear lights, charged and mounted
- High-visibility reflectors or a reflective vest, especially for dawn and dusk riding
For e-bike riders and families, add a battery charger check and a child seat inspection tool to that list.
Now, the methodology. Pre-ride safety checklists follow two main frameworks: ABC (Air, Brakes, Chain/Cranks) and ABCM (adding an M-check, a full visual scan of the bike following an M-shaped pattern). These take 2 to 5 minutes and are designed to catch mechanical failures before they become traffic hazards.
| Method | Steps covered | Best for | Time needed |
|---|---|---|---|
| ABC | Tires, brakes, drivetrain | General cyclists | 2–3 minutes |
| ABCM | ABC + full frame scan | Commuters, road riders | 3–5 minutes |
| Expanded urban | ABCM + lights, helmet, signals | Urban/e-bike riders | 5–7 minutes |
For urban safety checklist tips, the expanded version is strongly recommended. E-bike riders need the full urban version plus a battery and electronics scan. Families add a child seat and visibility review on top of that. And if you are prepping for a longer outing, the gear and prep for ultracycling workflow adds even more layers of protection.
Step-by-step pre-ride safety workflow: The ABC/ABCM method
With your gear assembled, it is time for the hands-on routine. Follow each step in order. Skipping or rushing one step defeats the purpose of the whole process.
-
Air (tire pressure and condition): Squeeze both tires firmly. Road bike tires should feel rock solid; mountain and urban tires should have slight give. Use your gauge if you are unsure. Inspect the tread and sidewalls for cuts, embedded glass, or unusual wear. A slow leak at home is far better than a flat in traffic.
-
Brakes (lever feel and pad engagement): Pull each lever. There should be firm resistance and the wheel should stop immediately. Squeeze and hold for two seconds. If the lever touches the handlebar or feels spongy, that is a brake adjustment you need before riding. Check that brake pads are not worn down to the metal.
-
Chain and cranks (lubrication and smooth operation): Spin the pedals and run through your gears. Shifts should be clean and quiet. A chain that skips, squeals, or jumps between gears needs attention. If the chain looks dry or rusty, apply lube and wipe off the excess.
-
M-check (full visual scan): Start at the front wheel, move up to the handlebars, down to the bottom bracket, back up to the seat, and down to the rear wheel. This traces the letter M. Check that bolts are tight, nothing rattles, and the frame shows no cracks or unusual bends.
Pro Tip: Do the M-check in the same direction every time. Consistency is what makes it fast. Within a week of practice, pre-ride safety checks that used to take five minutes will feel automatic at under three.
For more detail on urban cyclist tips and how these steps adapt to commuting, or for a full breakdown of commuter cycling essentials before your daily ride, both resources expand on each step with real-world examples.
Adapting for urban commuters and e-bike riders: Expanded checklist
The standard ABC workflow covers most basics, but urban and e-bike riders face unique risks: denser traffic, higher speeds, electronics dependencies, and the constant threat of the door zone.
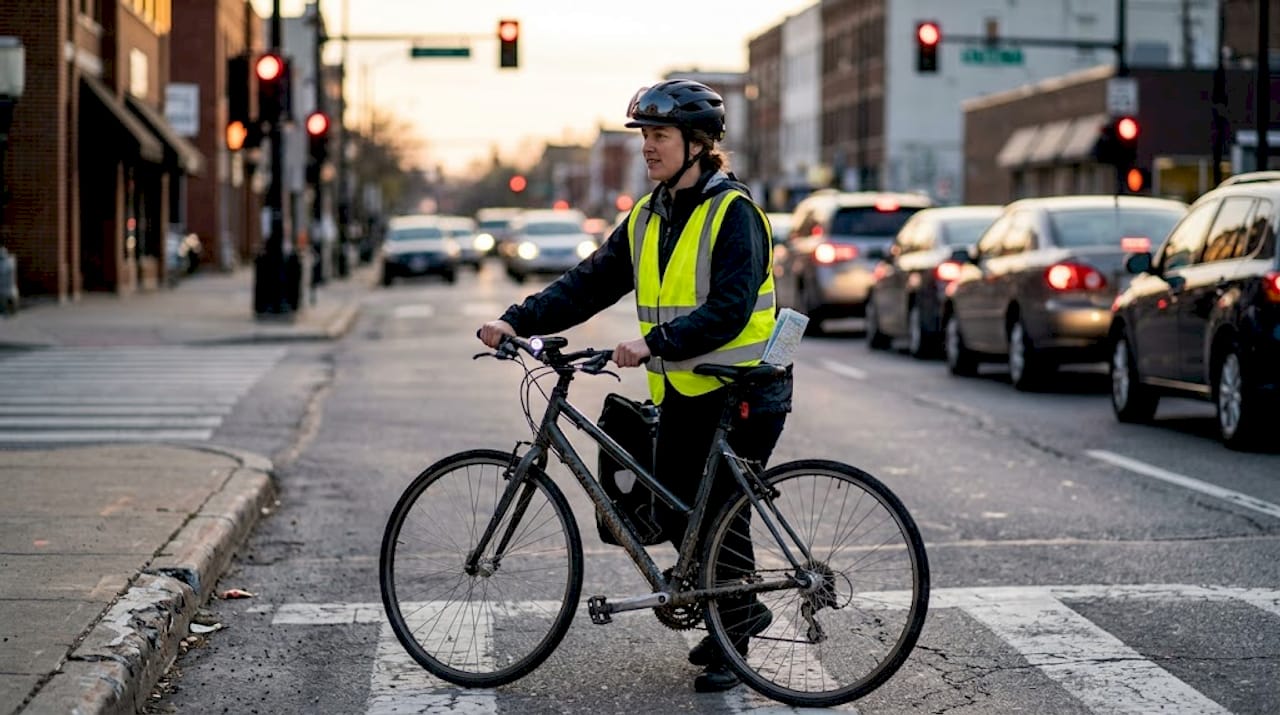
Urban checklists expand to 7 points: brakes, wheels and tires, steering and handlebars, chain and drivetrain, saddle position, lights, and helmet fit. E-bike riders add a battery and electronics scan on top of that.

| Urban/e-bike check | What to look for |
|---|---|
| Lights (front and rear) | Charged, functioning, securely mounted |
| Helmet fit | No wobble, chin strap snug but comfortable |
| Battery mounting | No loose connectors, terminals clean and dry |
| Handlebars | Centered, no play when you apply pressure |
| Saddle | Height stable, no side-to-side movement |
For e-bikes specifically, battery mounting and clean terminals are non-negotiable. A loose battery connection at 25 km/h in city traffic is a serious hazard, not a minor inconvenience. Behavioral safety bridges the gap where infrastructure does not protect you.
Key urban behaviors to build into your routine:
- Stay 1 meter from parked cars to stay out of the door zone at all times
- Signal 3 seconds early before any turn or lane change
- Make eye contact with drivers at intersections before proceeding
- Use a front light of at least 200 lumens even during the day in heavy traffic
Pro Tip: At urban intersections, treat a green light the same way you would treat a yellow. NHTSA-aligned safety guidance confirms that intersection behavior is where most urban cyclist injuries happen. A two-second pause before entering can save your life.
For a full breakdown, the urban cycling checklist steps and commuter daily essentials resources cover every point in greater detail.
Family and child safety: Workflow adaptation for multi-rider setups
Urban workflows expand for advanced riders, but families face different challenges: children cannot assess their own safety, equipment adds complexity, and group dynamics create distraction.
“Helmets reduce head injury risk by 48 to 60%. For children, this is not optional. Fit matters as much as wearing one at all.”
For family rides, your workflow must include:
- Helmet check for every rider: No wobble, level on the head, chin strap forms a V under each ear. A helmet that moves freely is not protecting anyone.
- Child seat inspection: Recommended for children ages 1 to 4. Check that the seat is mounted firmly, the harness is snug, and no cables or straps are in contact with the wheel.
- Visibility gear for all: Lights on every bike, reflective strips on children’s gear, high-visibility vests for dusk or overcast conditions.
- Route planning: Choose family cycling routes that minimize intersections and avoid high-speed roads.
- Intersection rules: Walk bikes across busy crossings. Riding against traffic accounts for 25% of fatal crashes. Never do it, even for a short stretch.
For group rides with children, assign one adult to the front and one to the rear. The front rider calls out hazards, the rear rider watches for separation. This is a simple system, but it works.
Advanced cyclist scenarios: Edge cases and workflow pitfalls
Even a well-practiced routine can fail when real-world conditions get complex. Here are the situations where advanced cyclists need specific adaptations.
Common pitfalls to avoid:
- Rushing through the checklist while distracted (phone in hand, headphones on)
- Skipping the M-check because the bike “looks fine”
- Forgetting to recheck the bike after repairs or adjustments
- Assuming a charged battery means all e-bike systems are functional
High-risk scenarios and adaptations:
- Night riding: A 200+ lumen front light is the minimum. Add a flashing rear light and reflective ankle bands, which move naturally and draw attention from drivers.
- Heavy urban traffic: Signal early, take the lane when needed, and avoid riding in blind spots of large vehicles. Trucks and buses have wide blind zones on their right side.
- Post-repair rides: After any maintenance, run the full checklist as if the bike is new to you. A cable not reattached correctly or a wheel not fully seated can fail fast.
Statistic to remember: Protected lanes reduce collisions by 50%. Where you have access to them, use them. Where you do not, your behavior becomes your infrastructure.
Pro Tip: For extended or more challenging rides, check the ultracycling safety tips guide for workflow additions that apply when distance and fatigue become factors. Joint injury prevention is also worth reviewing via sports injury prevention research for cyclists logging serious mileage.
What most guides miss: The real power of behavior and infrastructure
Here is what we think most safety guides get wrong: they treat the checklist as the destination, not the starting point. A bike in perfect mechanical condition can still put you in serious danger if you ride unpredictably, skip signals, or assume drivers see you.
The data is clear. Helmet use and predictable riding save lives at a rate that outperforms almost any individual mechanical fix. Avoiding phone use, making eye contact at intersections, and staying visible are behaviors that no checklist step can replace.
Infrastructure matters enormously too. Protected lanes cut collision rates in half. But most riders do not have access to them for every stretch of their commute. That gap is where personal habits carry the most weight.
We believe the most effective safety habit is this: treat every ride as if no driver can see you until they prove otherwise. That mental shift changes how you position yourself, when you signal, and how you approach intersections. Build commuter safety habits around that assumption, and your checklist becomes part of a much larger, more effective system.
Enhance your safety: Gear and checklists from The Beam
Knowing the workflow is step one. Having gear that supports it every day is step two.

At THE BEAM, we design helmets and visibility accessories specifically for the kinds of riders this guide was written for: urban commuters, e-bike riders, and families who take safety seriously. Our helmet collection includes the VIRGO integral helmet with MIPS technology, built for real-world protection without compromising on fit or comfort. Our bike accessories cover rear-view mirrors, high-visibility reflectors, and connected safety tools that integrate directly into your pre-ride workflow. If you are building a safer routine, start with gear you can trust every single time.
Frequently asked questions
How long should a bicycle safety checklist take before each ride?
A standard ABC or ABCM checklist takes 2 to 5 minutes to complete. Expanded urban and e-bike versions can take up to 7 minutes when lights, helmet fit, and electronics are included.
What is the most critical item to check for family rides?
Helmet fit is the priority. Research shows helmets can reduce head injury risk by 48 to 60%, but only when worn correctly and sized properly for each rider.
How do I adapt the workflow for riding at night?
Mount a front light with at least 200 lumens, add a flashing rear light, and check all reflectors before every night ride. Visibility gear becomes your first line of defense after dark.
Why is the door zone dangerous for urban cyclists?
Dooring happens suddenly and without warning. Always ride at least 1 meter from parked cars, as riding too close to parked vehicles puts you directly in the path of an opening door with no time to react.


