

For daily riding, a seatpost-mounted rear camera is the smartest first purchase, not a helmet cam. It records overtakes at roughly the same height as a car’s headlights, stays steady while your head moves, and acts as a visible deterrent to close passes. Helmet cameras earn their place too, just further down the list.
You’ll want a front or helmet camera added later if:
- You regularly ride through complex junctions where forward evidence matters more than rear coverage.
- You already own a GoPro-style camera and want rider POV footage for awareness or dispute purposes.
- Your budget covers two devices, letting you run seatpost and handlebar together.
The features that actually matter here are loop recording, automatic incident saving, and long battery runtime. The Beam builds its RS 1000 AI DashCam and VIRGO helmet around exactly that priority list.
Key Takeaways
A rear seatpost camera with loop recording and incident detection delivers more usable safety evidence per dollar than any helmet-mounted setup.
| Point | Details |
|---|---|
| Buy rear first | A seatpost camera at headlight height captures close-pass gaps better than any other position. |
| Add front camera second | A handlebar unit covers junctions and forward incidents once budget allows a second device. |
| Save helmet cams for POV | Helmet mounts prove rider awareness but add shake and neck strain compared with bike-mounted units. |
| Features beat resolution | Loop recording, incident auto-save, and long battery life matter more than cinematic image quality. |
| The Beam maps to this strategy | The RS 1000 AI DashCam targets the rear-first role, with VIRGO and FRAME FLASH covering POV and passive visibility. |
Table of Contents
- Caméra Casque vs Guidon: Which One Wins for Safety?
- What Does Each Mounting Position Actually Record?
- Which Features Actually Matter for a Safety Camera?
- How Do You Choose the Right Setup for Your Riding?
- How Should You Install and Maintain Your Camera?
- How The Beam’s Lineup Fits This Rear-First Strategy
- What Everyday Riders Get Wrong About Camera Safety
- Ride With Evidence, Not Just Intentions
- Sources
Caméra Casque vs Guidon: Which One Wins for Safety?
The rear seatpost mount wins for most riders, and it’s not close. A rear-facing camera captures the exact moment a car passes too tight, at a height that lines up with headlights and license plates, which is the evidence that actually holds up with insurers. A handlebar mount comes second, useful for junctions and head-on incidents, while a helmet camera ranks third for pure safety purposes, better suited to showing what the rider saw than proving what a driver did wrong.
- Seatpost/rear: Rock steady, excellent for close-pass evidence, awkward to check footage mid-ride, and the strongest deterrent because drivers see it.
- Handlebar/front: Stable dashcam-style view of junctions and oncoming traffic, but hands, cables, or your own knees can clip the frame.
- Helmet: True point-of-view footage that shows exactly where you were looking, at the cost of head shake and extra weight up top where you feel it most.
A single seatpost camera covers most commuting risk. A two-camera setup, seatpost plus handlebar, makes sense once budget allows, giving you 360-degree context on both who caused an incident and how it unfolded.
What Does Each Mounting Position Actually Record?
The mount you pick determines what kind of evidence you walk away with, and the differences are bigger than most riders expect.
A seatpost rear camera sits at roughly the height of a car’s headlights, which means it captures the actual lateral gap a driver leaves when overtaking. That height match is what makes seatpost mounts the closest thing cycling has to a courtroom exhibit: the footage shows distance, not just presence. It’s also visible to the driver behind you, which changes behavior before an incident even happens.
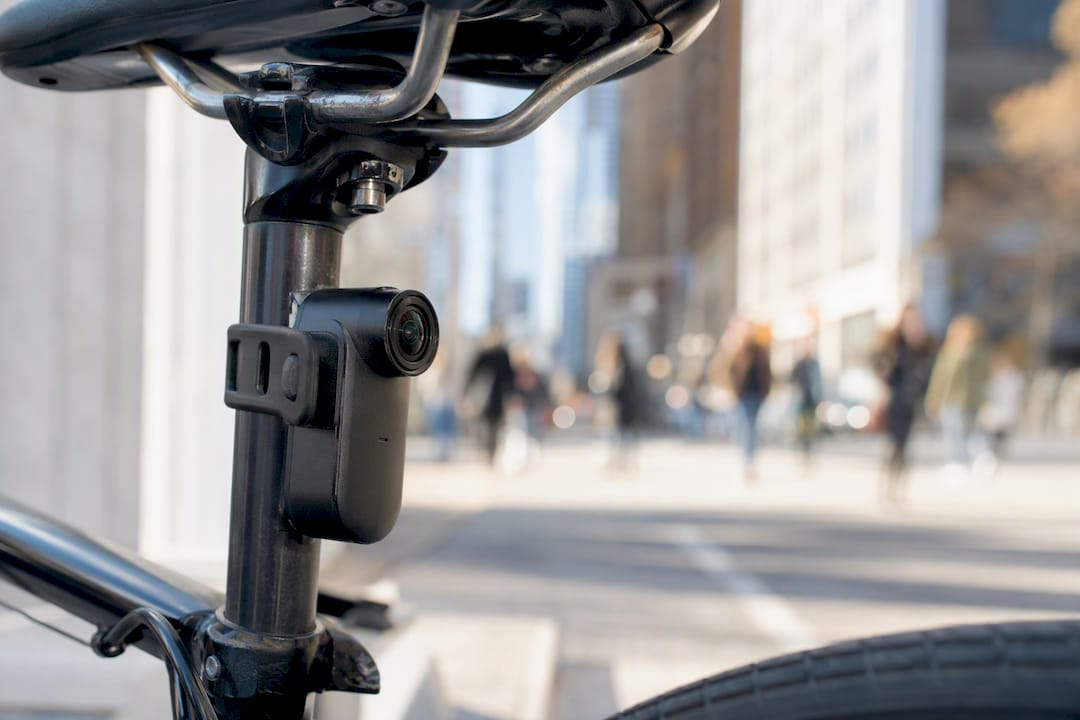
A handlebar mount behaves like a car dashcam. It holds a level, horizon-stable forward view that’s less affected by head turns than a helmet unit, which makes it good at documenting junction violations, red-light runners, and left-hook turns. The downside: your hands, brake levers, or a phone mount can creep into frame depending on how you ride.
A helmet camera shows exactly what you saw, which matters when the question isn’t “what did the car do” but “did the rider see it coming.” That’s valuable in disputes over rider awareness, but head movement introduces shake that rear and handlebar mounts don’t have, and the added weight sits right where neck strain builds up on long rides.
- Close pass at speed: seatpost footage wins, because it measures the gap.
- Junction collision: handlebar footage wins, because it’s steady and forward-facing.
- Dispute over rider awareness: helmet footage wins, because it shows your line of sight.
Pro Tip: If you can only afford one camera, buy the one that answers the question you’re most likely to face in a dispute, and for most commuters that’s “how close did that car get,” which points straight to the seatpost.
Which Features Actually Matter for a Safety Camera?
Forget cinematic quality. A camera built for daily safety is judged on whether it saves the right ten seconds of footage, not on how good that footage looks in a highlight reel.
Loop recording with automatic incident detection matters most: without an auto-save trigger, a collision can overwrite the only clip that would have proven your case, since loop cameras constantly record over old footage to save storage. Look for a unit that locks the preceding 30 to 60 seconds the moment it detects a sudden stop or impact.
Beyond that, prioritize:
- All-day battery life so the camera doesn’t die halfway through a commute.
- A secure IP-rated housing that shrugs off rain, road spray, and grit.
- Stable firmware that doesn’t corrupt files or freeze mid-ride.
- Resolution sharp enough to read a plate, especially in low light, since a blurry clip is legally close to no clip at all.
- Simple export to your phone or a computer, since insurers and police both want the file quickly, not a login to a proprietary app.
Purpose-built cycling safety cameras are engineered around loop recording, incident detection, and long runtime rather than the stabilization and short-burst capture that action cameras chase. Many also bundle in a rear light, which does double duty as visibility gear and evidence tool.
How Do You Choose the Right Setup for Your Riding?
Start with one question: what’s the single scenario you’re most worried about? For nearly every rider, that’s a close pass from behind, and the answer is a rear seatpost camera first.
- Commuters riding mixed traffic should buy rear first, always. Close passes and door-zone incidents happen behind you more often than in front.
- Road and gravel riders covering long, faster routes benefit from adding a handlebar unit next, since junction and descent incidents tend to happen at speed and in front.
- E-bike riders, who often carry more weight and momentum, should treat rear coverage as non-negotiable given the added stopping distance in a close pass.
- Budget-conscious buyers should resist splitting funds across two cheap cameras. One reliable rear unit beats two unreliable ones.
Before buying, check three things on any product page: mount compatibility with your seatpost or bar diameter, whether spare mounts are sold separately, and the warranty length on the battery, which tends to be the first part to degrade.
How Should You Install and Maintain Your Camera?
Getting the angle right matters as much as picking the mount. Aim a seatpost camera slightly downward so it captures the road surface and any vehicle within a car length behind you, not just open sky. Aim a handlebar camera level with the horizon so junctions and oncoming traffic stay centered in frame.
Run a short check before every ride: confirm the recording light is on, wipe the lens, tug the mount to check it’s seated, and make sure the battery clears 50 percent for the distance you’re riding. Lock mounts with a security screw where the manufacturer offers one, since quick-release mounts are convenient for you and for anyone else who fancies walking off with your camera.
- Clean the lens weekly, more often in wet weather or dusty gravel conditions.
- Update firmware when prompted rather than ignoring it for months.
- Store the battery partially charged if the bike sits unused for weeks.
Pro Tip: A five-second pre-ride glance at the recording indicator has saved more disputed claims than any spec on a box, because the one ride you skip the check is statistically the one where you need the footage.
How The Beam’s Lineup Fits This Rear-First Strategy
Thebeamofficial designs its lineup around the same evidence-first logic this article has laid out from the start. The Ride Safety System RS 1000 AI DashCam is built specifically for the rear-mounted role this guide recommends buying first, pairing AI incident detection with the kind of continuous loop recording that safety cameras need and action cameras skip. The VIRGO integral helmet with MIPS covers the protective side of the equation for riders who also want helmet-mounted awareness footage, without pretending a helmet cam should be your primary evidence source. FRAME FLASH reflectors round things out as a passive visibility layer that works even when your camera’s battery doesn’t.
- RS 1000: rear-first AI dashcam, matches the seatpost recommendation directly.
- VIRGO: MIPS-equipped helmet for riders who want POV capability alongside protection.
- FRAME FLASH: passive reflectors that back up active camera deterrence.
The rear-first case for cycling cameras isn’t a brand preference, it’s what close-pass evidence and driver deterrence actually require: a stable, driver-visible unit at headlight height, recording continuously, with the footage that matters saved automatically.
Product photos for these three lines appear at the end of this article.
What Everyday Riders Get Wrong About Camera Safety
The conventional advice treats helmet cameras as the default because that’s what people associate with cycling footage online. That’s backward for anyone buying primarily for safety and evidence, not content. The research is consistent on this point: a driver-visible, stable rear camera changes behavior and produces usable evidence far more reliably than a shaky POV clip of your own handlebars.
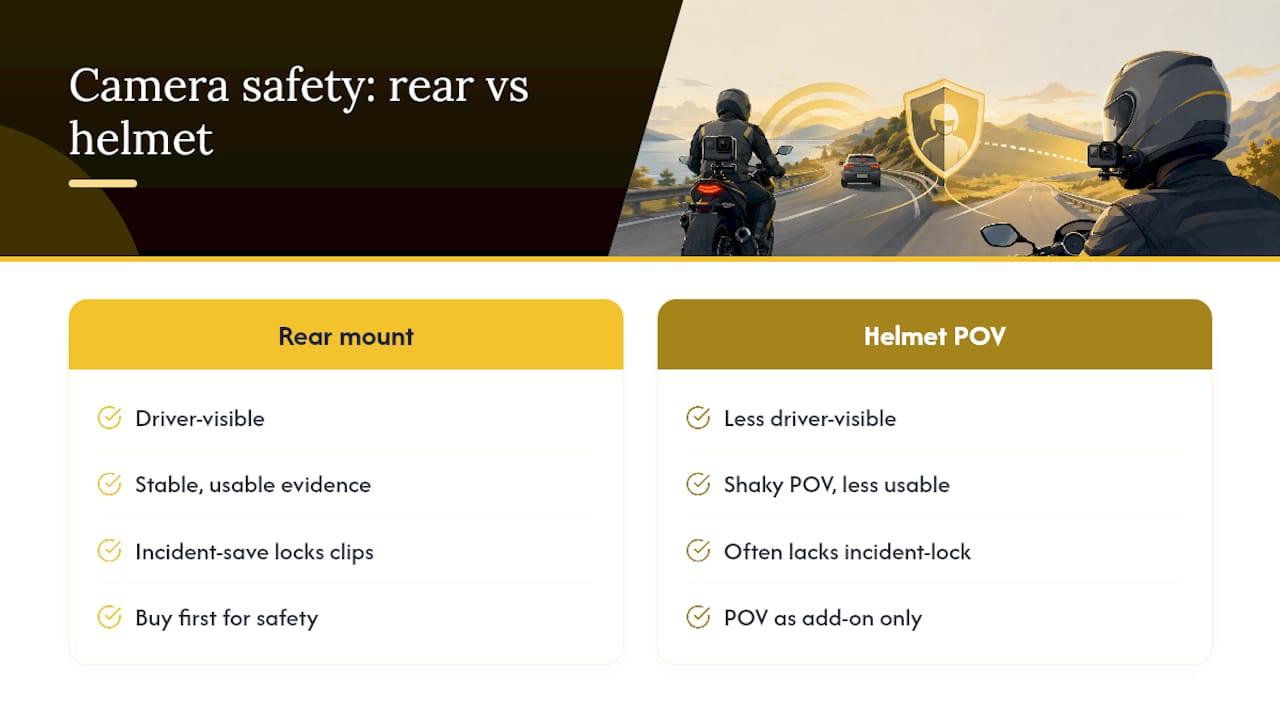
What’s overrated is chasing 4K resolution and cinematic stabilization on a safety purchase. What’s underrated is battery runtime and whether the incident-save feature actually locks footage before it gets overwritten, because that single feature is the difference between having proof and having nothing.
If you’re buying one camera this year, buy the rear one. Add a front unit when a specific riding pattern, heavy junction traffic, fast descents, justifies it. Treat helmet cameras as a POV add-on for riders who already have rear coverage sorted, not a replacement for it.
— Sophie
Ride With Evidence, Not Just Intentions
Most riders delay buying a safety camera because they’re comparing specs meant for action filmmakers, not commuters. Thebeamofficial skips that comparison entirely: the RS 1000 AI DashCam is built around the rear-first strategy this article recommends, with incident detection and loop recording designed for daily riding rather than highlight reels.

If you’re building out visibility rather than just evidence, the FRAME FLASH reflectors pair naturally with a rear camera setup, giving drivers a passive visual cue even before your camera’s deterrent effect kicks in. Riders who want to see how this gear performs in real conditions can check the Ultracycling event page for a look at long-distance use cases. Start with the FRAME FLASH product page, add the RS 1000 when you’re ready for active evidence, and you’ve covered both halves of the safety equation this article has been building toward.
Sources
- Safety camera vs action camera — CyclingNews
- Cycling cameras for safety: front, rear and insurance — Roadman Cycling
- Cycling camera buyer’s guide — BikeRadar
- Bike helmet cameras — Cycling Weekly


