

TL;DR:
- Gravel cycling gear prioritizes helmets with impact-mitigation technology and CPSC certification for safety.
- Choosing the right helmet involves proper fit, impact protection features, and considering full-face options for technical terrain.
Gravel cycling gear is the full system of helmets, protective accessories, clothing, and bike components that keep you safe and in control on mixed-surface terrain. For safety-focused riders, the most critical piece is a certified helmet with impact-mitigation technology, specifically one that meets the CPSC standard required for US sale and includes MIPS or a rotational-impact liner. THE BEAM’s VIRGO, a full-face integral helmet with MIPS, sits at the top of that category and is available in the United States through Thebeamofficial’s e-commerce platform.
Table of Contents
- How does gravel cycling gear differ from road and mountain gear?
- What helmets and protective accessories do gravel riders actually need?
- How do you pick and fit a gravel helmet correctly?
- What clothing and footwear raise safety on gravel rides?
- How do drivetrain, tyres, and bike setup affect your control on gravel?
- How do you care for and replace helmets and safety gear?
- Why does investing in premium gravel safety gear pay off?
- Key Takeaways
- The case for taking gravel helmet safety more seriously than most riders do
- The VIRGO helmet from Thebeamofficial: where to buy in the US
- Useful sources and further reading
How does gravel cycling gear differ from road and mountain gear?
Gravel sits between road and mountain biking in almost every dimension, and that middle ground shapes every gear decision you make.
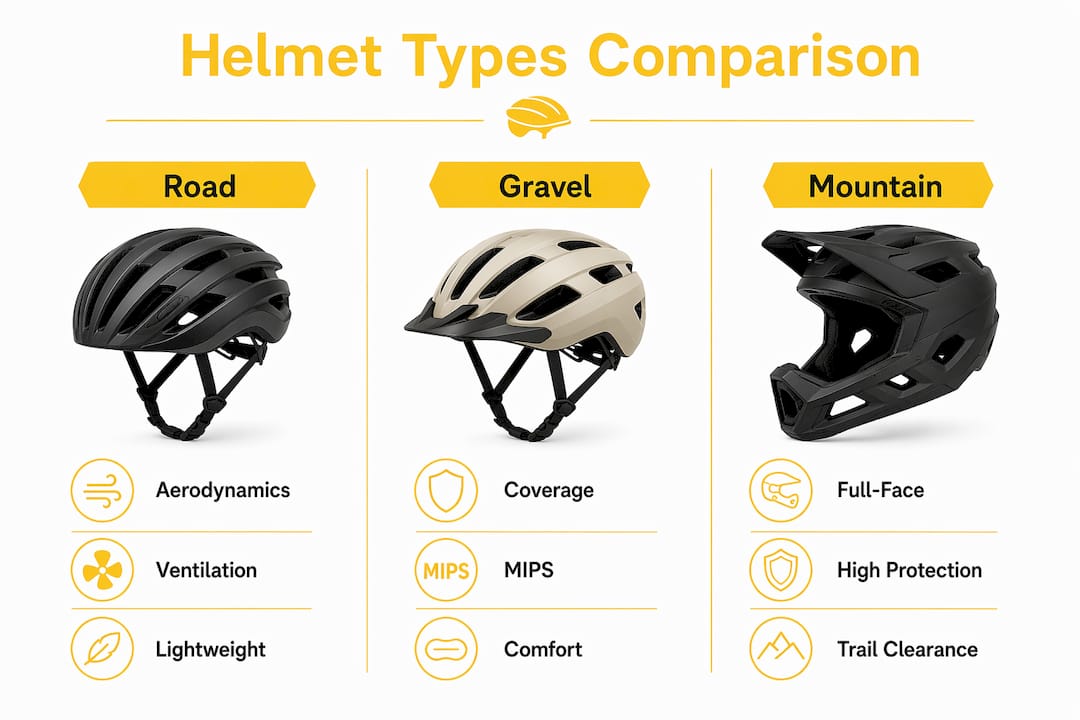
Road gear optimizes for aerodynamics and low weight. Mountain gear prioritizes trail clearance, full-face protection, and aggressive tread. Gravel demands a different balance: enough protection for unpredictable loose surfaces, enough efficiency for long paved linking sections, and enough durability to survive both.
| Category | Road | Gravel | Mountain |
|---|---|---|---|
| Helmet priority | Aerodynamics, ventilation | Coverage, MIPS, retention | Full-face, chin bar |
| Tyre width | 25–32mm | 35–50mm | 50mm+ |
| Drivetrain | 2x, tight ratios | 1x wide-range or 2x | 1x, very low ratios |
| Footwear | Stiff carbon, no tread | Reinforced, treaded outsole | Aggressive tread, ankle protection |
| Accessoires | Minimal | Lights, mirrors, repair kit | Body armor, hydration pack |
The unpredictability factor is what separates gravel from both disciplines. You might hit a smooth fire road, then a loose rocky descent, then a creek crossing, all in thirty minutes. That variability is why gravel-specific helmets lean toward extended rear coverage and why accessories like rear-view mirrors and high-visibility reflectors matter more here than on a closed trail.
What helmets and protective accessories do gravel riders actually need?
Le site gravel helmet category breaks into three practical tiers.
Open/road-style helmets cover the top and sides of the skull with good ventilation. They work for mellower gravel routes but leave the face and lower head exposed.
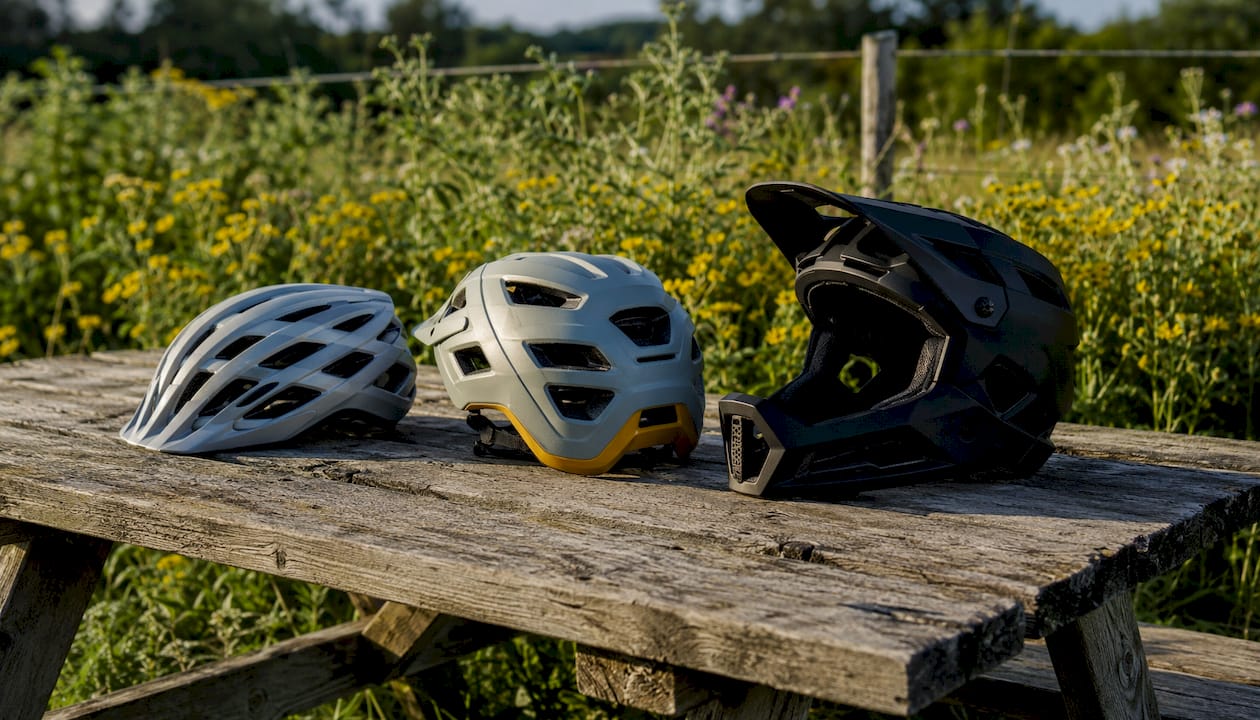
Extended-coverage helmets add rear and temporal protection without the weight of a full-face shell. A solid middle ground for most mixed-terrain riders.
Integral/full-face helmets like the VIRGO include a chin bar and full-face shell. For aggressive gravel descents or bikepacking routes with technical sections, this is the most protective option available. The VIRGO pairs that coverage with MIPS technology, which addresses rotational forces during angled impacts, the kind most common in real-world crashes.
US certification check: Any helmet sold for cycling in the United States must meet the CPSC (Consumer Product Safety Commission) standard. ASTM F1952 and Snell B-95 are additional voluntary standards that indicate more rigorous testing, worth noting when comparing premium options.
Complementary protective accessories:
- Rear-view mirrors (handlebar-mounted or glasses-mounted) let you monitor traffic without turning your head on loose surfaces
- High-visibility reflectors and lights front and rear, mandatory for low-light riding and strongly recommended for any gravel route near roads
- Rear dashcams record incidents and improve situational awareness; Thebeamofficial offers connected safety accessories including AI-powered rear-view cameras
- Reinforced gloves protect palms in a fall and reduce vibration fatigue
- Knee and elbow pads are worth adding for technical descents or bikepacking
Pro Tip: MIPS is not a helmet brand. It is a liner system licensed to helmet manufacturers. When shopping, look for “MIPS” on the product spec sheet alongside the CPSC certification label, not just on marketing imagery.
How do you pick and fit a gravel helmet correctly?
Fit determines whether a helmet actually protects you. A CPSC-certified shell with MIPS is useless if it shifts on impact.
- Confirm CPSC certification before anything else. Check the label inside the helmet, not just the product listing.
- Verify impact-mitigation tech. Look for MIPS, a rotational-impact liner, or a multi-density EPS shell in the spec sheet.
- Measure your head circumference at the widest point, roughly one inch above your eyebrows. Match to the manufacturer’s size chart.
- Adjust the retention system. Most premium helmets use a dial-fit retention cradle at the rear. It should hold the helmet snugly without pressure points.
- Set the straps. The side straps should form a Y just below each ear. The chin strap should allow two fingers between strap and chin, no more.
- Check the front gap. With the helmet level, you should see no more than two finger-widths between the front edge and your eyebrows.
- Test with your eyewear and a skullcap. Both change the fit. A helmet that fits bare may be too tight with a winter cap underneath.
Pro Tip: Tilt your head forward sharply after buckling. If the helmet rocks forward over your eyes, the retention system needs tightening or the size is too large. Do this test in the shop before you buy.
Replace any helmet immediately after a significant impact, even if the shell looks intact. EPS foam crushes to absorb energy and does not recover. Follow the manufacturer’s stated lifespan guidance, typically three to five years from first use, regardless of visible condition.
What clothing and footwear raise safety on gravel rides?
Gravel apparel prioritizes durability and real-world function over aerodynamic fit. Technical fabrics with four-way stretch and abrasion-resistant panels handle repeated contact with rough surfaces far better than standard road kit. Reputable gravel clothing guides consistently recommend versatile, durable pieces rather than purely aero road kit.
Footwear is where gravel diverges most sharply from road cycling. Gravel shoes feature:
- Reinforced uppers that resist debris and abrasion
- A wider toe box that accommodates natural foot expansion on long rides, reducing numbness
- Treaded outsoles with enough grip for hike-a-bike sections and creek crossings
- Recessed cleat compatibility so you can walk without slipping
Safety-relevant accessories to carry:
- Tubeless plug kit and sealant. Tubeless setup lets you run lower pressures for better traction; a plug kit handles cuts that sealant alone cannot seal.
- Chain tool and spare tube as a last resort for remote rides.
- Front and rear lights, even for daytime riding on routes that cross roads.
- Clip-on mudguards for wet conditions.
Pro Tip: Pack your tubeless plug kit and multi-tool in a top-tube bag, not a jersey pocket. On rough terrain, reaching into a pocket while riding is genuinely difficult. Front-loading your most-used tools saves time when something goes wrong.
How do drivetrain, tyres, and bike setup affect your control on gravel?
Bike setup is a safety issue, not just a performance one. The wrong gearing or tyre pressure makes crashes more likely on loose terrain.
Gearing: Gravel riding demands lower ratios than road cycling. A 1x drivetrain with a 40T or 42T chainring and a 10-44T or 10-52T cassette is a typical setup for mixed terrain. For steeper or more technical routes, a 10-51T or 10-52T cassette gives you a genuine bailout gear for seated climbing on loose pitches where standing loses traction entirely. Experienced gravel racers and coaches like Logan Jones-Wilkins consistently prioritize wide gear range over small cassette jumps.
Tyres and pressure: Moving from a 35mm tyre to a 45mm tyre increases volume significantly, improving both comfort and grip. Canyon’s guidance cites approximately 28–32 psi for a 70kg rider on 45mm tyres as a starting reference. Lower pressure conforms to the surface and reduces transmitted vibration. Wheel size also matters: 700c suits 35–45mm tyres for mixed terrain, while 650b suits 47–53mm for more technical trails.
Cockpit and compliance:
- Flared handlebars (12–24 degrees of drop flare) widen your grip in the drops, improving stability on descents
- A shorter stem (70–90mm) quickens steering response on technical terrain
- A vertically compliant seatpost reduces high-frequency vibration on long gravel days, measurably cutting fatigue
Pro Tip: Tyre pressure and seatpost compliance deliver more comfort and control than almost any other upgrade. Set your pressure before every ride based on your weight and the day’s surface, not a fixed number you memorized.
How do you care for and replace helmets and safety gear?
Inspect your helmet before every ride. Run your hand across the shell feeling for cracks, check that the retention dial clicks and holds, and tug the straps to confirm the buckle is secure. A crushed or cracked EPS liner is not always visible from the outside.
Replacement rules:
- After any crash involving head contact, replace immediately, no exceptions
- Store helmets away from direct UV exposure and heat, both degrade EPS and shell integrity faster than riding does
- Follow the manufacturer’s stated replacement interval, typically three to five years from first use
Accessory maintenance:
- Check light batteries before every ride; a dead rear light on a gravel route near roads is a real risk
- Torque mirror mounts to spec after rough rides; vibration loosens them
- Refresh tubeless sealant every three to four months or after a significant puncture repair
Pro Tip: Keep a small checklist taped inside your gear bag: helmet shell check, light charge, tyre pressure, sealant date. Two minutes before a ride beats a problem mid-route.
Why does investing in premium gravel safety gear pay off?
Budget helmets meet the CPSC minimum. Premium helmets exceed it, and the difference shows up in ways that matter after a crash.
Better retention systems hold position during impact rather than shifting. Multi-density EPS shells manage energy across a wider range of impact speeds. MIPS and similar rotational liners address the angled impacts that flat-impact tests do not fully capture. Integrated mounts for lights, cameras, and visors mean fewer aftermarket additions that can compromise fit or aerodynamics.
Premium gear also tends to last longer. A well-constructed helmet stored correctly reaches its manufacturer lifespan without degradation. Cheaper shells can degrade from UV and sweat exposure well before that point, meaning you replace them more often and spend more over time.
The VIRGO from Thebeamofficial sits firmly in the premium tier: a full-face integral design with MIPS, built for gravel and urban riders who want maximum protection without sacrificing usability. Premium protection features like these are what separate a helmet you trust in a real crash from one that just passes a lab test.
Pro Tip: If your budget forces a choice between a premium helmet and premium clothing, always spend on the helmet. Abrasions heal. Head injuries are a different category of consequence entirely.
Key Takeaways
Gravel cycling gear centers on a CPSC-certified helmet with MIPS technology, supported by tubeless tyres, wide-range gearing, and visibility accessories that together reduce crash risk and improve control on mixed surfaces.
| Point | Details |
|---|---|
| Helmet certification first | Confirm CPSC certification and MIPS before any other feature when buying a gravel helmet. |
| Fit determines protection | A helmet that shifts on impact fails regardless of its rating; check retention and strap fit every ride. |
| Tyre pressure and gearing | Run moderate tyre pressure on 35–45mm tyres and use a cassette with a wide gear range to ensure a reliable bailout gear on steep climbs. |
| Carry a tubeless plug kit | Sealant alone cannot seal large cuts; a plug kit and chain tool are non-negotiable for remote gravel rides. |
| Thebeamofficial VIRGO | The VIRGO integral helmet with MIPS is a premium full-face option available in the US for safety-focused gravel riders. |
The case for taking gravel helmet safety more seriously than most riders do
Most gravel riders I talk with spend hours obsessing over tyre pressure and cassette ratios, then buy the cheapest helmet that fits. That priority order is backwards.
The gear that absorbs the consequence of everything going wrong is the helmet. A 1-psi tyre pressure mistake costs you some comfort. A helmet that shifts on impact or lacks rotational protection costs you something you cannot get back. The gravel community has been slow to adopt full-face and integral helmets compared to mountain biking, partly because gravel speeds feel lower and partly because the culture still leans road. But gravel descents on loose terrain at 25–35 mph are not meaningfully safer than trail riding. The surface is less predictable, not more.
The other thing riders underestimate is visibility. A rear-view mirror or dashcam on a gravel route that crosses roads is not optional equipment for cautious riders. It is the difference between knowing a car is approaching and guessing. Thebeamofficial’s approach, building integrated safety accessories alongside helmets, reflects exactly the right instinct: protection is a system, not a single product.
The VIRGO helmet from Thebeamofficial: where to buy in the US
If you are shopping for a premium gravel helmet in the United States, the VIRGO integral helmet with MIPS from Thebeamofficial is worth a serious look. It combines full-face coverage with MIPS rotational protection and a design built for real-world gravel and urban use, not just lab certification.

You can browse the full range of adult helmets and safety accessories directly on the Thebeamofficial website. Before purchasing, confirm the CPSC certification label on the specific model and size you order. Thebeamofficial ships to the United States through its direct e-commerce platform, with product pages that include sizing guides and fit instructions. Start with your head measurement, compare it to the size chart, and order the size that matches, not the one that feels closest in a photo.
Useful sources and further reading
The sources below are worth bookmarking if you want to go deeper on any of the topics covered here.
- Gravel Cycling Safety: Essential Skills and Gear Guide — Thebeamofficial’s own guide covering helmet fit, essential kit, and safety fundamentals for gravel riders.
- Gravel Bike Setup: Gearing, Tyres, Wheel Size and More — Canyon’s practical breakdown of 700c vs. 650b, tyre width ranges, and 1x vs. 2x tradeoffs.
- Gravel Bike Comfort Upgrades That Work — Covers tyre pressure guidance, seatpost compliance, and cockpit changes with specific examples.
- Gravel Bike Gearing Explained — Detailed comparison of cassette ranges, chainring sizes, and groupset options from Shimano GRX, SRAM XPLR, and Campagnolo EKAR.
- Essential Gravel Goods and Gear — Bicycling’s practical kit list covering tubeless setup, plug kits, multi-tools, and luggage solutions.
- How to Set Up Your First Gravel Race Bike — Logan Jones-Wilkins on bailout gearing and cassette priorities for new gravel racers.
- Best Gravel Bike Clothing — Cycling Weekly’s tested recommendations on technical fabrics and durable gravel apparel.
| Source | Best for |
|---|---|
| Thebeamofficial blog | Helmet fit, safety gear, gravel protection guides |
| Canyon US blog | Tyre pressure, wheel size, comfort upgrades |
| Cyclist.co.uk | Gearing ratios, cassette comparisons, groupset options |
| Bicycling.com | Tubeless kit, repair essentials, ride preparation |
| Velo / Outside | Race setup, bailout gearing, first-event advice |


