
TL;DR:
- Regular visual and tactile inspections are essential to detect hidden foam damage that can compromise helmet safety. UV exposure, crashes, and age degrade helmet materials, making timely replacement crucial even when no external damage is visible. Consistent maintenance and careful monitoring ensure maximum protection during every ride.
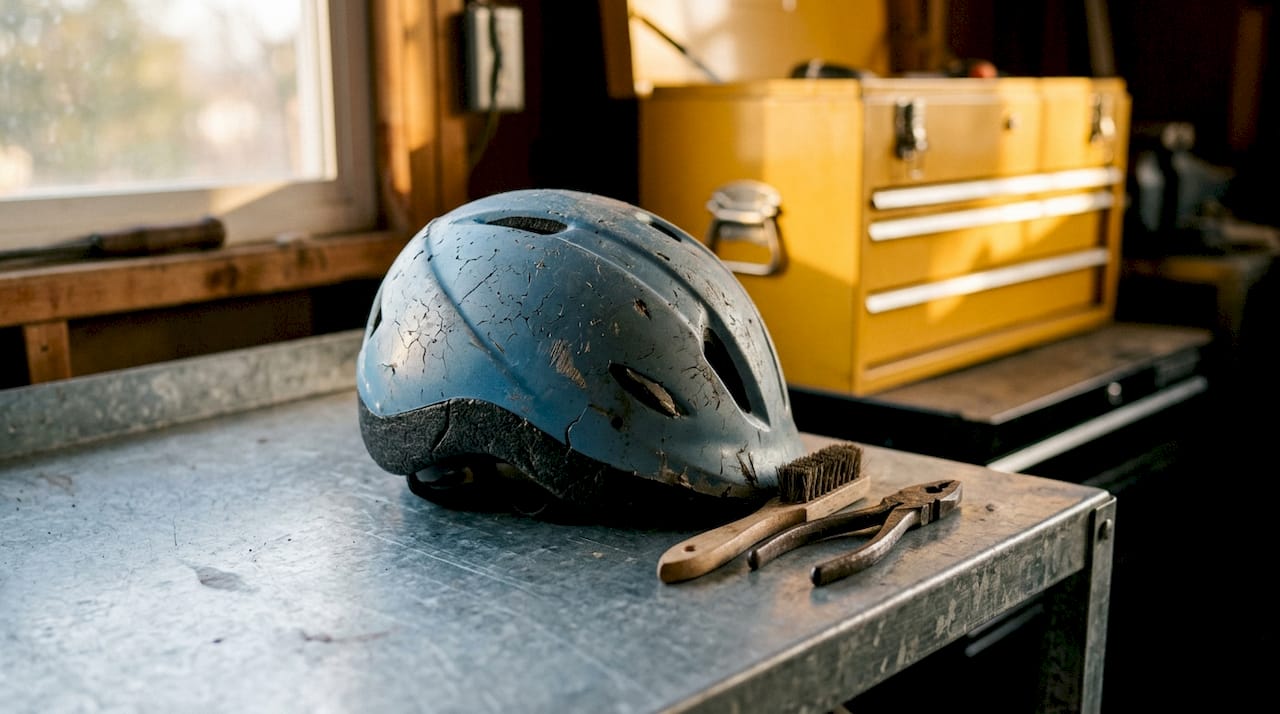
Helmet wear assessment is the practice of identifying physical and structural signs that a cycling helmet can no longer provide reliable impact protection. Knowing how to spot helmet wear means combining a visual scan with hands-on pressure testing to catch damage that eyes alone will miss. The two-pass method, covering shell, foam liner, straps, and buckles, is the standard approach recommended by the Bicycle Helmet Safety Institute (BHSI). Skipping this process means riding with compromised protection you cannot see.
How to spot helmet wear through visual inspection
The first pass of any helmet inspection checklist is purely visual. Clean the helmet with a damp cloth before you start so surface grime does not hide cracks or discoloration.
Shell cracks and abrasions are the most obvious damage signs. Run your eyes along every seam, vent edge, and curved surface. A crack near a vent is particularly serious because vents already concentrate stress during an impact. Even a hairline fracture in the outer shell signals that the foam underneath absorbed force and may be permanently deformed.
Discoloration and fading are not cosmetic issues. UV damage makes plastic brittle and reduces the shell’s ability to spread impact energy across the foam. A helmet that has gone from vivid to chalky or patchy has been degraded by sunlight, regardless of how few miles it has seen. Treat any color change as a structural warning, not an aesthetic one.
Here is what to check during a full visual pass:
- Outer shell: Look for cracks, deep scratches, dents, or areas where the shell has separated from the foam liner.
- Foam liner: Inspect through the vents for compressed, cracked, or crumbling EPS foam. Any visible deformation means the foam has already absorbed an impact.
- Straps: Fraying or discoloration on the webbing weakens the retention system. Straps that have stiffened or turned gray from sweat and UV exposure should be replaced.
- Buckles and adjusters: Squeeze each buckle blade. Broken or bent blades will not hold under crash forces. Check that the adjuster dial or rear retention ring moves smoothly and locks firmly.
- Interior padding: Compressed or crumbling comfort pads are a minor issue on their own, but they often indicate the helmet has been stored poorly or used heavily.
Pro Tip: Inspect your helmet in natural daylight rather than indoor lighting. Fluorescent light flattens shadows and makes hairline cracks nearly invisible against a white or light-colored shell.
Many cyclists miss damage because they only look at the top of the helmet. The sides and rear, which take the most impact in a typical fall, deserve equal attention. Rotate the helmet slowly in your hands and check every angle.
How to perform tactile tests for hidden foam damage
Visual inspection finds surface damage. Tactile testing finds the damage that matters most: crushed foam inside an intact-looking shell. Thin modern shells can hide severe internal foam damage beneath a surface that shows no cracks at all, which is why pressing is not optional.
Follow these steps for a complete tactile assessment:
- Press the outer shell gently with your thumb. Apply moderate, even pressure across different zones: top, sides, front, and rear. A healthy helmet shell should feel firm and spring back immediately. If it flexes inward and stays depressed, or if you feel a soft zone beneath the surface, the foam underneath is compromised.
- Perform the “beer can” test. This is the BHSI’s practical diagnostic: press the shell firmly and release. If the shell dents and rebounds unevenly, or if you hear a faint crinkle, the foam is crushed and the helmet must be replaced. A healthy shell rebounds cleanly with no sound.
- Check the foam liner through the vents. Insert a finger through each vent and press the exposed EPS foam directly. Healthy EPS foam feels uniformly firm. Soft spots, crumbling texture, or areas that compress easily indicate permanent deformation.
- Understand the difference between EPS and EPP foam. EPS (expanded polystyrene) is the standard material in road and gravel helmets. It is designed for a single impact and does not recover. EPP (expanded polypropylene), used in some urban and e-bike helmets, has limited multi-impact recovery, but foam crush is still permanent beyond a threshold. Neither material gives you a second chance after a serious hit.
- Test the retention system under load. Put the helmet on your head, tighten the fit system to your normal riding setting, then try to rock the helmet forward, backward, and side to side. Excessive movement means the retention system has lost its grip. A helmet that shifts more than an inch in any direction will not stay in position during a crash.
Pro Tip: Do the tactile test after every season, not just after crashes. Repeated minor vibrations from rough roads and trail riding gradually compress foam over time, and the degradation is cumulative even without a single hard impact.
The reason tactile testing matters so much is that cyclists routinely underestimate impact severity. Many riders do not realize they have hit their helmet hard enough to cause internal foam damage without any visible signs on the surface. If you dropped your helmet onto a hard floor from shoulder height, that counts as an impact worth testing.
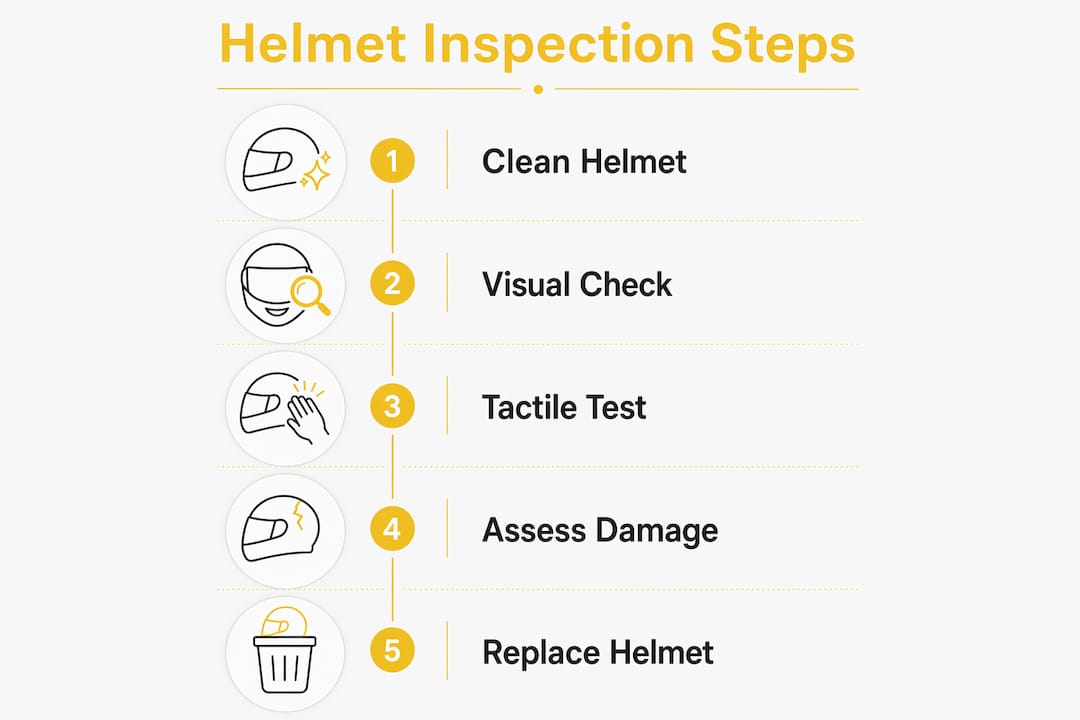
When should you replace your helmet?
Replacement timing is one of the most misunderstood areas of helmet safety. The core rule is simple: replace immediately after any crash where the helmet contacted a hard surface, even if the helmet looks completely undamaged. Foam is designed for one-time impact and may be internally compromised with no external evidence. Riding on a post-crash helmet is riding without protection.
Beyond crash replacement, these criteria determine when a helmet has reached the end of its safe life:
- Age and UV exposure: Manufacturers recommend replacement every 3 to 5 years, but this assumes average use and storage. A helmet ridden daily in strong sunlight degrades faster than one used twice a week and stored indoors.
- Visible shell damage: Any crack, deep abrasion, or delamination between shell and foam is grounds for immediate replacement, regardless of age.
- Failed tactile test: Soft spots, uneven rebound, or any zone that compresses and stays compressed means the foam has already done its job once.
- Strap or buckle failure: Broken buckle blades or loose stitching compromise the helmet’s ability to stay on your head during a crash. A helmet that cannot be secured correctly cannot protect you.
- Retention system failure: A fit system that no longer holds the helmet firmly in place, even after adjustment, means the helmet will shift on impact and reduce protection.
A common misconception is that a helmet with no visible damage is safe to keep using indefinitely. The helmet lifespan guide from Thebeamofficial makes clear that material degradation from UV, sweat, and heat is invisible and cumulative. The five-year guideline exists precisely because degradation happens whether or not you can see it.
Helmet maintenance tips that prevent premature wear
Consistent care extends the safe life of your helmet and makes damage easier to spot when it does appear. The goal is not to make a worn helmet last longer. It is to prevent unnecessary degradation so you get the full protective lifespan from a sound helmet.
- Clean with mild soap and cool water only. Harsh chemicals, solvents, and spray sunscreens degrade both the shell and the foam. Wipe the interior padding with a damp cloth after every ride in hot weather to remove salt from sweat, which accelerates strap and foam breakdown.
- Store away from heat and direct sunlight. A car trunk in summer can reach temperatures that soften and deform EPS foam. A garage shelf away from windows is a better option than a car or a windowsill.
- Never hang your helmet by its straps. Hanging by the straps stretches the webbing and stresses the anchor points where straps meet the shell. Use a helmet hook or set it flat on a shelf.
- Log your helmet’s age and crash history. Write the purchase date inside the liner with a permanent marker. Note any crashes, even minor ones. This makes replacement decisions straightforward and removes guesswork.
- Check the fit system monthly. Spin the adjustment dial through its full range and check that it clicks and holds at each setting. A retention system that slips or skips settings needs servicing or replacement.
Pro Tip: After cleaning, let your helmet air-dry completely before storing it in a bag or box. Trapping moisture inside accelerates foam degradation and promotes bacterial growth in the padding.
For a deeper look at care routines, the helmet maintenance guide from Thebeamofficial covers cleaning schedules, storage solutions, and how to assess when maintenance is no longer enough. Consistent upkeep also makes your regular inspection faster because you are working with a clean, well-documented helmet rather than guessing at its history.
Key takeaways
Reliable helmet protection depends on combining visual inspection with tactile pressure testing at regular intervals, not just after crashes.
| Point | Details |
|---|---|
| Use the two-pass method | Complete a visual scan first, then press-test the shell and foam for hidden damage. |
| Fading signals structural risk | UV discoloration means the shell plastic has become brittle, not just less attractive. |
| Replace after every crash | Foam is a single-use material; internal damage after impact is invisible and permanent. |
| Test the retention system | A helmet that shifts more than an inch on your head will not protect you in a fall. |
| Track age and use history | Write the purchase date inside the liner and note crashes to make replacement decisions clear. |
Why most cyclists inspect too late
I have reviewed hundreds of helmets over the years, and the pattern is always the same. Cyclists bring in a helmet after a crash and are genuinely surprised when the foam crumbles under light pressure. They assumed that because the shell looked fine, the helmet was fine. That assumption is the most dangerous one in cycling safety.
The tactile test is the step most riders skip entirely. It takes thirty seconds and it is the only way to catch the damage that actually kills people. A visual check alone is not a helmet inspection. It is a cosmetic review.
What I find equally concerning is how riders treat the five-year replacement guideline as a ceiling rather than a starting point. A helmet used daily by a commuter in a sunny climate may need replacement in three years. A weekend rider who stores their helmet properly might safely reach five. The guideline is an average, not a guarantee. Your inspection results matter more than the calendar.
Die helmet safety check guide from Thebeamofficial is the resource I recommend to riders who want a structured process they can repeat consistently. Inspection should be a habit, not a reaction to a crash.
— Sophie
Ride safer with Thebeamofficial

Thebeamofficial builds cycling safety equipment for riders who take protection seriously. The VIRGO integral helmet with MIPS technology is designed for road, gravel, and e-bike riders who want certified protection without compromising on fit or visibility. Beyond helmets, the FRAME FLASH reflectors add high-visibility coverage that works alongside your helmet to keep you seen on every ride. For cyclists who want to go further, the Thebeamofficial Ultracycling event connects the safety-focused riding community with expert resources and gear built for long-distance performance. Explore the full range at Thebeamofficial.
FAQ
How often should I inspect my helmet for wear?
Inspect your helmet before every ride with a quick visual check, and perform a full visual and tactile inspection at least once a month. After any crash or significant impact, inspect immediately and replace if there is any doubt.
Can a helmet look fine but still be unsafe?
Yes. Thin shells can hide severe internal foam damage with no visible cracks. The tactile press test is the only reliable way to detect crushed foam beneath an intact-looking surface.
What is the beer can test for helmets?
The beer can test means pressing the helmet shell firmly and releasing it. If the shell dents and rebounds unevenly, or stays slightly depressed, the foam underneath is compromised and the helmet needs immediate replacement.
How long does a cycling helmet last?
Manufacturers recommend replacement every 3 to 5 years, but daily use, high UV exposure, and crash history all shorten that window. Write the purchase date inside your helmet and inspect regularly rather than relying on the calendar alone.
Do straps and buckles affect helmet safety?
Frayed straps and broken buckles directly compromise how the helmet stays on your head during a crash. Broken buckle blades or loose stitching are replacement criteria, not minor maintenance issues.


