
TL;DR:
- Proper reflector placement and angle are crucial for nighttime visibility and safety.
- Regional regulations specify correct colors, quantity, and placement of bike reflectors.
- Regularly check and securely install reflectors to maintain effective visibility.
Most cycling accidents involving cars happen in low-light conditions, and a large share of those riders had no reflectors at all. Reflectors are not just a nice-to-have accessory. In the US and Europe, regulatory standards require specific reflectors for bikes used on public roads. Whether you commute through city streets or ride gravel paths at dusk, proper reflector installation can mean the difference between being seen and being invisible. This guide walks you through everything: the tools you need, how to install each reflector type, what the law requires in your region, and how to troubleshoot common mistakes.
Table of Contents
- What you need to install bike reflectors
- Step-by-step: Installing spoke, pedal, and frame reflectors
- Regional regulations: U.S. and European reflector requirements
- Troubleshooting and common mistakes
- A cyclist’s perspective: Why attention to detail matters
- Upgrade your safety gear with The Beam
- Frequently asked questions
Key Takeaways
| Point | Details |
|---|---|
| Check legal requirements | Laws on bike reflectors vary between the US and Europe, so check your region’s mandates before installation. |
| Use the right tools | Gather the proper tools and materials, including reflectors suited for your bike and area, before starting work. |
| Install for visibility | Correct placement of reflectors is critical for being seen by drivers, especially at night or in poor weather. |
| Test after installation | Always test your reflectors after installing them to make sure they’re secure and visible from all angles. |
What you need to install bike reflectors
Before you start installing, you need the right tools and materials. Skipping this step is one of the most common reasons reflectors end up loose, misaligned, or non-compliant. Taking five minutes to gather everything upfront saves a lot of frustration later.
The basic toolkit is simple:
- A Phillips-head or flathead screwdriver (depending on your reflector hardware)
- Clean gloves to protect your hands and keep surfaces grease-free
- A clean cloth or alcohol wipe for surface preparation
- A ruler or tape measure for precise placement
- The reflectors themselves, matched to your bike type and regional requirements
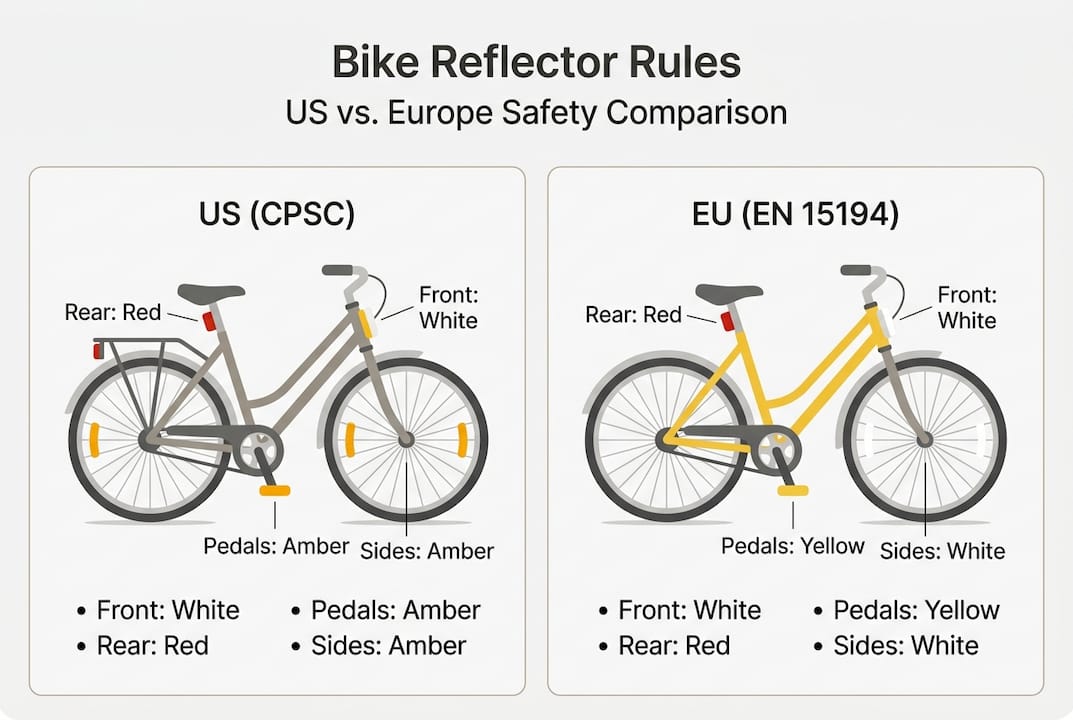
Not all reflectors are the same, and this matters more than most riders realize. US CPSC standards and EU requirements differ significantly in terms of color, placement, and quantity. Buying the wrong set can leave you both unsafe and non-compliant.
Here is a quick overview of the main reflector types and their typical use:
| Reflector type | Placement | Typical color |
|---|---|---|
| Front reflector | Fork or handlebar | Blanco |
| Rear reflector | Seatpost or rack | Rojo |
| Pedal reflectors | Both pedals, front and back | Amber |
| Spoke reflectors | Wheel spokes | Amber or white |
| Frame reflectors | Down tube or chainstay | Amber or white |
Before purchasing, always verify your local bike reflector safety standards to make sure you are buying the right colors and quantities. A reflector that does not meet legal specs is essentially useless from a compliance standpoint, even if it looks bright.
Important: Always check that your reflectors are rated for road use, not just decorative. Look for certification markings on the packaging.
For riders who want to go beyond the minimum, pairing reflectors with high visibility cycling gear creates a layered safety approach that is far more effective than reflectors alone. Reflectors work passively, meaning they only reflect light that hits them. Active visibility tools add another layer of protection.
Step-by-step: Installing spoke, pedal, and frame reflectors
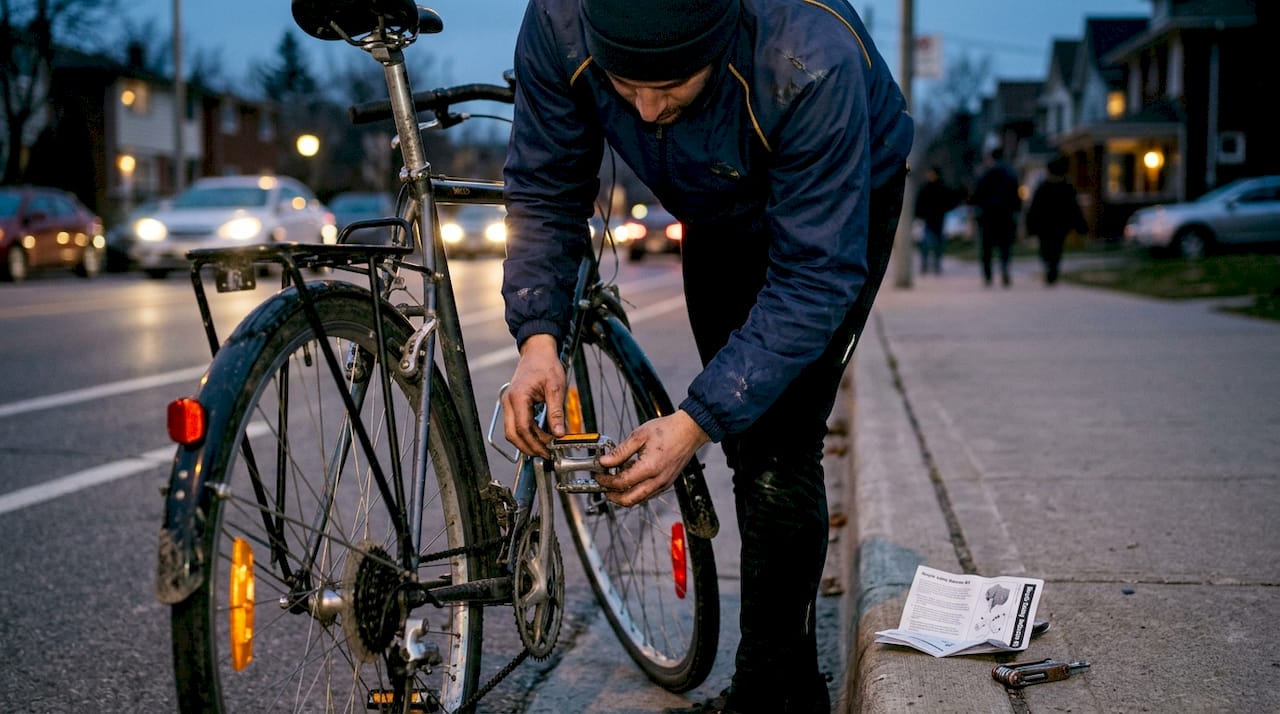
With your tools and reflectors ready, it is time to start the installation process. Each reflector type has a slightly different method, and getting the details right matters for both safety and durability.
Spoke reflectors
- Clean each spoke with a dry cloth to remove dirt and grease.
- Open the reflector clip and slide it onto the spoke at the midpoint between hub and rim.
- Snap the clip shut firmly. It should not slide when you push it with your thumb.
- Position reflectors symmetrically every 3-4 spokes for balanced visibility and to avoid wheel imbalance.
- Repeat on both wheels.
Pedal reflectors
- Check whether your pedals have pre-drilled reflector slots. Many modern pedals do.
- If using clip-on reflectors, clean the pedal surface first.
- Align the reflector so it faces forward and backward, not sideways.
- Screw or snap into place, depending on the mounting style.
- Tug gently to confirm it is secure before riding.
Frame reflectors
- Choose a flat, clean section of the down tube or chainstay.
- Wipe the surface with an alcohol wipe and let it dry fully.
- Peel the adhesive backing (if applicable) and press firmly for 30 seconds.
- For screw-mount types, pre-drill if needed and fasten without overtightening.
- Check alignment: the reflective face should point outward, perpendicular to traffic.
Pro Tip: After installing all reflectors, take your bike into a dark room and shine a flashlight from different angles. Any reflector that does not light up brightly needs to be repositioned or replaced.
Safety note: Spoke reflectors add minor weight to the wheel. Distribute them evenly to avoid any wobble during high-speed riding.
Proper installation dramatically improves your urban cyclist safety at night. Studies on nighttime cycling collisions consistently show that reflector placement angle is as important as reflector presence. A reflector pointed at the wrong angle is nearly as ineffective as no reflector at all.
Regional regulations: U.S. and European reflector requirements
To ensure both safety and compliance, consider the regional standards that apply to you. Regulations vary more than most cyclists expect, and riding with the wrong setup in the wrong country can result in fines or, worse, reduced protection.
Here is a side-by-side comparison of the main regional requirements:
| Region | Front | Rear | Pedals | Sides |
|---|---|---|---|---|
| United States (CPSC) | Blanco | Rojo | Amber (front and back) | Amber or white |
| Reino Unido | Blanco | Rojo | Amber | Not always required |
| Germany (StVZO) | Blanco | Rojo | Amber | Spoke reflectors required |
The US Consumer Product Safety Commission (CPSC) sets the baseline for bikes sold in America. US requirements include white front, red rear, amber pedal, and side reflectors, and these apply to new bikes at the point of sale. Individual states may add their own rules for road use.
Germany’s StVZO (Straßenverkehrs-Zulassungs-Ordnung) is one of the strictest frameworks in Europe. It mandates spoke reflectors on both wheels in addition to the standard front, rear, and pedal setup. France and other EU countries follow similar logic but may differ on spoke reflector requirements.
Key things to check before riding:
- Are your reflectors the correct color for your region?
- Do you have reflectors on both pedals, front and back?
- Are spoke or side reflectors required where you ride?
- Are your reflectors in good condition, not cracked or yellowed?
For a detailed breakdown of what applies to your situation, reviewing understanding reflector regulations is a smart starting point. You can also check reflector visibility standards for the latest 2026 updates across major markets.
One thing that surprises many riders: reflectors are required on bikes even when lights are present. They serve a different function. Lights are active; reflectors are passive. Both are needed.
Troubleshooting and common mistakes
With everything installed, it is important to double-check your work and avoid common pitfalls. Even experienced cyclists make installation errors that reduce reflector effectiveness or cause them to fall off mid-ride.
The most frequent mistakes include:
- Skipping surface cleaning: Adhesive reflectors applied to dirty or oily surfaces will detach within days. Always clean and dry before applying.
- Wrong angle: Reflectors must face oncoming traffic directly. A reflector angled even 30 degrees off-axis loses a significant portion of its reflective power.
- Uneven spoke placement: Clustering spoke reflectors on one side of the wheel creates imbalance and reduces all-around visibility.
- Using decorative reflectors: These may look similar but lack the retroreflective rating needed for road safety and legal compliance.
- Over-tightening screw mounts: This can crack the reflector housing, reducing its structural integrity and reflective surface.
To test that reflectors stay secure after installation, shake the wheel firmly and check that nothing moves. Pedal reflectors should be tugged by hand. Frame-mounted reflectors should not flex or rattle when you tap them.
Pro Tip: Do a reflector check every month, especially after riding in rain or on rough terrain. Water and vibration are the two biggest causes of reflector loosening over time.
If a reflector has shifted, do not just push it back into place. Remove it fully, clean the surface again, and reinstall from scratch. A half-secured reflector is worse than none because it gives a false sense of security.
For more practical advice on staying visible, the cycling safety tips section covers gear choices that complement your reflector setup and help you stay protected in all light conditions.
A cyclist’s perspective: Why attention to detail matters
Here is something most installation guides will not tell you: the difference between a safe setup and a dangerous one is often just one poorly placed reflector. We have seen riders who followed every step correctly except for the angle of their rear reflector. From a driver’s perspective at 50 meters, that reflector was invisible.
The checklist approach is useful, but it can create a false sense of completion. You tick the boxes, you feel done. Real safety comes from understanding why each step matters, not just that it matters. A reflector installed at the wrong height on a frame may be blocked by a pannier bag. A spoke reflector placed too close to the hub reflects light at the wrong angle entirely.
We always recommend doing a real-world test after installation: ride at dusk with a friend following in a car or on another bike. Ask them what they can see. The results are often surprising and always instructive. Pairing that test with proper urban cycling protection gear gives you a complete picture of your visibility profile. Take the extra time. It is always worth it.
Upgrade your safety gear with The Beam
If you are ready to upgrade your bike’s safety setup, there are products designed for both style and maximum visibility. At THE BEAM, we build safety gear that does not compromise on design or performance.

Our minimalist high visibility bike reflectors are engineered to meet both US and European standards, with clean aesthetics that suit any bike style. If you are also looking to protect your head, explore our range of safe bike helmets, including the VIRGO with MIPS technology. For a full overview of what we offer, browse all our all safety accessories and find the right combination for your riding style and region.
Frequently asked questions
Are bike reflectors mandatory in the US and Europe?
Yes, most US states and European countries require specific front, rear, pedal, and side reflectors. US and EU reflector rules differ in color and placement, so always check your local regulations.
How do I know my reflectors are installed securely?
After installation, shake the wheel firmly and tug each reflector by hand. If anything moves or rattles, remove it and reinstall from scratch.
What tools do I need for installing bike reflectors?
You typically need a screwdriver, clean gloves, and an alcohol wipe. The basic tools required are minimal, but surface preparation is just as important as the hardware itself.
How many spoke reflectors should I use for maximum safety?
Place spoke reflectors every 3-4 spokes symmetrically on each wheel. This ensures even visibility from all angles and keeps the wheel balanced during riding.


