

Real 360° visibility comes from three things working together: a front light with steady and flash modes, a bright omnidirectional rear light, and side or biomotion reflectors on your wheels and ankles. Aim for around 400 lumens as an urban baseline, and know that adding movement to your reflectors, not just brightness, can boost detection by up to 5.5 times compared with a single static light. The sections below walk through placement, modes, and what the law actually requires.
TL;DR:
- Moving reflectors on pedals or ankles can increase driver detection distances by up to 5.5 times compared to static lights, thanks to biomotion cues.
- Side reflectors such as spoke strips and low-mounted frame reflectors are crucial for lateral visibility, especially at intersections and during daytime riding.
- A comprehensive 360° visibility system includes at least a 400+ lumen front light, omnidirectional rear light, side reflectors, and biomotion accessories, prioritized in that order.
- Proper mode selection — flashing during daytime and urban night, steady in rural or unlit conditions — enhances recognition and safety.
- Routine maintenance like cleaning reflectors, checking battery life, and ensuring lights are securely mounted should be part of every rider’s pre-ride checklist.
Table of Contents
- What visibilité 360 vélo really means for your setup
- The research behind why moving lights beat static ones
- The three pillars: lighting, reflectors, and biomotion
- Your practical 360° checklist: what to buy and where it goes
- When to flash and when to hold steady
- What the law typically requires, and how to check yours
- Keeping your setup working: maintenance that actually matters
- A real-world 360° build worth copying
- A commuter’s prioritized upgrade path
- How THE BEAM’s lineup maps to this checklist
- Sources
- FAQ
What visibilité 360 vélo really means for your setup
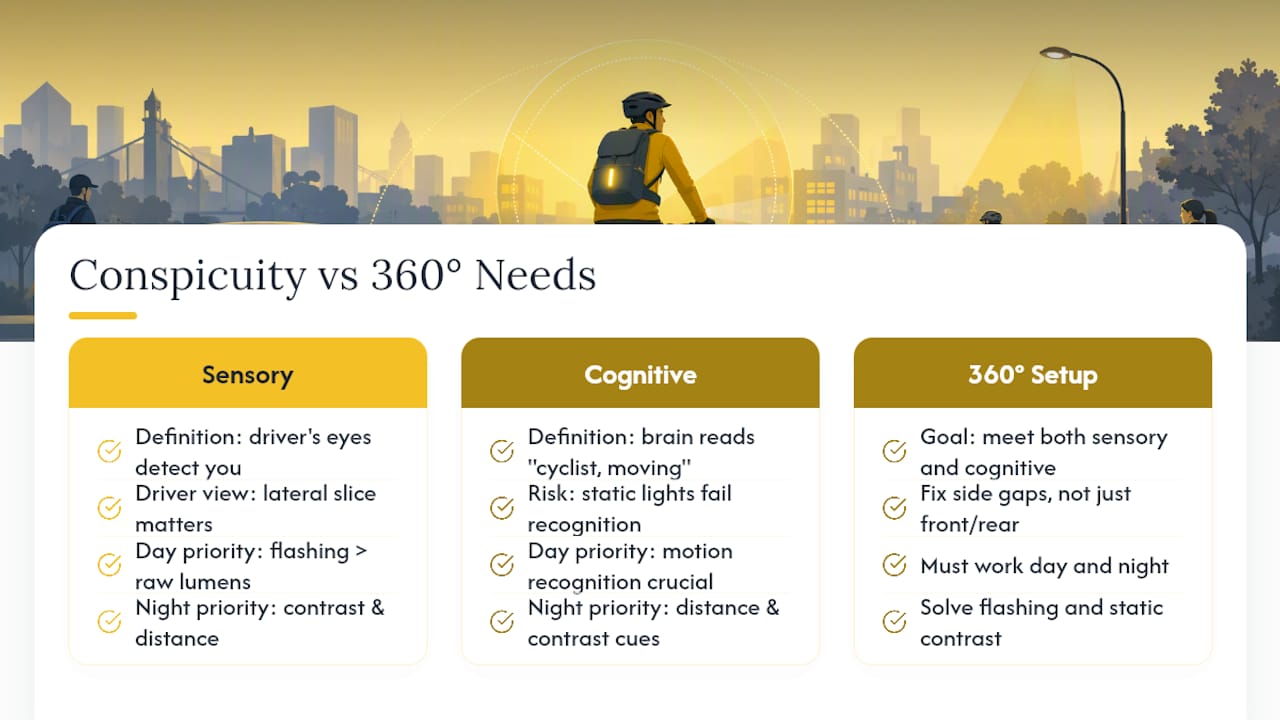
“Visibilité 360 vélo” gets used loosely, but the technical term worth knowing is conspicuity, the degree to which a cyclist stands out against a visual background. Conspicuity has two flavors: sensory (can a driver’s eyes physically detect you) and cognitive (does their brain correctly interpret what they’re seeing as “cyclist, moving, this direction”). A bike lit up like a Christmas tree can still fail the second test if none of that light moves in a way a human brain recognizes as a person pedaling.
That distinction explains why side visibility is so often the weak point. Drivers pulling out of driveways or turning across your path at intersections aren’t looking at your front or rear. They’re scanning a lateral slice of road, and a bike with only a front and rear light is nearly invisible from that angle. Daytime and nighttime needs also diverge: in daylight, a flashing light competing against sunlight matters more than raw lumens, while at night, distance judgment and static contrast take priority. A genuinely 360° setup has to solve both problems at once, not just the one that’s easiest to fix.
The research behind why moving lights beat static ones
Closed-road studies out of Clemson University found that adding moving lights or reflective markers to pedals or ankles increased driver detection distance by up to 5.5 times compared with a single static seatpost light.
That number matters because it isolates the effect of biomotion, the visual pattern the human brain uses to recognize another living creature from its movement alone, even in silhouette or low light. A steady light on a static point (your seatpost, your helmet) just looks like a light. A light that bounces up and down in the rhythmic arc of a pedal stroke reads as “person” almost instantly, even to a driver who isn’t consciously looking for a cyclist. Separate closed-road work confirms leg-mounted retroreflective strips outperform torso-only reflective vests for night-time recognition distance, because the vest doesn’t move the way legs do.
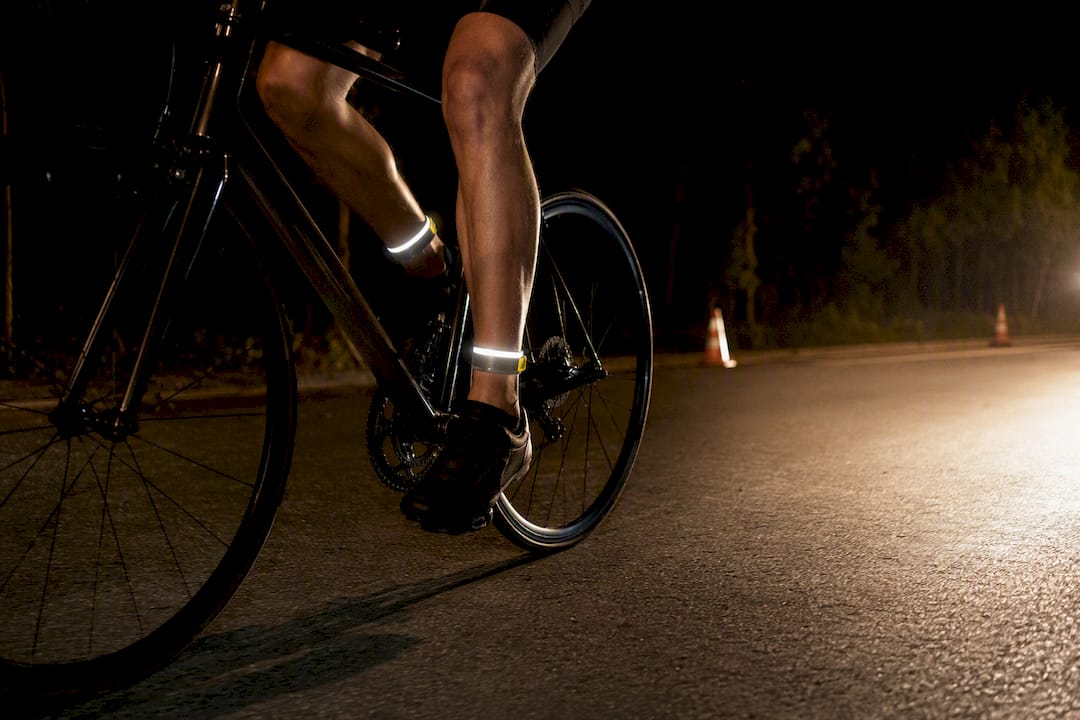
This is also why hi-vis clothing alone isn’t a fix. Reviews of cycling safety gear note that reflective and hi-vis accessories help but show mixed results on actual crash rates when used in isolation. Combining static and moving cues gives drivers both the sensory signal and the cognitive pattern they need.
The three pillars: lighting, reflectors, and biomotion
Full coverage depends on three distinct systems, each doing a job the others can’t.
Active lighting covers distance and direct line-of-sight visibility. A white front light and red rear light are the baseline, but where you mount them changes what they do. Helmet-mounted lights move with your head, which helps at intersections when you turn to check traffic. Handlebar-mounted lights hold a steady beam angle for illuminating the road. Seatpost-mounted rear lights sit at a predictable height for following traffic but do nothing for side visibility.
Passive reflectors fill in when your batteries die or a light shakes loose, and they cover angles active lighting typically misses:
- Spoke and rim reflectors catch headlights from the side, covering the exact angle most bikes leave blank.
- Frame-mounted reflectors on the down tube or seat tube add a low, wide reflective surface visible from oblique angles.
- Pedal reflectors bridge the gap between passive and active biomotion, since they move with every stroke even with no battery involved.
Biomotion is the multiplier. Reflectors or lights on ankles, pedals, or wheels don’t just add brightness, they add a movement signature a driver’s brain processes faster than a static glow. A wheel reflector spinning at 15 mph and an ankle band swinging with your stride do more perceptual work than a second static light ever could.
Your practical 360° checklist: what to buy and where it goes
Build this in order of impact, not in order of what looks impressive on a bike.
- Front light, 400+ lumens for city riding, 800 to 1,500+ for unlit rural roads. Look for a beam shape that throws light 10 to 15 meters ahead without a hard cutoff that blinds oncoming traffic. Mount it on the handlebars, angled slightly down, with both steady and flash modes available.
- Rear light with wide-angle or omnidirectional optics. A single narrow LED is visible from directly behind and nearly invisible from 30 degrees off-axis. Look for designs using base-facing or side LEDs specifically to close that gap, mounted at seatpost or seat-stay height where following traffic expects to see it.
- Side and wheel reflectors. Spoke reflectors are the cheapest fix on this list. Rim-mounted reflective strips and low-profile side lights add continuous lateral coverage that a front and rear light physically cannot provide, since light doesn’t bend around a bike frame.
- Biomotion accessories: reflective ankle bands, pedal reflectors, and reflective tape on shoe heels or pant cuffs. These are inexpensive, and per the Clemson research, disproportionately effective for the money.
- Keep factory reflectors installed. Riders remove them for looks constantly, and it’s the single most common visibility mistake on this list.
Pro Tip: If you can only spend on one upgrade this month, skip the fancy front light and buy ankle bands. They cost less than a coffee run and the biomotion effect works whether it’s pitch dark or dusk.
When to flash and when to hold steady
Mode selection matters as much as gear choice, and it changes with the environment.
- Urban daytime: run a flashing front and rear, or a dedicated daytime flash mode if your light has one. A flashing light breaks through visual clutter, parked cars, storefronts, other traffic, far better than a steady beam competing against a bright, busy background.
- Urban night: flashing rear still works well to grab attention at intersections, but consider a steady front so drivers can judge your distance and closing speed accurately.
- Rural night: steady front is close to essential. On unlit roads, a flashing beam makes it hard for a driver to tell how far away you are or how fast you’re approaching, which is more dangerous than it looks.
Don’t overdo the flashing points. A bike with four or five independent flash patterns can actually make it harder for a driver to parse what they’re seeing, or judge how far away you are. One flashing point up front, one behind, and everything else steady or passive is a reasonable rule of thumb.
What the law typically requires, and how to check yours
Most road authorities require some version of a white front light, a red rear light, and passive reflectors visible from the side, but exact wording, required hours of use, and reflector specifications vary by country and even by region within a country. Treat the following as common baseline practice, not a substitute for checking your own jurisdiction:
- White or yellow front-facing light, visible from a set distance.
- Red rear-facing light, often required to be either steady or flashing depending on local rules.
- Amber or white side reflectors, frequently required on wheels or pedals in addition to lights.
If you ride in France, the Highway Code sets specific requirements for lights and reflectors that can differ from what you’ll find in guides written for other countries, so check your national road authority’s official page rather than relying on general cycling blogs. Independent of what the law technically requires, functioning lights and passive reflectors on all four sides of your bike are simply good practice, legal minimums are a floor, not a target.
Keeping your setup working: maintenance that actually matters
A perfect setup that isn’t maintained is worse than a lesser one you actually check. Build these habits in:
- Before every ride: confirm lights power on, mounts are tight (a loose light angled at the ground helps no one), and reflectors are wiped clean of road grime, mud noticeably dulls reflective surfaces.
- Monthly or seasonal: inspect rubber mounting straps for cracking, replace reflective tape once it looks faded or scuffed, and test battery runtime since lumen output drops as batteries age even before they die completely.
- Watch for these common mistakes: riders removing factory reflectors because they look dated, mounting a front light at the wrong angle so the beam points at the ground instead of ahead, and relying on a single light or reflector as your entire visibility plan. Redundancy is the point of a 360° system, not a backup plan.
A real-world 360° build worth copying
A certain cycling safety brand designs its lineup around exactly this layered approach rather than treating any single product as a fix.
A practical example: mount a FRAME FLASH reflector on the down tube for a low, wide reflective surface visible from oblique angles day or night, then add WHEEL FLASH units to the rims to cover the side angle that front and rear lights structurally can’t reach. Pair those with a front light in the 400 to 800 lumen range for mixed urban riding and a wide-beam rear light mounted at seat-stay height.
The logic isn’t about stacking gadgets. It’s about making sure every approach angle, front, rear, both sides, has something covering it independently, so a dead battery or a scratched reflector doesn’t leave a blind spot in your visibility.
A commuter’s prioritized upgrade path
If money’s tight, spend it in this order: ankle reflectors first, then a better rear light, then upgrade your front light last. Ankle bands are very inexpensive and exploit biomotion, the single highest-return fix on this list. A quality rear light with real lateral spread comes next because most close calls happen from behind or from the side, not head-on.
If you can only make one purchase this year, I’d pick a wide-beam rear light over anything else. But no amount of gear replaces riding predictably and choosing routes that don’t put you shoulder to shoulder with fast traffic. Equipment buys you margin. It doesn’t buy you immunity.
— Sophie
How THE BEAM’s lineup maps to this checklist
Thebeamofficial’s advantage over piecing together a visibility setup from a dozen random listings is simple: every product is built to solve one specific angle in the 360° checklist above, so you’re not guessing which reflector actually covers your blind spots.

FRAME FLASH handles the low, wide frame coverage the checklist calls for, and WHEEL FLASH solves the lateral gap that front and rear lights leave open by design, not by accident. If you’ve read through the checklist and realized your bike is missing side coverage, that’s the exact problem these two products were built around. Check the FRAME FLASH product page for current specs and mounting details, and if you’re planning longer efforts where visibility matters even more, THE BEAM’s ultracycling resources cover setups built for extended low-light riding. Order now and get your side coverage sorted before your next night ride.
Sources
The biomotion research cited throughout comes from a Clemson University dissertation on cyclist conspicuity, alongside a related ScienceDirect study on biological motion and detection distance. Lumen and mounting guidance draws from BikeTips’ night riding safety guide, and rear-light design context comes from Cycling Weekly’s lighting buyer’s guide.
- Clemson University dissertation (Darlene E. Edewaard) — biomotion/conspicuity research
- Study on increasing conspicuity using biological motion — ScienceDirect
- Night Riding Safety: How to Stay Visible and Protected After Dark (BikeTips)
- Best Bike Lights 2026: reviewed by experts | Cycling Weekly
FAQ
How can I be visible when riding a bike at all angles?
Combine a front light with steady and flash modes, an omnidirectional rear light, and side or biomotion reflectors on your wheels and ankles. The ankle and pedal reflectors matter more than most riders realize, since moving reflectors can increase detection distance by up to 5.5 times compared with a static light alone.
Is wearing a high-visibility vest required by law when cycling?
Requirements vary by country and sometimes by region, so check your local road authority rather than assuming one rule applies everywhere. Independent of the legal requirement, functioning lights and reflectors on all sides of the bike are worth using regardless of what hi-vis clothing rules say locally.
What lumen output do I actually need for a bike light?
Around 400 lumens is a reasonable minimum for city riding, while unlit rural roads call for 800 to 1,500 lumens or more so you can see hazards and be seen in return.
Are spoke and wheel reflectors actually worth adding?
Yes. They cover the lateral angle that front and rear lights structurally cannot reach, and because they spin with the wheel, they benefit from the same biomotion effect that makes ankle and pedal reflectors so effective at night.


