
TL;DR:
- Proper cleaning of a bike helmet involves hand-washing it with mild soap and lukewarm water to prevent damage. Regular cleaning every two to four weeks maintains hygiene and ensures the helmet’s protective integrity. Avoid heat, harsh chemicals, and machine washing to preserve the helmet’s safety features and extend its lifespan.
Cleaning a bike helmet correctly means hand-washing it with mild soap and lukewarm water to protect its foam, shell, and straps from damage. Knowing how to clean a bike helmet the right way is not just about hygiene. It directly affects how well your helmet protects you. Sweat, bacteria, and grime break down padding and degrade adhesives over time. The good news is that the best bike helmet cleaning method requires nothing more than a soft cloth, a toothbrush, and a gentle detergent like baby shampoo or dish soap.
What tools and materials do you need to clean your bike helmet?
The right supplies make the difference between a safe clean and one that quietly damages your helmet. Mild detergents like dish soap or baby shampoo are effective and safe for cleaning without degrading foam or plastic. Harsh chemicals like bleach or alcohol are never appropriate. They strip protective coatings and weaken the EPS foam that absorbs impact.
Here is what you need before you start:
- Mild detergent: Baby shampoo, dish soap, or a dedicated sports gear cleaner
- Microfiber cloths: Two or three, for wiping the shell and drying padding
- Soft-bristle brush: An old toothbrush works perfectly for vents and strap buckles
- Two small buckets or containers: One for soapy water, one for rinsing
- Lukewarm water: Never hot; temperature matters more than most cyclists realize
- Optional deodorizing spray: A helmet-safe, alcohol-free spray for between deep cleans
Avoid abrasive sponges, steel wool, or any scrubbing pad with a rough surface. These scratch the shell and create micro-grooves where bacteria settle. Skip paper towels too. They leave fibers behind and can scratch polycarbonate shells.
Pro Tip: Keep a small zip-lock bag with a microfiber cloth and a travel-size bottle of baby shampoo in your cycling bag. A quick wipe-down after every ride dramatically reduces how much deep cleaning you need.
How to clean your bike helmet: step-by-step process
Cleaning a cycling helmet has four distinct components: the padding, the straps, the outer shell, and the vents. Each one needs a slightly different approach.

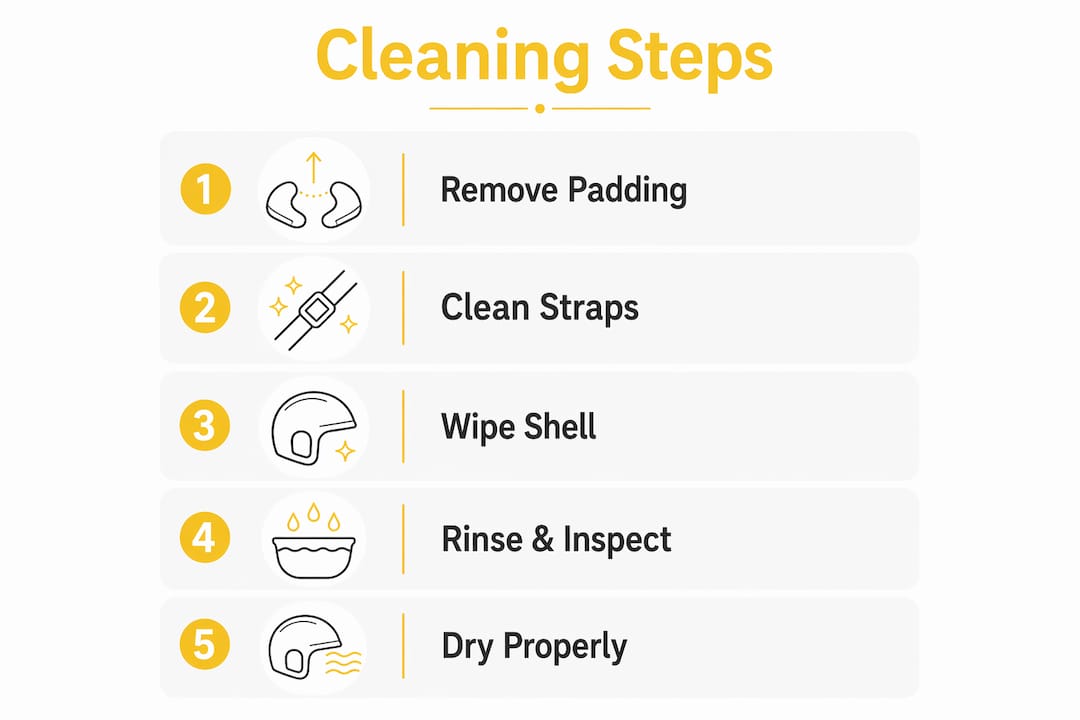
Step 1: Remove the padding
Start by detaching all removable padding from the inside of the helmet. Most modern helmets use velcro tabs, so the pads pull out easily. Removing padding before washing allows for deeper cleaning and prevents water from getting trapped inside the shell.
Fill a small container with lukewarm water and a few drops of mild soap. Submerge the pads and gently squeeze them to work the soap through the foam. Water temperature must stay at or below 86°F (30°C) to prevent synthetic fibers from shrinking or losing elasticity. Rinse each pad under cool running water until the water runs clear. Press them gently between two microfiber cloths to remove excess water. Do not wring or twist.
Step 2: Clean the straps
Straps collect sweat and grime and are often the dirtiest part of the helmet. They also affect fit and safety, so keeping them clean and flexible matters. Dip your toothbrush in soapy water and scrub the full length of each strap, including the buckles and adjustment sliders. Pay extra attention to the chin strap, which contacts skin directly on every ride.
Rinse straps thoroughly with a damp cloth. Do not submerge the entire helmet to rinse the straps. That risks waterlogging the EPS foam inside the shell.
Pro Tip: Run your fingers along the straps after rinsing. If they feel stiff or sticky, give them another pass with the toothbrush. Stiff straps lose flexibility faster and can crack over time.
Step 3: Wipe the outer shell and vents
The outer shell needs a gentle touch. Dampen a microfiber cloth with your soapy water mixture and wipe the entire exterior surface in smooth, circular motions. For vents, use the toothbrush to dislodge compacted dirt and insects. Vents are often overlooked, but blocked vents reduce airflow and can trap moisture against the foam.
Do not submerge the helmet shell in water for any extended period. EPS foam is porous. Prolonged soaking causes water absorption, which leads to mold growth inside the helmet and significantly extends drying time. A damp cloth is all you need for the shell.
Follow up with a clean, damp cloth to remove all soap residue. Soap left on the shell can attract more dirt and may dull the finish over time.
Step 4: Rinse and inspect
After cleaning each component, do a final wipe of the entire helmet with a clean, water-only microfiber cloth. Check the velcro tabs on the padding attachment points. If any velcro is peeling, use clear silicone adhesive to reattach it. Superglue solvents chemically degrade EPS foam and should never be used on helmet components.
| Component | Cleaning method | Key caution |
|---|---|---|
| Padding | Hand wash in soapy water below 86°F | Do not wring; press dry gently |
| Straps | Scrub with toothbrush and mild soap | Do not soak the full helmet |
| Outer shell | Wipe with damp microfiber cloth | No abrasive tools or harsh chemicals |
| Vents | Toothbrush with soapy water | Rinse thoroughly to remove soap |
| Velcro tabs | Wipe clean; reattach with silicone adhesive | Never use superglue |
How to dry and maintain your bike helmet after cleaning
Drying is where most cyclists make their biggest mistake. Heat causes EPS foam expansion and shell de-bonding, so rushing the process with a hairdryer or leaving the helmet in direct sunlight causes real structural damage. The damage is often invisible until the helmet fails to protect you in a crash.
The correct approach is straightforward:
- Air dry in shade: Place the helmet and padding in a well-ventilated area away from direct sunlight
- Use a clean towel as a base: Set the helmet upside down so air circulates through the vents
- Allow 12–24 hours: Padding takes longer to dry than the shell; never reassemble before everything is completely dry
- Check before reassembling: Press the padding between your fingers to confirm no moisture remains at the core
Proper helmet storage methods also play a role in long-term maintenance. A helmet stored in a hot car or a damp bag between rides will degrade faster regardless of how well you clean it. Store it in a cool, dry place, ideally in a breathable bag or on a dedicated hook.
Pro Tip: Place a small sachet of silica gel inside the helmet during storage. It absorbs residual moisture and prevents the musty odor that builds up in padding over time.
To preserve strap elasticity, avoid folding straps tightly when storing. Lay them flat or let them hang naturally. Straps that are repeatedly kinked lose their shape and become harder to adjust.
What common mistakes should cyclists avoid when cleaning their bike helmets?
Most helmet damage from cleaning is entirely preventable. These are the mistakes that shorten helmet life and compromise protection:
- Machine washing or dishwashing: High temperatures and mechanical agitation destroy EPS foam and the adhesives that bond the shell layers. Never put a helmet in a dishwasher, washing machine, or dryer.
- Using bleach, alcohol, or petroleum-based cleaners: Harsh cleaners degrade helmet plastic and foam, weakening the materials that absorb impact. Mild soap and water are sufficient.
- Soaking the shell: Submerging the full helmet invites mold and extends drying time to the point where most cyclists reassemble too early.
- Using superglue for repairs: Superglue solvents eat through EPS foam. Use clear silicone adhesive instead.
- Drying with heat: Hairdryers, radiators, and direct sunlight all cause foam expansion and shell separation.
Cleaning frequency matters too. Frequent cyclists should clean their helmets every 2–4 weeks to prevent bacteria buildup and maintain helmet function. Riders who sweat heavily or ride in humid conditions should lean toward the shorter end of that range.
A helmet that looks clean on the outside can still harbor bacteria and sweat damage on the inside. Regular cleaning of the padding is what actually protects your skin and preserves the foam’s protective properties.
Cleaning is also a good time to check for signs of helmet wear. Cracks, compressed foam, or damaged straps are signals that no amount of cleaning can fix. A compromised helmet needs to be replaced, not refreshed.
Key takeaways
Hand-washing with mild soap and lukewarm water is the only safe method for cleaning a bike helmet, and skipping heat during drying is just as critical as avoiding harsh chemicals.
| Point | Details |
|---|---|
| Use mild soap only | Baby shampoo or dish soap cleans effectively without degrading foam or plastic. |
| Keep water below 86°F | Higher temperatures shrink padding fibers and reduce elasticity. |
| Never machine wash | Dishwashers and washing machines destroy EPS foam and helmet adhesives. |
| Air dry in shade | Heat from dryers or sunlight causes foam expansion and shell de-bonding. |
| Clean every 2–4 weeks | Frequent riders need regular cleaning to prevent bacteria buildup and material breakdown. |
What I’ve learned from cleaning helmets the hard way
The first time I ruined a helmet, I left it on a sunny windowsill to dry faster. The shell looked fine. The foam inside had separated from the liner. I only found out when I pressed the padding back in and felt the crunch. That helmet went straight into the trash.
What most cleaning guides skip is the velcro detail. When padding velcro tabs start to peel, the instinct is to grab whatever adhesive is nearby. Superglue feels like the obvious fix. It is actually one of the worst things you can apply to a helmet. The solvents in cyanoacrylate adhesives dissolve EPS foam on contact. Clear silicone adhesive takes longer to set but leaves the foam completely intact.
The other thing I have come to believe strongly is that hygiene is the primary goal of helmet cleaning, not appearance. A helmet that smells clean and looks shiny but has been scrubbed with alcohol-based products is structurally weaker than one that has been gently hand-washed with baby shampoo. The hygiene-focused cleaning approach preserves the protective layers that actually matter in a crash.
My honest recommendation: treat your helmet like you treat your skin. Gentle, consistent care beats aggressive cleaning every time. A quick wipe after each ride and a proper hand-wash every few weeks will keep your helmet performing the way it was designed to for its full lifespan.
— Sophie
Cycling safety gear worth knowing about
Keeping your helmet clean is one part of a complete approach to ride safety. Thebeamofficial designs high-end cycling safety equipment for road, gravel, urban, and e-bike riders who take protection seriously.

If you are preparing for a long-distance challenge, Thebeamofficial’s ultracycling event brings together safety-conscious cyclists who understand that gear maintenance is not optional at that distance. For riders who want an extra layer of protection on every ride, the RS 1000 AI DashCam records your ride and enhances your visibility to other road users. Clean gear and smart technology work together. Neither replaces the other.
FAQ
How often should I clean my bike helmet?
Clean your helmet every 2–4 weeks if you ride frequently. Riders who sweat heavily or ride in hot, humid conditions should clean closer to every two weeks.
Can I put my bike helmet in the washing machine?
No. Washing machines damage EPS foam and adhesives through heat and mechanical agitation. Hand-washing is the only safe method.
What soap is safe for cleaning a cycling helmet?
Baby shampoo and mild dish soap are both safe and effective. Avoid bleach, alcohol, and any petroleum-based cleaner, as these degrade the foam and plastic.
How do I dry my helmet after washing?
Air dry in a shaded, well-ventilated area for 12–24 hours. Heat from hairdryers or direct sunlight causes foam expansion and shell de-bonding, so patience is the only correct approach.
When does cleaning stop being enough?
When you notice cracked foam, a loose shell, or damaged straps, cleaning will not restore protection. Check the helmet lifespan guidelines to know when replacement is the right call.


