

Use a flashing, daytime-visible rear light plus a steady front light, even under a clear midday sun, and pair both with reflectors and ankle biomotion markers. Lights aren’t legally required in daylight, but reflectors are mandatory at all times in France. Before every ride, clip a charged flashing rear light to your seatpost and a steady front light to your handlebars. That’s the baseline. Everything else is refinement.
TL;DR:
- A flashing rear light and steady front light are essential, especially with a genuine daytime flash mode for the rear, to ensure high visibility in sunlight.
- Reflectors and biomotion markers, such as ankle reflectors, significantly improve driver recognition by creating motion cues that far extend visibility distances.
- Legal requirements in France demand reflectors at all times and lights only in low visibility conditions, but safety advice recommends exceeding minimum illumination levels, especially in urban or rural riding environments.
- The recommended brightness for daytime lights ranges from 30 to 50 lux at 10 meters for front lights and 25 to 150 lumens for rear lights with flash modes that are irregular or high-contrast.
- Combining active lights, passive reflectors, and biomotion cues creates a redundant, effective visibility system that works even if batteries fail or lights are temporarily off.
Table of Contents
- What Counts as Éclairage Diurne Vélo?
- Do You Legally Need Daytime Bike Lights in France?
- How Bright Should Your Lights Be for Daytime Riding?
- Which Daytime Light Setup Should You Choose?
- Why Reflectors and Biomotion Still Matter With Lights On
- When Do Radar Taillights and Brake Lights Earn Their Price?
- How Do You Keep Daytime Lights Working Reliably?
- Where THE BEAM Fits Into a Daytime Visibility Setup
- What Actually Matters in a Daytime Visibility Setup
- Build Your Daytime Visibility Kit With THE BEAM
- Sources
What Counts as Éclairage Diurne Vélo?
Daytime running lights for bikes, what French cyclists call éclairage diurne vélo, are lights designed to stay visible in bright ambient light rather than just to illuminate the road at night. The distinction matters because a light bright enough to light your path in the dark is often far too dim to register against sunlight from 100 meters away. Daytime visibility depends on contrast and motion, not raw brightness.
A driver scanning a busy street picks up flashing patterns and moving light points far faster than a static glow. That’s the entire logic behind daytime running lights: they’re built to catch a driver’s peripheral vision in conditions where a normal headlight would disappear.
Front daytime running lights
A steady front light works fine at night, but for daytime use, a flashing or pulsing mode with a wide-angle beam tends to draw more attention on mixed-light routes, tree-lined streets, tunnels, or roads with sudden shadows. Some units run a hybrid mode: steady core beam with a pulsing flash layered on top, giving you both path illumination and daytime conspicuity in one unit.
Flashing rear lights
Rear daytime visibility depends almost entirely on flash pattern. A light with an erratic or high-contrast flash sequence is more noticeable in sunlight than one with a slow, predictable pulse. This is where most riders under-invest, buying a rear light rated for nighttime lumens without checking whether it has a genuine daytime flash mode.
Helmet and low-mounted accent lights
A small light or reflective accent on the helmet adds a second visibility point at a different height than your seatpost or handlebars, which helps drivers judge your position and speed more accurately.
Radar-equipped taillights and combination units
These sit at the premium end. They combine a bright daytime flash with a radar sensor that detects approaching vehicles and alerts you through a paired head unit, useful on fast or busy roads where a glance backward isn’t always practical.
Backup lights and clip-ons
A cheap clip-on LED costs little and weighs almost nothing. Keep one in a saddle bag or jersey pocket. When your primary light dies mid-ride, a backup means you’re never riding unlit.
Do You Legally Need Daytime Bike Lights in France?
Not always, but the safety case is strong enough that “legally optional” shouldn’t mean “skip it.” French law under the Code de la route requires a white or yellow front light and a red rear light only when visibility is insufficient, meaning at night or in conditions like fog and heavy rain. Reflectors, called catadioptres, are mandatory at all times, day or night, and skipping them can draw a fine starting at €11, rising to €38 for repeated or aggravated noncompliance.
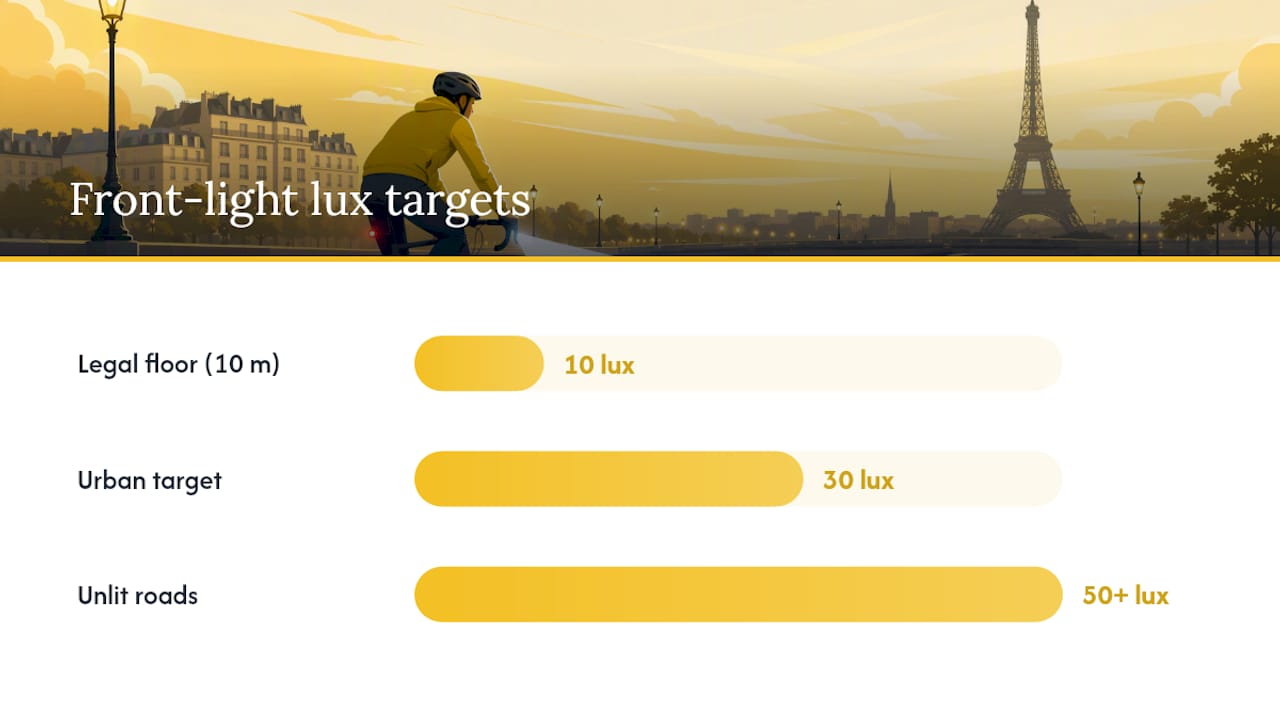
The visibility gap: The legal minimum for lighting intensity is 10 lux at 10 meters. The Fédération française des usagers de la bicyclette (FUB) recommends 30 lux at 10 meters for urban riding and up to 50 lux on unlit rural roads, roughly three to five times the legal floor.
That gap between “legal” and “actually safe” is the whole argument for daytime running lights. A recent regulatory update also clarified something riders often get wrong: the mandatory rear light must stay non-flashing, but complementary devices like orange flashing indicators and brake-activated stop lights have been authorized as add-ons since late 2024. You can legally run a flashing daytime light alongside your fixed rear light. You just can’t replace the fixed light with a flashing one.
Research on conspicuity backs the case for going beyond the legal minimum. Studies on retroreflective placement and lighting position find that biomotion cues, particularly on ankles and pedals, significantly extend the distance at which drivers recognize a cyclist, more than torso-mounted reflectors alone. The moving light point mimics human gait, which the brain flags faster than a static shape.
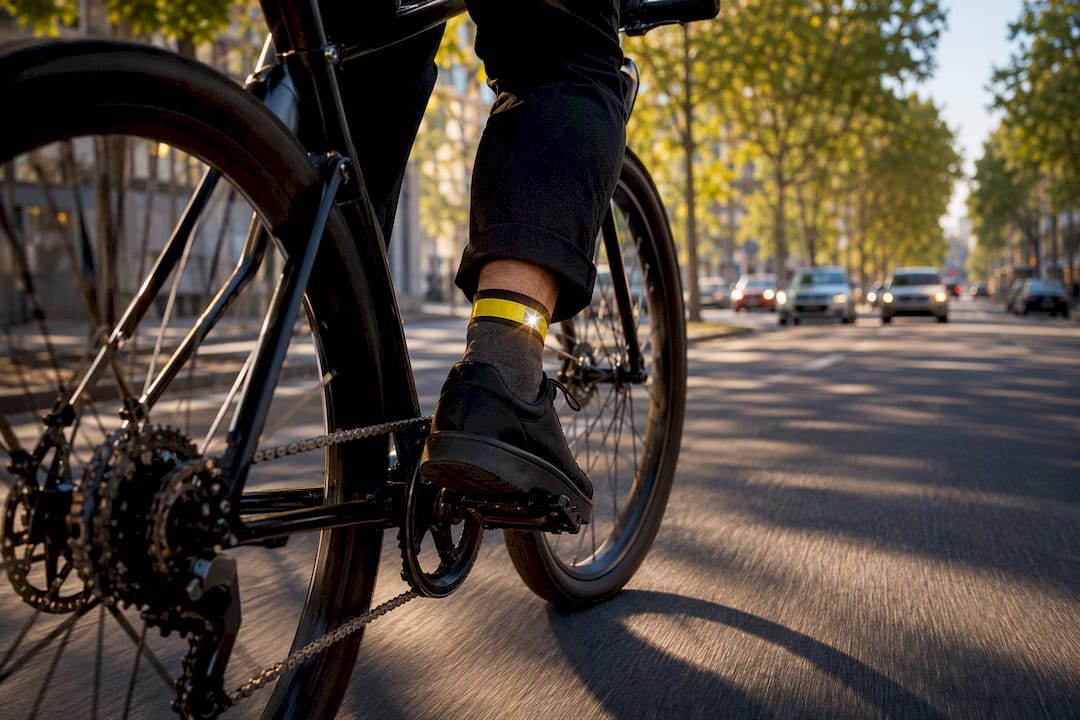
Practical rule of thumb: run a daytime-visible flashing rear light any time you’re in traffic, and switch on both lights automatically in tunnels, fog, or heavy rain, which are exactly the conditions where the legal lighting requirement applies.
How Bright Should Your Lights Be for Daytime Riding?
Lumens and lux measure different things, and mixing them up leads to bad purchases. Lumens measure total light output from the source. Lux measures how much of that light actually lands on a surface at a given distance, which is what a driver’s eye actually perceives. A light rated at 800 lumens with a poorly focused beam can produce less usable lux at 10 meters than a well-focused 300-lumen unit.
FUB’s guidance centers on lux at distance rather than raw lumens: 10 lux at 10 meters is the legal floor, 30 lux is the recommended urban target, and 50 lux suits unlit roads. For rear lights, FUB points to a 25 to 150 lumen range depending on your typical riding environment, with the higher end reserved for exposed or high-speed routes.
A few practical targets worth remembering:
- Urban commuting front light: 30 to 50 lux at 10 meters, beam angled slightly downward to avoid blinding oncoming traffic.
- Rural or unlit-road front light: 50+ lux, tighter beam focus for longer throw.
- Rear light for daytime traffic: 25 to 150 lumens with a genuine daytime flash mode, not just a night mode run during the day.
- Flash frequency: irregular or high-contrast pulse patterns register faster in bright sunlight than slow, even blinks.
Flash frequency deserves more attention than most buyers give it. A light that pulses at an erratic rhythm breaks up the visual background more effectively than one with a smooth, predictable cadence, which is why some manufacturers build daytime-specific units around distinct flash sequencing rather than just raw output.
Battery runtime is the other half of the equation. A blindingly bright light that dies after 90 minutes is worse than a moderate one that lasts your full commute. Match your runtime target to your actual weekly mileage, not to the manufacturer’s peak-brightness claim.
Pro Tip: Test your lights outdoors at midday before committing to a mode. A flash pattern that looks aggressive in your kitchen can look barely noticeable against real sunlight, and vice versa.
Which Daytime Light Setup Should You Choose?
Picking a setup comes down to four questions: where you ride, how fast, how exposed you are to overtaking traffic, and what you’re willing to charge or replace.
- Match the setup to your route. Urban commuters with frequent stops and low speeds can prioritize wide-angle flash visibility over beam throw. Rural or fast-road riders need a longer-throw front beam and a rear light in the higher lumen range, since vehicles close distance faster.
- Weigh exposure to overtaking traffic. If you spend most of your ride on shared streets with cars passing from behind, the rear light matters more than the front. On mixed paths with pedestrians and cyclists, a moderate front light with a wide beam angle serves you better than a narrow, glare-heavy one.
- Set a mounting plan before you buy. The seatpost is generally the best rear-light position; it sits at a consistent height, away from panniers or saddlebags that can block the beam. Helmet mounts add a second visibility point but shift with head movement, which can help or blur the flash pattern depending on the light. Handlebar-mounted front lights should aim slightly downward to illuminate the road without glaring oncoming drivers.
- Plan for battery life realistically. If your commute is 30 minutes each way, a light rated for 90 minutes of flash mode covers a full week without daily charging. Longer rides or multi-day trips call for either a higher-capacity battery or a backup clip-on.
Before every ride, glance behind you (or have someone check) to confirm nothing, no saddlebag, jacket flap, or rack, blocks your rear light’s line of sight. It’s a five-second check that prevents the single most common daytime visibility failure: a perfectly good light aimed at your own gear.
Pro Tip: Angle your rear light slightly upward if you run panniers or a rack bag. A dead-level beam often gets partially swallowed by cargo, cutting your effective visibility distance in half.
Why Reflectors and Biomotion Still Matter With Lights On
Lights can fail. Batteries die, mounts loosen, lenses fog. That’s why passive visibility gear, reflectors, reflective tape, and biomotion placement, isn’t a downgrade from lights. It’s the backup system that keeps working when your battery doesn’t.
The strongest evidence points to leg and pedal placement specifically. Reflective strips positioned on ankles or pedals create a moving light pattern that mirrors your pedaling motion, and that motion cue extends driver recognition distance well beyond what a static torso reflector achieves, even without a full reflective vest.
A practical combination that avoids looking like a mobile hazard sign: one bright accent point (helmet or vest), ankle reflectors on both legs, and a flashing rear light. That’s the trio most conspicuity research converges on, and it works whether you’re commuting in jeans or full kit. For a deeper look at combining these elements without overloading your setup, the reflective gear guide covers specific placements worth adding.
- Adhesive frame reflectors and retroreflective tire sidewalls add passive visibility without any battery dependency.
- Small reflective points on moving parts, pedals, cranks, wheel spokes, outperform equivalent-sized static reflectors.
- Clean your catadioptres regularly. Road grime dulls reflectivity faster than most riders expect.
When Do Radar Taillights and Brake Lights Earn Their Price?
Advanced visibility systems aren’t for every commute, but on the right roads, they change how you ride entirely.
Radar-equipped taillights detect vehicles approaching from behind and send an alert to a paired head unit or bike computer, shifting your awareness from reactive glances over the shoulder to a proactive early warning. That shift is particularly valuable on fast or busy roads where a car can close distance in seconds.
Brake-activated stop lights and turn indicators serve a different purpose. They don’t replace your mandatory fixed rear light. They add a secondary signal that communicates intent, useful in group rides or heavy traffic where drivers benefit from knowing you’re slowing or turning, not just that you’re present.
Consider investing in these systems if:
- You regularly ride fast, high-traffic roads where a few seconds of warning matters.
- You do frequent group rides where turn signals reduce ambiguity for riders behind you.
- You tour or commute long distances daily and want redundancy beyond your primary lights.
- Your current head unit supports the pairing protocol; check ANT+ or Bluetooth compatibility before buying, since not all radar units pair with every bike computer.
How Do You Keep Daytime Lights Working Reliably?
A light that works perfectly in the shop and fails on a rainy Tuesday commute isn’t doing its job. Build a routine, not a hope.
- Charge nightly if you commute daily, and run a full weekly check to confirm actual runtime matches the rated spec.
- Before each ride, verify mounts are secure, lenses are clean, and flash mode is actually engaged, not just powered on.
- In cold weather, keep batteries warmer by storing lights indoors overnight rather than leaving them clipped to a bike left outside; cold cuts battery capacity noticeably.
- Carry a small backup clip-on and a strip of reflective tape in your bag. If your primary system fails mid-route, you’re covered in under a minute.
Riders who commute year-round sometimes switch to dynamo-hub setups specifically to remove battery anxiety from the equation entirely, worth considering if charging routines keep slipping.
Where THE BEAM Fits Into a Daytime Visibility Setup
THE BEAM designs cycling safety equipment around a simple premise: visibility gear should be easy to use correctly, every single time, not just on days you remember to charge everything. That focus shows up in how the brand approaches reflectors as a complement to active lighting, not an afterthought bolted on for legal compliance.
A common real-world scenario: a commuter runs a solid front and rear light setup but skips passive reflectors, assuming the lights cover everything. Then a battery dies mid-commute on a cloudy afternoon, exactly when ambient light drops and visibility matters most. Reflectors like FRAME FLASH are built to stay effective in that gap, minimalist enough not to clutter your bike, but bright enough to hold up their end when batteries can’t.
Pairing a frame-mounted reflector with your existing lights, plus ankle-level biomotion markers, rounds out a setup that doesn’t depend entirely on any single point of failure. Product photos of THE BEAM’s current lineup appear at the end of this article for anyone comparing options directly.
What Actually Matters in a Daytime Visibility Setup
Most advice on bike lighting treats daytime visibility as an afterthought to nighttime safety, a mistake given that a large share of cyclist collisions happen in broad daylight, often because drivers simply don’t register a cyclist against a busy visual background. The conventional wisdom, buy the brightest light you can afford, misses the actual lesson from conspicuity research: motion and contrast beat raw output every time.
Where I think riders go wrong is treating reflectors as a legal box to check rather than a functional backup system. Lights fail. Batteries die at the worst moments. A setup built entirely around active lighting, with no passive redundancy, is one dead battery away from being invisible on a gray afternoon.
Prioritize in this order: a genuine daytime flash mode on your rear light first, ankle or pedal reflectors second, and only then worry about premium extras like radar units. The France-specific rules, reflectors mandatory at all times, lights only when visibility drops, actually point toward the right habit: build a setup that works whether or not you remember the legal trigger point. Simple, redundant, and ready before you ever swing a leg over the saddle.
— Sophie
Build Your Daytime Visibility Kit With THE BEAM
This guide highlights gear in the category of reflectors, lighting accessories, and visibility equipment built for riders who want a setup that works without constant fiddling, not a drawer full of gadgets you forget to charge.

If you’ve read this far, you already know the biggest gap in most daytime setups isn’t the light, it’s the missing passive backup. The FRAME FLASH reflector closes that gap: minimalist enough to mount permanently without cluttering your frame, bright enough to keep you visible the moment a battery dies or a flash mode gets left off by accident. It’s built specifically for riders who want redundancy without extra bulk, whether you’re commuting through city traffic daily or riding long stretches of unlit rural road on weekends.
Consider adding a reflector to your current lighting setup, checking the fit for your frame, and ordering before your next commute. Browse reflector options and pick the mount that matches your bike.
Sources
- Service-public — bike equipment rules
- FUB — Choosing your lighting
- ScienceDirect — increasing conspicuity with lighting and clothing
- Bicycling — best bike visibility gear


