

TL;DR:
- Choosing cycling eyewear depends on proper fit, lens type, and design features suited to your riding discipline. Fit is crucial, and measuring face width, bridge, and temple size ensures comfort and stability during rides. Lens categories, coatings, and frame style influence visibility, protection, and fog resistance across different riding conditions and terrains.
Cycling eyewear is defined as specialized protective glasses designed to shield your eyes from wind, debris, UV radiation, and glare while enhancing visual clarity on the bike. Knowing how to select cycling eyewear correctly means evaluating three core factors: fit, lens technology, and design features matched to your riding discipline. Get any one of these wrong and you will deal with fogging, slipping frames, or distorted vision at the worst possible moment. This guide covers sizing standards, Visible Light Transmission (VLT) categories, protective coatings, and frame design so you can make a confident, informed choice.
How to select cycling eyewear: getting the fit right
Fit is the single most important factor in cycling eyewear. A lens with perfect optics becomes useless if the frame slides down your nose on a climb or digs into your temples after 30 minutes.

Measuring your face for the right frame size
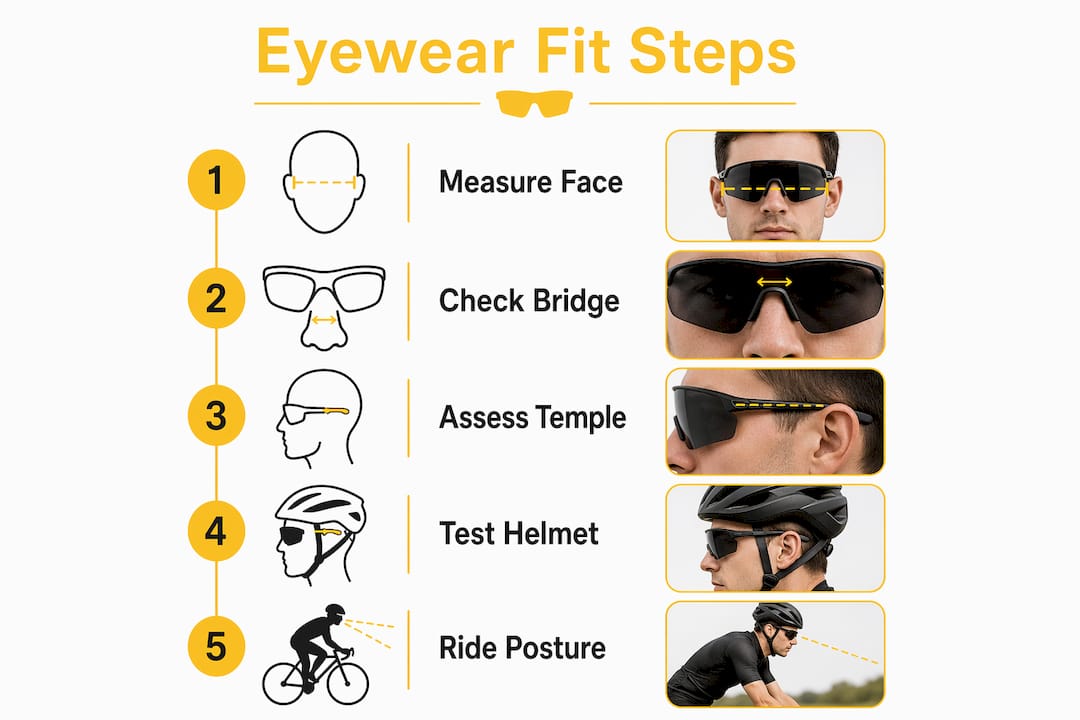
Face width categories break down into three sizes: under 13 cm for small frames, 13–14 cm for medium, and over 14 cm for large. Measure across your cheekbones with a soft tape measure to find your category. Lens width typically runs 60–75 mm, with wider lenses offering more coverage against wind and debris on longer rides. Choosing the wrong width leaves gaps at the sides where wind and road grit can enter directly.
Bridge width and nose pad adjustability
Bridge width determines how the frame sits across your nose. A bridge that is too narrow pushes the lenses away from your face, reducing coverage. A bridge that is too wide lets the frame slide forward. Adjustable nose pads and multiple temple size options let you fine-tune the fit for your specific face shape, which matters most on rides lasting two hours or more.
Temple length and helmet compatibility
Temple length affects both comfort and stability. Temples that are too long will bow outward under a helmet, creating pressure points. Helmet compatibility is non-negotiable: always test your glasses while wearing the helmet you actually ride in, not just while standing in front of a mirror. Slim temple arms generally fit better under most helmet retention systems.
| Fit Factor | Small Face (under 13 cm) | Medium Face (13–14 cm) | Large Face (over 14 cm) |
|---|---|---|---|
| Recommended lens width | 60–65 mm | 65–70 mm | 70–75 mm |
| Bridge width | Narrow (14–16 mm) | Standard (16–18 mm) | Wide (18–20 mm) |
| Temple length | 120–125 mm | 125–130 mm | 130–135 mm |
| Nose pad type | Fixed or narrow adjustable | Adjustable | Wide adjustable |
Pro Tip: Test your glasses in your actual riding posture, leaning forward over the bars. Frames that feel secure upright often slip forward in an aggressive position.
What lens types work best for different cycling conditions?
Lens choice determines what you see and how clearly you see it. The wrong lens in the wrong conditions reduces contrast, causes glare, or leaves you squinting into the sun.
Understanding VLT categories
Lens categories range from Cat 0 to Cat 4, based on how much visible light they transmit. Cat 0 transmits 80–100% of light and suits overcast or rainy rides. Cat 1 (43–80%) works for low sun angles and variable cloud cover. Cat 2 (18–43%) and Cat 3 (8–18%) are the standard choices for most cycling conditions in full sun. Cat 4 transmits only 3–8% of light and is reserved for extreme brightness like snow or high-altitude desert riding. Using a Cat 4 lens in a shaded forest trail is genuinely dangerous.
Photochromic and interchangeable lenses
Photochromic lenses automatically adjust tint in response to light intensity, making them the best single-lens solution for rides that move through tunnels, tree cover, and open roads. The ability to swap lenses is increasingly considered a must-have feature for cyclists who ride in changing conditions. Interchangeable systems let you carry a dark lens for noon sun and a clear or yellow lens for dawn and dusk, without buying two separate pairs.
Polarized and contrast-enhancing lenses
Polarized lenses cut horizontal glare from wet roads and reflective surfaces. They are excellent for road cyclists dealing with traffic and puddles but can make it harder to read LCD screens on bike computers. Contrast-enhancing lenses, often tinted amber or rose, sharpen terrain definition on gravel and mountain trails where reading the ground surface matters more than glare reduction.
- Sunny road rides: Cat 3 polarized lens
- Overcast or rainy rides: Cat 0 or Cat 1 clear/light tint
- Low-light morning or evening rides: Cat 1 yellow or amber lens
- Mixed terrain or variable light: Photochromic lens
- Mountain biking: Cat 2 contrast-enhancing amber or rose lens
Protective coatings that extend lens life
Hydrophobic coatings repel water and keep lenses clear in rain, while anti-scratch coatings preserve optical quality over time. Both treatments directly affect how long your lenses stay usable. Anti-fog coatings on the inner lens surface reduce condensation during hard efforts in cold weather.
Pro Tip: Clean lenses with a microfiber cloth only. Paper towels and shirt fabric scratch anti-reflective and hydrophobic coatings faster than road grit.
Key design features that affect comfort and performance
Frame design is where most cyclists make their second-biggest mistake, after fit. Choosing a frame purely for looks often means sacrificing ventilation, field of vision, or stability.
Wraparound designs and eye coverage
Wraparound, tall-lens designs prevent eye fatigue and stop tear duct watering caused by wind exposure, especially in aerodynamic riding positions. The taller the lens, the more of your visual field stays protected when you tuck your chin. Road cyclists in particular benefit from this because their head angle exposes the lower eye area to direct airflow.
Ventilation and anti-fog performance
Ventilation around the brow and frame reduces fogging and improves comfort during humid or high-intensity rides. Frames with open brow channels allow warm air from your face to escape upward rather than condensing on the lens. This matters most on climbs, where your breathing rate spikes and ambient temperature drops.
Frame styles compared
Full-frame designs offer the most structural protection and lens stability. Half-frame designs reduce weight and improve airflow but sacrifice some debris protection at the lower edge. Frameless or rimless designs give the widest unobstructed field of vision and the lowest weight, but lenses are more vulnerable to impact damage. For urban cycling safety, full-frame or wraparound designs are the most practical choice given mixed traffic and unpredictable debris.
Here is a breakdown by cycling discipline:
- Road cycling: Lightweight wraparound frame, Cat 3 or photochromic lens, slim temples for helmet fit
- Gravel riding: Full-frame with interchangeable lenses, contrast-enhancing tint, anti-scratch coating
- Mountain biking: Full-frame or goggle-style, Cat 2 amber lens, non-slip grip on temples and nose
- Urban commuting: Lightweight half-frame or full-frame, Cat 1–2 lens, anti-fog coating
- E-bike riding: Wraparound with photochromic lens for speed-induced wind exposure
How to choose bike glasses step by step
Selecting the right pair becomes straightforward when you follow a structured process rather than buying based on appearance alone.
- Identify your primary discipline. Road cyclists prioritize aerodynamics and lightness, while mountain bikers need ruggedness and contrast. Urban riders need versatility and anti-fog performance. Start here before looking at any specific product.
- Assess your typical light conditions. Ride mostly in full sun? Cat 3 is your baseline. Ride at dawn, dusk, or in variable weather? Photochromic or interchangeable lenses are worth the extra cost.
- Measure your face width. Use a tape measure across your cheekbones. Match the result to the small, medium, or large frame category before trying anything on.
- Test fit in riding posture. Put on your helmet, lean forward, and shake your head. The frame should not move. Check for pressure points at the temples and nose bridge.
- Check lens coating options. Confirm the lens includes at minimum an anti-scratch coating. Hydrophobic coating is worth prioritizing if you ride in wet climates.
- Verify helmet compatibility. Slide the temple arms under your helmet straps. Slim, flexible temples work best with most modern helmet retention systems.
- Avoid these common mistakes. Do not choose a frame based on color alone. Do not skip ventilation features because you ride in cold weather. Cold air still causes fogging on hard efforts. Do not buy a fixed Cat 3 lens if more than 20% of your rides happen in low light.
The cycling safety gear landscape in 2026 increasingly treats eyewear as a performance tool, not an accessory. Treating it the same way will improve both your comfort and your safety on every ride.
Key Takeaways
Selecting cycling eyewear correctly requires matching fit, lens category, and frame design to your specific riding discipline and conditions.
| Point | Details |
|---|---|
| Fit comes first | Measure face width and test in riding posture with your helmet on before buying. |
| Match VLT to conditions | Use Cat 0–1 for low light, Cat 2–3 for standard sun, and photochromic for variable rides. |
| Prioritize lens versatility | Interchangeable or photochromic lenses outperform fixed tints for most cyclists. |
| Frame design affects performance | Wraparound designs reduce wind fatigue; ventilated frames prevent fogging on climbs. |
| Discipline drives the decision | Road, mountain, and urban cycling each require different frame styles and lens priorities. |
Why fit beats everything else in cycling eyewear
Cyclists tend to obsess over lens tint and brand aesthetics, but the feature that actually determines whether you wear a pair of glasses for three years or abandon them after two rides is fit. I have seen riders spend serious money on technically excellent lenses and then stop using the glasses entirely because the frame slid forward every time they looked down at their stem.
The part of this process that most guides underplay is testing in your actual riding position. Standing upright in a shop tells you almost nothing. The moment you drop into an aggressive road position or start bobbing on a mountain trail, a frame that felt secure becomes a distraction. Glasses that slip even slightly force you to push them up repeatedly, which breaks your focus and your grip on the bars.
My other strong opinion: photochromic lenses are worth every extra dollar for anyone who rides more than three days a week. The convenience of not swapping lenses mid-ride, especially when the weather shifts unexpectedly, is something you only fully appreciate after you have been caught with a Cat 3 lens in a sudden overcast. Versatility in a single lens is not a luxury feature. For most cyclists, it is the practical choice.
Ventilation is the other underrated factor. Cyclists who ride hard in cool weather often assume fogging is not their problem. It is. The temperature differential between your face and the lens surface creates condensation regardless of ambient temperature. A frame with a proper brow vent solves this without requiring any extra effort from you.
— Sophie
Thebeamofficial: complete your cycling safety setup
Eyewear protects your vision. A well-fitted helmet protects everything else. Thebeamofficial designs high-end cycling helmets and safety accessories built for road, gravel, urban, and e-bike riders who take protection seriously without sacrificing style.

The VIRGO integral helmet with MIPS technology pairs naturally with the wraparound eyewear profile described in this guide, with a retention system designed to accommodate slim temple arms without pressure points. Thebeamofficial also offers rear-view mirrors, high-visibility reflectors, and connected safety accessories that work alongside your eyewear to improve your presence on the road. Browse the full helmets collection to find the right protection for your discipline and riding style.
FAQ
What is the correct face measurement for cycling eyewear sizing?
Face width under 13 cm fits small frames, 13–14 cm fits medium, and over 14 cm fits large frames. Measure across your cheekbones with a soft tape for the most accurate result.
Which lens category is best for everyday cycling?
Cat 2 and Cat 3 lenses are the standard for most cycling conditions in full sun. Cat 1 or photochromic lenses work better for variable light or early morning and evening rides.
How do I know if my cycling glasses fit correctly?
The frame should not move when you shake your head in your riding posture while wearing your helmet. There should be no pressure points at the nose bridge or temples after 20 minutes of wear.
Are polarized lenses good for cycling?
Polarized lenses reduce glare from wet roads and reflective surfaces, making them useful for road cyclists. They can make LCD bike computer screens harder to read, so test compatibility with your display before committing.
What does hydrophobic coating do on cycling lenses?
A hydrophobic coating repels water from the lens surface, keeping your vision clear in rain. It also makes the lens easier to clean and extends the optical quality of the lens over time.


