
TL;DR:
- Using a rear-view mirror enhances cyclist safety by providing better rear visibility in various riding conditions. Proper installation and alignment, tailored to your handlebar type and riding style, are essential for effectiveness. Regular maintenance and adjustment ensure the mirror remains reliable and helps prevent dangerous blind spots during rides.
Most cyclists only realize how much they needed a rear-view mirror the moment they nearly get clipped from behind. Without one, your only option is to look over your shoulder and hope your steering stays straight. This bicycle rear-view mirror setup guide walks you through every step, from choosing the right mirror type and gathering your tools, to installing, aligning, and maintaining it properly. Whether you ride urban streets, gravel roads, or long weekend routes, a properly mounted mirror changes how safe and confident you feel on the bike.
Table of Contents
- Key takeaways
- What you need before installing bicycle rear-view mirrors
- Step-by-step installation for handlebar and bar-end mirrors
- Adjusting the mirror for maximum rear visibility
- Troubleshooting and maintaining your bike mirror
- What I have learned after years of riding with mirrors
- Mirrors worth your ride from Thebeamofficial
- FAQ
Key takeaways
| Point | Details |
|---|---|
| Choose the right mirror type | Match your mirror style to your riding position before buying to avoid compatibility issues. |
| Check handlebar diameter first | Standard bars range from 22.2mm to 35mm; confirm sizing before installation to get a secure fit. |
| Set mirror angle from riding position | Sit naturally on the bike before adjusting to reflect your actual sightline on the road. |
| Shoulder should cover 20 to 25% | Too much shoulder in the mirror means you are missing the lane behind you. |
| Inspect before every ride | A loose mirror after a rough ride can shift without warning and leave you with a blind spot. |
What you need before installing bicycle rear-view mirrors
Getting the setup right starts well before you pick up a screwdriver. The type of mirror you choose, the tools you have, and whether your handlebar is compatible all determine how well this goes.
Mirror types and which suits your riding style
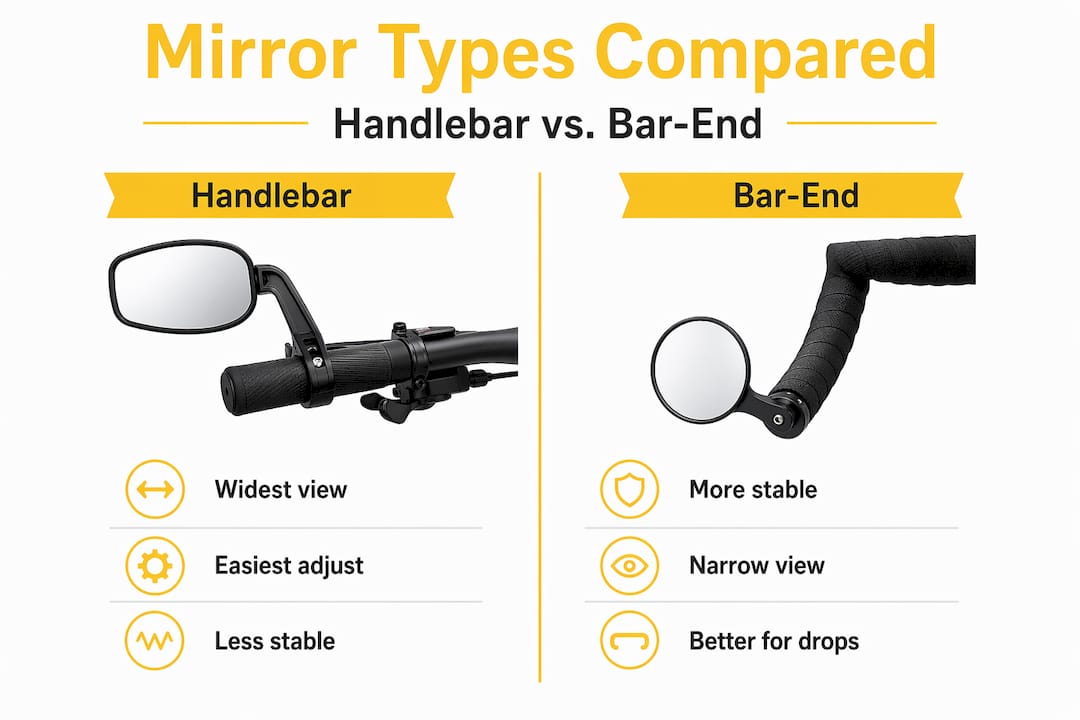
There are three main mirror categories. Handlebar-mounted mirrors clamp onto the outside of your bar and offer the widest field of view. They are ideal for commuters and urban riders who need maximum awareness. Bar-end mirrors sit inside the end of your handlebar and look cleaner. They are popular with road cyclists because they do not interfere with an aggressive riding position. Helmet-mounted mirrors attach to your helmet or glasses and move with your head, which some riders find more intuitive but others find distracting.
According to cycling safety experts, handlebar mirrors suit commuters best, while bar-end mirrors offer more stability and discretion for aggressive riding positions.

Checking handlebar compatibility
This is the step most people skip, and it causes most installation problems. Standard handlebar diameters run from 22.2mm to 35mm depending on bike type, and bar-end internal diameters typically fall between 17mm and 21mm. Check your handlebar specs before purchasing a mirror. Most product listings include a compatibility range.
Tools you will need
| Tool | Purpose | Notes |
|---|---|---|
| Allen keys (2mm to 8mm) | Tightening clamp or mount bolts | Hex keys in these sizes cover the vast majority of mirror bolts |
| Torque wrench | Precise tightening on alloy or carbon bars | Optional but strongly recommended |
| Flathead screwdriver | Adjusting certain clamp types | Depends on mirror brand |
| Anti-slip tape or pads | Preventing rotation on smooth bars | Especially useful on carbon fiber |
| Clean rag and isopropyl alcohol | Cleaning the mounting area | Removes grease and grime before installation |
Pro Tip: If your bike has carbon fiber handlebars, do not skip the torque wrench. Carbon strips and cracks under uneven pressure faster than alloy, and there is no warning before it fails.
Step-by-step installation for handlebar and bar-end mirrors
Once your tools are ready and compatibility is confirmed, the actual installation process is straightforward. The sequence matters more than the effort.
Installing a handlebar-mounted mirror
- Choose your side. In countries with right-hand traffic, mount the mirror on the left side of the bar. This gives you a view of vehicles approaching from behind in the lane nearest to you. If you ride in a left-hand traffic country, reverse this.
- Clean the mounting area. Wipe the handlebar section with isopropyl alcohol where the clamp will sit. This removes any lubricant or road film that could let the clamp rotate.
- Slide the clamp into position. Position the clamp around 2 to 3 centimeters from the grip or brake lever. You want the mirror visible without blocking any controls.
- Hand-tighten the bolt first. Get the clamp snug by hand before reaching for a tool. This lets you check the mirror orientation before committing.
- Align the mirror arm. Point the arm roughly toward the rear of the bike, then tighten the clamp bolt with your Allen key. Snug is enough at this stage.
- Test with gentle pressure. Push the mirror in multiple directions. If the clamp shifts, tighten slightly more. If it holds, you are ready to move on to alignment.
Installing a bar-end mirror
- Remove the bar-end plug. Bar-end plugs often need removing before the mirror can be inserted. Use a flathead screwdriver to pry it free.
- Clean the inside of the bar. Run a clean rag inside the bar end to remove debris that could prevent a solid fit.
- Insert the mirror stem. Slide the mirror’s expanding plug into the bar end, making sure it sits flush.
- Expand and tighten. Turn the bolt to expand the internal anchor against the inside of the bar. Stop when the mirror is firm and does not rotate under moderate hand pressure.
Comparison: handlebar-mounted vs. bar-end mirrors
| Feature | Handlebar-mounted | Bar-end |
|---|---|---|
| Field of view | Wider | Narrower but adjustable |
| Installation complexity | Low | Low to medium |
| Vibration stability | Moderate | High |
| Visibility on aggressive positions | Limited | Better |
| Best for | Commuters, urban riders | Road cyclists, gravel riders |
Pro Tip: Never over-tighten a handlebar clamp. Over-tightening can strip threads or crack carbon fiber bars. Tight enough to resist rotation under pressure is the right target.
Adjusting the mirror for maximum rear visibility
Installing the mirror is only half the job. A poorly aimed mirror is almost as useless as no mirror at all. Proper alignment takes about two minutes and makes a significant difference in what you can actually see.
How to set your mirror angle correctly
The most common mistake is adjusting mirrors while standing next to the bike. Adjustment is most accurate when you sit in your natural riding posture, hands on the bars, feet on the pedals. Your body position changes what you can see in the mirror, so standing adjustments rarely carry over.
Once you are seated:
- Aim the mirror so the road behind you is centered in the view.
- Adjust until your shoulder occupies no more than 20 to 25% of the inner field of the mirror. More shoulder than that means you are missing the lane.
- Tilt the mirror slightly outward. This expands coverage to the adjacent lane and reduces the blind zone directly behind your wheel.
- The ideal view shows a clear lane behind you, a sliver of your shoulder on the inner edge, and roughly one full lane to the outside.
Mirrors that point too far inward show mostly your elbow and shoulder. Mirrors angled too far inward drastically reduce how much of the lane you can monitor. Always favor slightly outward.
Adjustment differences by mirror type
Handlebar mirrors typically use a ball-and-socket joint or a pivot screw for angle adjustment. Bar-end mirrors adjust at the stem joint. Helmet-mounted mirrors are the most flexible since the whole mirror moves with your head, but they require you to consciously look at the correct angle rather than glancing naturally downward.
Learning how to use rear bike mirrors effectively also means understanding that mirrors do not replace shoulder checks. Use them together.
Pro Tip: After any ride with rough roads or trail descents, sit on the bike and re-check your mirror angle before your next ride. Vibration shifts mirror positions gradually without you noticing.
Troubleshooting and maintaining your bike mirror
Even a well-installed mirror develops issues over time. Knowing what to look for keeps your rear visibility consistent.
Common problems and how to fix them
- Mirror wobble. The most frequent issue. Usually caused by a loose clamp bolt or a bar diameter mismatch. Re-tighten the bolt with an Allen key. If wobble persists, check whether you have the right clamp size for your bar. An undersized clamp will never hold firm regardless of how tight you make it.
- Vibration blur. The image in the mirror shakes too much to be useful at speed. Rigid expanding mounts significantly reduce distortion compared to adjustable arm designs. If your mirror uses a long flexible stem, consider switching to a stiffer model.
- Mirror rotating over time. This means the mounting surface is too smooth for the clamp to grip. Clean the bar thoroughly and add anti-slip tape under the clamp. This solves the problem in nearly every case.
- Dirty or fogged mirror. A weekly wipe with a microfiber cloth and a mild glass cleaner keeps the mirror surface clear. Avoid abrasive materials that scratch the reflective coating.
Staying on top of maintenance
Routine pre-ride checks should include a quick push on the mirror to confirm it holds firm. After rides on rough roads, check both the clamp tightness and the mirror angle. Set a reminder every few weeks to inspect the mounting bolts more carefully.
One often overlooked detail: there are no federal U.S. regulations requiring bicycle mirrors, but some states and municipalities have specific rules about what mirror equipment is permitted or required. If you are riding in a new region, a quick check of local cycling laws is worth your time.
Pro Tip: Check mirror stability before every single ride. A mirror that shifted overnight on your garage floor looks fine until you need it at 40 km/h on a descending road.
What I have learned after years of riding with mirrors
What surprises me most is how many experienced cyclists still treat mirrors as optional. I spent years riding without one, convinced that shoulder checks were enough. They are not. Not on fast descents, not in heavy urban traffic, not when you are already managing a technical section of road.
The first time I set up a bar-end mirror correctly, what struck me was not how much I could see. It was how much I had been missing. A car sitting in my blind zone for 30 seconds while I was focused on the road ahead. A cyclist drafting behind me that I had no awareness of.
The biggest mistake I see in step by step bike mirror setup is people adjusting mirrors while standing over the bike. You get one view standing, a completely different one riding. Always adjust from the saddle.
The second mistake is treating the mirror as a replacement for shoulder checks. It is not. Mirrors compress and distort distance. A quick shoulder check confirms what the mirror suggests. Used together, they give you situational awareness that neither provides alone.
If you are new to riding with a mirror, give it three rides before deciding it works or does not. The first ride it feels like something extra to manage. By the third, glancing at it becomes as natural as checking your speed.
— Sophie
Mirrors worth your ride from Thebeamofficial

Thebeamofficial designs rear-view mirrors specifically for cyclists who take road safety seriously, not as an afterthought. The CORKY rearview cycling mirror is built for a wide range of handlebar sizes, resists vibration at speed, and installs in minutes without specialist tools. It is the kind of mirror that stays where you put it and shows you what you need to see. Explore the full lineup at the Thebeamofficial cycling accessories page and find the right fit for your riding style, whether you commute daily or push long-distance routes on the weekend.
FAQ
What is the best mirror position on a bicycle?
Mount the mirror on the left side of the handlebar for right-hand traffic countries. Position the clamp close to the grip and aim the mirror so the road behind you is centered with your shoulder covering no more than 20 to 25% of the view.
How do I stop my bike mirror from wobbling?
Tighten the clamp bolt with an Allen key and check that your clamp matches your handlebar diameter. If the wobble continues, add anti-slip tape under the clamp or switch to a mirror with an expanding internal mount for a more stable fit.
Do I need to remove bar-end plugs before installing a bar-end mirror?
Yes. Bar-end plugs need to come out before you can insert a bar-end mirror. Use a flathead screwdriver to remove the plug, clean the inside of the bar, then insert and tighten the mirror’s expanding anchor bolt.
How often should I adjust my bicycle mirror?
Check the mirror angle before every ride and re-adjust after rides on rough terrain. Vibration from uneven surfaces gradually shifts the mirror position, so a quick check takes seconds and keeps your rear view accurate.
Are bicycle mirrors required by law in the U.S.?
There are no federal regulations in the U.S. mandating bicycle mirrors, but individual states and cities may have their own rules. Always check local cycling laws if you are riding in an unfamiliar area.


