

For most city commutes, run a front light between 100 and 200 lumens and a rear light between 20 and 50 lumens, with a daytime flash mode for extra visibility in traffic. On darker or unlit stretches, push the front closer to 400 to 600 lumens. What matters more than the number on the box is whether the beam actually lights the road ahead without blinding drivers coming toward you.
TL;DR:
- Most city riders only need front lights between 100 and 200 lumens for well-lit streets and up to 600 lumens for dark or unlit stretches.
- Lux measurements at 10 meters offer a more accurate indication of effective illumination than lumen ratings alone, especially with focused beam optics.
- A well-aimed, focused beam maximizes usable light on the road, reducing glare into oncoming drivers’ eyes and improving safety.
- Redundant lighting, such as a backup rear light or helmet-mounted option, significantly lowers the risk of riding in darkness if a primary light fails.
- For regulatory compliance, a front white light and rear red light are mandatory, but aiming for 30 lux at 10 meters provides a safer visibility standard.
Table of Contents
- Lumens Vélo Ville: Quick Scenarios and Recommended Targets
- Lumen vs. Lux: Why the Number on the Box Lies to You
- How to Choose a City Bike Light That Actually Works
- Reading Beam Diagrams: Hotspot, Flood, and Mixed Optics
- What French Law and Visibility Standards Actually Require
- Building a Commute Setup That Won’t Let You Down
- Battery Life, Maintenance, and When to Replace Your Light
- What The Beam’s Field Testing Says About Real Urban Riding
- Author Sophie: Balancing Brightness, Comfort, and Design
- Find Lighting Built for These Exact Numbers
- Sources
- FAQ
Lumens Vélo Ville: Quick Scenarios and Recommended Targets
The right lumen count for city riding depends entirely on how much ambient light already surrounds you. A well-lit boulevard with streetlamps every 30 meters needs far less punch than a canal path with no lighting at all. Industry guidance built around scenario testing gives you a solid starting point, and it maps closely to what French urban cyclists actually need for lumens vélo ville decisions.
- Well-lit city streets (being seen): around 50 lm front, 10 lm rear
- Partially lit urban roads: around 100 lm front, 20 lm rear
- Dark city stretches or unlit paths: 400 to 600+ lm front, 100+ lm rear
These figures come from scenario-based recommendations distinguishing “being seen” from “seeing,” a distinction detailed by ROUVY’s bike lighting guide.
| Urban condition | Front light (lm) | Rear light (lm) | Primary goal |
|---|---|---|---|
| Well-lit streets | ~50 | ~10 | Being seen |
| Partially lit roads | ~100 | ~20 | Being seen + basic path visibility |
| Dark or unlit stretches | 400–600+ | 100+ | Seeing obstacles |
The French cycling federation, the FUB, translates this into a lux target rather than a raw lumen figure: at least 30 lux measured at 10 meters for basic safety. That standard usually corresponds to lights in the 25 to 150 lumen range for rear visibility, depending on the beam’s focus. A steady low mode works fine when your job is simply to be noticed. Once you need to spot potholes, curbs, or a parked car door swinging open, switch to a higher, more focused output.
Lumen vs. Lux: Why the Number on the Box Lies to You
Lumen measures total light output from the bulb in every direction. Lux measures how much of that light actually lands on a surface at a given distance. A 1,000 lumen light with scattered, unfocused optics can put less usable light on the road 10 meters ahead than a well-focused 300 lumen unit.
That gap is why bike-components’ lighting guide treats lux as the more honest number for judging how well a road is actually lit. Lumens tell you what the bulb produces. Lux tells you what your eyes get.
- Lumens = total light emitted by the source
- Lux = light that actually reaches a specific surface at a specific distance
- Beam shape (hotspot vs. spread) determines how lumens convert into usable lux on the road
A 300 lumen light with good optics can outperform a 600 lumen unit with poor focus in real city conditions, since a tight, well-aimed beam concentrates its output exactly where you need it.
Pro Tip: Before buying, look for a beam diagram or a stated lux value at 10 meters on the product page. If a listing only shouts a lumen number with no beam photo or distance chart, treat that as a red flag, not a selling point.
How to Choose a City Bike Light That Actually Works
Picking the right setup starts with one honest question: are you mostly trying to be seen, or do you need to see the road? Most commuters need both, just in different proportions depending on the route.
- Decide your primary need. If your commute runs through lit streets with intersections and traffic, being seen matters more than raw brightness. If you cross unlit parks or canal paths, you need a light that actually illuminates the ground.
- Choose one multi-mode light or two dedicated lights. A single light with several output levels covers most commutes. Riders who mix well-lit and dark segments often do better with two lights: a low steady mode for traffic and a higher punch mode for the dark stretch.
- Check runtime at the lumen level you’ll actually use, not the marketing headline. A light rated for 10 hours often means 10 hours on its lowest, dimmest setting, not at 400 lumens.
- Confirm the charging method and battery type. USB-C rechargeable units are now standard, but replaceable battery packs matter if you ride long distances without reliable charging access.
- Check mounting and IP rating. Handlebar mounts give you a fixed beam angle that’s easy to aim correctly. Helmet-mounted lights follow your head movement, useful for scanning intersections but harder to aim consistently. Look for an IP54 rating or better if you ride in rain.
Weight rarely matters for a commute under 15 kilometers, so don’t let a few extra grams talk you out of a light with better optics and longer runtime.
Pro Tip: If you commute the same route daily, mount your main light once and leave it aimed correctly. Constantly readjusting a helmet light after every ride is how riders end up blinding oncoming drivers by accident.
Reading Beam Diagrams: Hotspot, Flood, and Mixed Optics
Beam shape falls into three broad categories, and each suits a different kind of city riding. A hotspot beam throws a concentrated, focused pool of light straight ahead, good for spotting obstacles at distance on faster rides or unlit paths. A flood beam spreads light wider and closer, useful for slow riding through crowded pedestrian zones where peripheral awareness matters more than throw distance. Most modern city lights blend the two into a mixed beam, a bright center with a softer spread around it.
- Hotspot beams: best for faster riding, longer sightlines, unlit or semi-lit roads
- Flood beams: best for slow-speed riding in pedestrian-heavy zones
- Mixed beams: the most versatile choice for typical mixed-traffic commutes
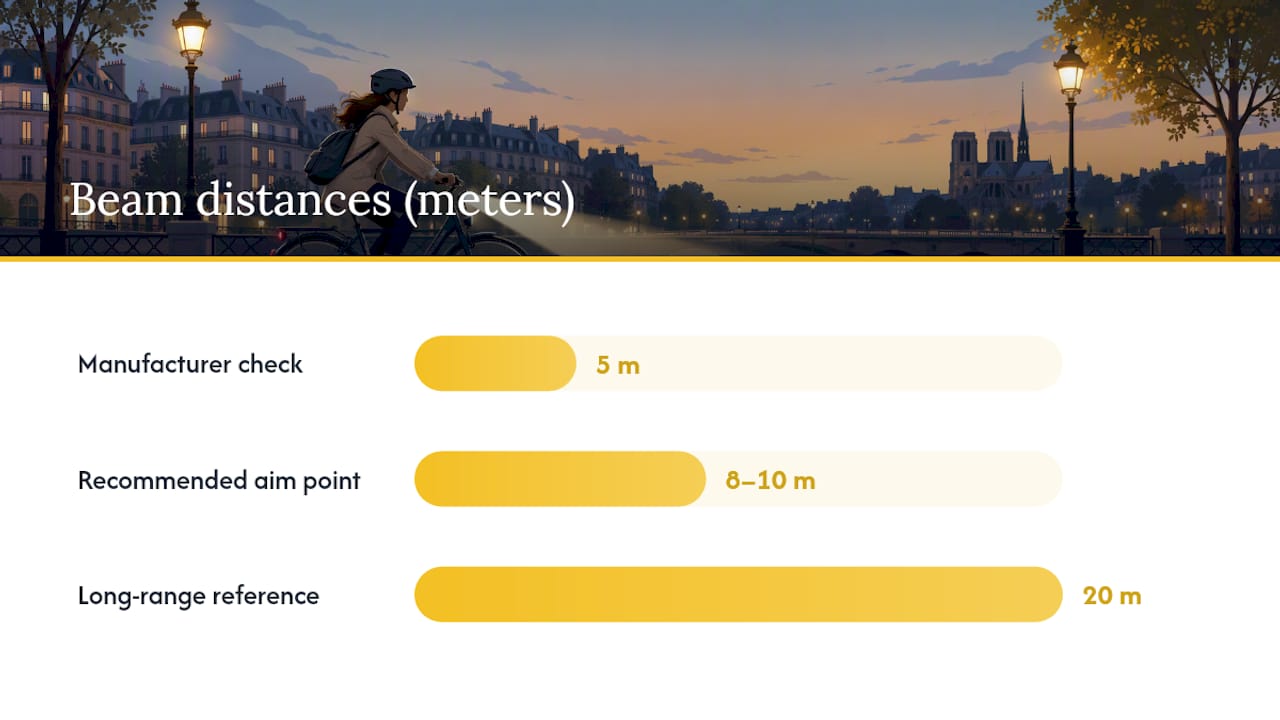
Manufacturer beam diagrams usually show light intensity at set distances, often 5, 10, and 20 meters. A genuinely usable urban beam should show meaningful lux values out to at least 10 meters, per bike-components’ technical breakdown, without a harsh cutoff that leaves a dark gap right in front of your wheel.
Aiming matters as much as the beam shape itself. A light aimed too high throws glare directly into oncoming drivers’ eyes, which is both dangerous for them and a common source of road tension between cyclists and cars. A beam with a sharp near-field cutoff reduces glare for oncoming traffic while still giving the rider a clear path, and that cutoff quality is often a better selection criterion than raw lumen count. Aim your front light so the brightest point of the beam hits the road roughly 8 to 10 meters ahead, not the eye level of the person walking toward you.
What French Law and Visibility Standards Actually Require
French regulations require a white front lamp and a red rear lamp visible at night and in poor daytime visibility. That’s the legal floor, not a safety target, and running exactly the legal minimum on a busy avenue is a bad idea.
- Legal minimum: front white light, rear red light, both functioning after dark
- FUB safety guidance: aim for at least 30 lux at 10 meters, which typically means 25 to 150 lumens for effective rear visibility depending on beam focus
- Daytime flashing is legal and effective for being seen in traffic, even in full sunlight
- Redundancy (two lights, or a light plus reflectors) reduces risk if one unit fails or a battery dies mid commute
That 30 lux benchmark comes directly from the FUB’s daytime lighting recommendations. It’s a more reliable target than chasing the highest lumen figure you can find on a listing. Reflective elements on your bike or bag work as a passive backup to any light, covered in more detail in The Beam’s guide to reflectors. During rush hour, when driver attention is split across pedestrians, buses, and other cyclists, adding a second flashing point of light, front or rear, meaningfully improves how quickly you get noticed.
Building a Commute Setup That Won’t Let You Down
A dependable urban setup usually looks the same regardless of your specific bike: one primary front light, one rear light, and a habit of checking both before you leave.
- Front: 100 to 200 lumens on the handlebar, steady for dark stretches, flashing or pulsing for daytime visibility in traffic.
- Rear: 20 to 50 lumens, flashing in most conditions, since flashing rear lights are consistently more noticeable to drivers than steady ones.
- Optional backup: a helmet-mounted light or a second clip-on rear light adds redundancy for longer commutes or high-traffic hours, a strategy worth adopting since flashing modes paired with a backup light reduce your odds of riding home dark if a battery dies.
- Switch modes by context: flashing during daylight and dusk, steady once it’s genuinely dark and you need to see the road surface clearly.
Before you clip in, run a 30-second check: battery level on both lights, mount tightness (a loose light that droops mid-ride is a common failure), beam aim, and a spare USB cable in your bag if you’re riding home after dark unexpectedly.
Pro Tip: Set a recurring phone reminder to charge your lights the night before a predictable long commute day. Dead batteries at 7 a.m. are almost always a charging habit problem, not a hardware problem.
Battery Life, Maintenance, and When to Replace Your Light
Runtime claims on the box rarely match real-world use at the lumen level you actually want. A light rated for 400 to 500 lumen output often lasts under two hours at that setting, while the same unit on an eco or flash mode can stretch to eight hours or more, a pattern confirmed across editor-tested lights reviewed by Bicycling. Always check the runtime figure at the specific lumen level you plan to use daily, not the headline number.
- Store lights partially charged if you won’t use them for weeks; full drain-to-zero storage degrades most lithium batteries faster
- Check waterproof seals and rubber charging port covers periodically, especially after riding in heavy rain
- Replace a light once charge cycles noticeably shorten runtime or a rear unit’s LEDs visibly dim
- Keep your receipt and check warranty terms before assuming a dead light needs full replacement
What The Beam’s Field Testing Says About Real Urban Riding
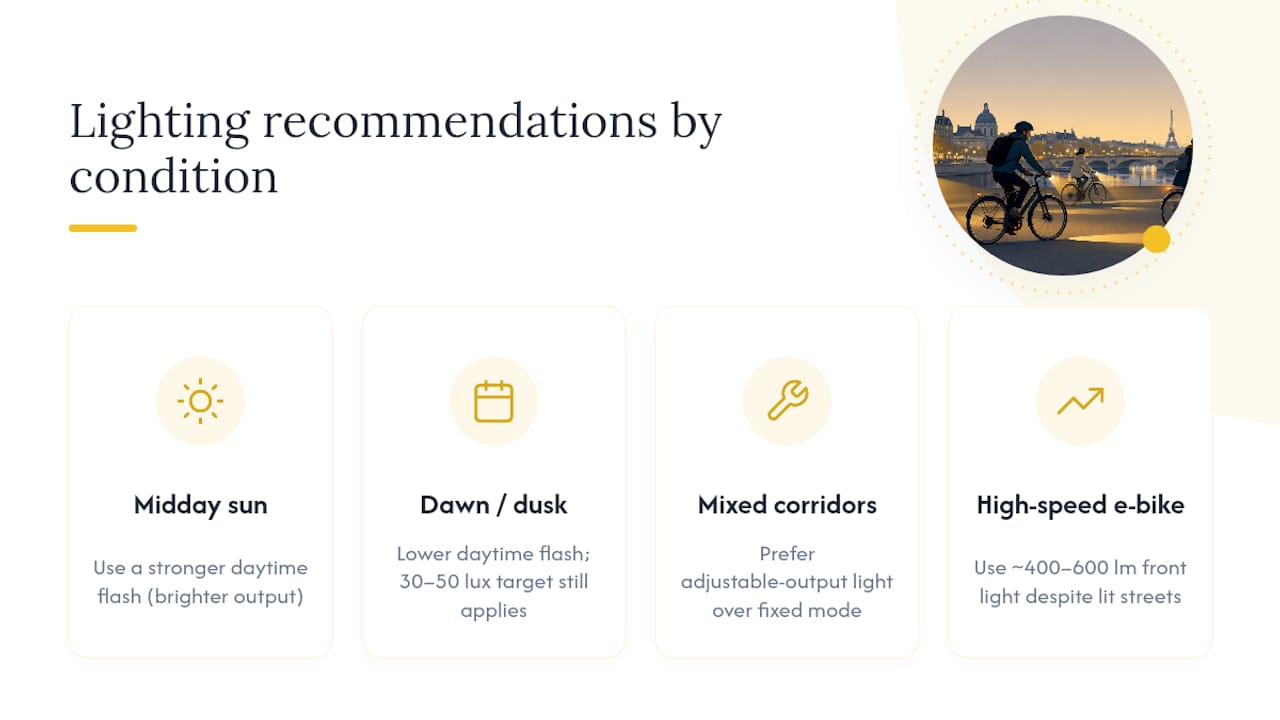
The Beam’s own field observations back the FUB’s 30 to 50 lux target as the practical sweet spot for most city commutes, a range detailed further in The Beam’s daytime lighting deep dive. Redundancy, running two lights instead of relying on one, comes up repeatedly as the single easiest fix for the most common failure mode: a light that dies mid-ride with no backup.
A few edge cases push riders outside the standard bands. Bright sunlight at midday demands a stronger daytime flash than dawn or dusk riding. Mixed lighting corridors, where streetlamps alternate with unlit stretches, favor a light with adjustable output over a fixed single mode. High-speed e-bike commutes need a front light closer to the 400 to 600 lumen range even on lit streets, since higher speed shortens your reaction window regardless of ambient light.
Author Sophie: Balancing Brightness, Comfort, and Design
My rule of thumb after looking at how city riders actually get hit or nearly hit: brightness fixes visibility problems, but only if the beam is aimed correctly and the light survives the ride. A 600 lumen light aimed at eye level is worse than a 150 lumen light aimed at the road.
The real trade-off isn’t brightness versus battery life, it’s brightness versus glare and weight versus reliability. A light bright enough to matter but light enough that you never skip mounting it wins over a heavier, more powerful unit gathering dust in a drawer. If you want visibility built into the bike itself rather than bolted on as an afterthought, look at integrated accessories designed for that balance.
— Sophie
Find Lighting Built for These Exact Numbers
Thebeamofficial designs its lighting and visibility accessories around the same lux and beam logic covered above, rather than chasing the biggest lumen number on the spec sheet. That distinction matters when you’re comparing a listing that only shouts “1,000 lumens” against one that actually shows a beam diagram and a lux value at distance.

When you’re shopping, look for the same signals this guide flags: USB-C charging, a stated waterproof rating, and a visible beam pattern rather than a bare lumen claim. The LUCIA front lighting collection and the CYCLYK rear lighting range are both built around the front and rear lumen bands covered in this guide, from well-lit city commutes up to darker unlit stretches. Riders wanting extra redundancy can pair either with the WHEEL FLASH and FRAME FLASH accessories for passive visibility that keeps working even if a battery runs low. Browse the current lineup and pick the setup that matches your actual commute, not just the biggest number on the box.
Sources
- Éclairage vélo : trop de lumière tue la lumière, et votre sécurité - Roulez
- Best lights for bikes: Top bike lights for safety & night riding | ROUVY
- Best Bike Lights for 2026: 13 Editor-Tested Picks
FAQ
Is 400 Lumens a Lot for a Bike Light?
Yes, for city riding. 400 lumens exceeds what most well-lit or partially lit urban roads require and sits closer to the range recommended for dark, unlit stretches or higher-speed e-bike commutes.
Are 2,000 Lumens Too Much for Urban Riding?
For nearly all city conditions, yes. Output that high risks throwing glare into oncoming drivers and pedestrians, and beam quality matters more than raw output once you’re above the 400 to 600 lumen range recommended for dark unlit paths.
Do 1,000 Lumens Light the Road Well?
Not necessarily. A 1,000 lumen light with poor optics can put less usable light on the road than a well-focused 300 lumen unit, since beam shape determines how much of that output actually reaches the surface ahead of you.
Is 800 Lumens a Lot for a City Commute?
It’s more than most urban scenarios call for. Very high lumens fit extreme edge cases like unlit rural connectors on an urban route, but for typical well-lit or partially lit streets, 50 to 200 lumens with a good beam pattern is usually enough.
What Rear Light Output Do I Actually Need?
Aim for 10 to 50 lumens depending on how lit your streets are, with a flashing mode rather than steady, since flashing rear lights draw more driver attention in traffic.


