
TL;DR:
- Proper bike mirror adjustment involves aligning mirrors from your actual riding posture to ensure clear rear views with minimal blind spots. Adjusting mirrors while sitting on the bike in your normal riding position prevents inaccurate angles caused by body position changes. Regularly checking and fine-tuning your mirrors during rides enhances safety and maintains optimal visibility.
Proper bike mirror adjustment is the process of angling your mirrors from your actual riding position so you see the road behind you clearly, with minimal blind spots and no need to turn your head. Knowing how to adjust bike mirrors correctly separates riders who feel confident in traffic from those who glance back and see nothing useful. The key technique is the Golden Triangle: your mirror should show a small sliver of your arm or shoulder, the lane directly behind you, and the adjacent lane beside you. Get that view right, and every ride becomes measurably safer.
How to adjust bike mirrors from your real riding position
Most cyclists make one critical mistake before they even start riding. They stand next to the bike, angle the mirror until it looks roughly right, then hop on and discover the view is completely wrong. Adjusting mirrors off-bike leads to inaccurate viewing angles during actual riding conditions. The reason is simple: when you sit down and lean forward into your riding posture, your eye height drops and your head tilts. The mirror that looked perfect while standing now points at the sky or at your elbow.

The fix is to always adjust from the saddle. Sit on the bike in your normal riding posture, hands on the grips, feet on the pedals. Only then should you reach over and move the mirror. Adjusting mirrors while sitting on the bike in your usual posture ensures the view aligns with actual sight lines while cycling. That single habit eliminates the most common source of poor mirror performance.
Body position also varies by bike type. A road cyclist leans aggressively forward. A commuter sits upright. An e-bike rider may shift posture depending on assist level and load. Each position creates a different eye height and head angle. Set your mirrors for the posture you actually use most, not the posture you happen to be in when you first unbox the mirror.
Pro Tip: If you ride in multiple positions, such as on the hoods and in the drops on a road bike, set your mirrors for the position you use most in traffic.
Here is what poor posture-based adjustment looks like in practice:
- Standing adjustment: mirror shows road behind you at standing eye height, roughly 5–6 inches higher than your seated position
- Seated adjustment without leaning: mirror shows a reasonable view, but still shifts when you lean into your normal grip
- Seated adjustment in full riding posture: mirror shows exactly what you will see at speed
The third option is the only one worth doing.
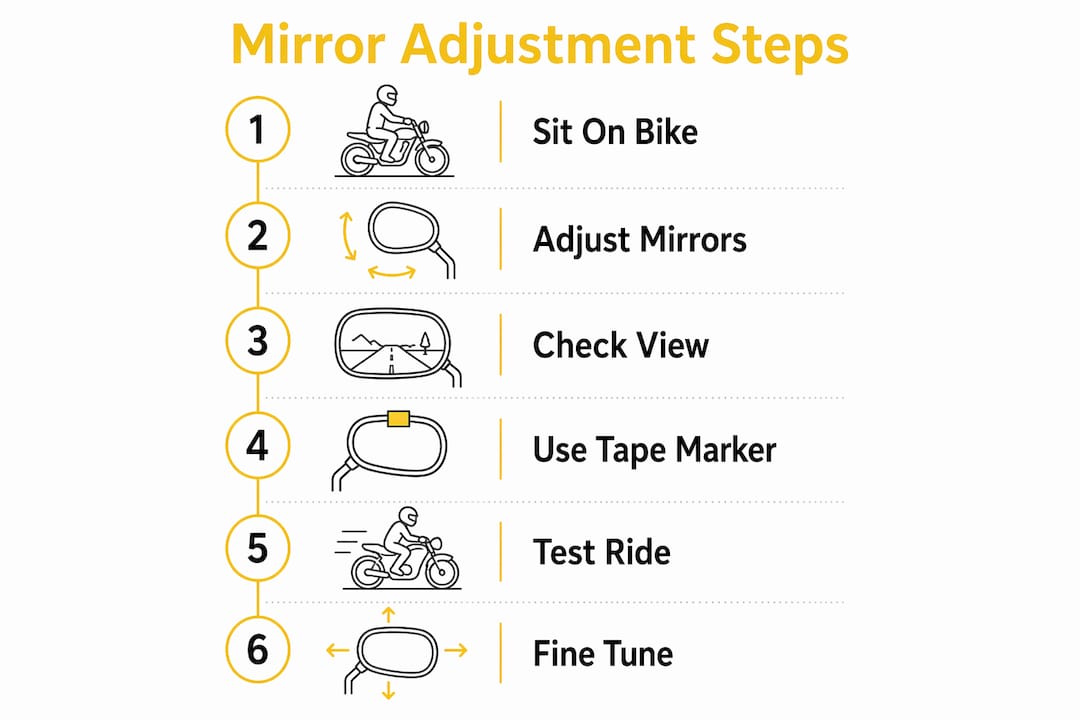
Step-by-step method for optimal mirror alignment
Follow this sequence every time you install or reinstall a mirror. Skipping steps creates compounding errors that are hard to diagnose later.
- Mount the mirror loosely. Attach the mirror to the handlebar end or bar clamp position, but leave the clamp loose enough to rotate the mirror by hand. For handlebar-end mirrors, thread them in but do not fully tighten yet.
- Sit in your full riding posture. Hands on grips, back at its normal angle, head in its natural forward position. Do not look at the mirror yet.
- Rotate the mirror to find the Golden Triangle. The Golden Triangle technique involves seeing a small sliver of your arm or shoulder, the lane directly behind you, and the adjacent lane in the mirror. That three-part view reduces blind spots and enables quick glances without head movement.
- Check the shoulder reference. A small part of the shoulder in the mirror frame is the target. Too much arm blocks the road view. Too little removes the spatial reference that helps you judge distances behind you.
- Confirm traffic-side placement. In the United States and other countries where traffic drives on the right, mirrors typically go on the left handlebar to watch passing cars. Right-side mirrors are optional but useful for monitoring the curb lane.
- Tighten the clamp firmly. Once the angle is set, tighten the mounting clamp fully. A loose clamp vibrates on rough pavement and shifts the mirror out of alignment within minutes.
- Verify the glance distance. You should be able to check the mirror with a brief eye movement, not a full head turn. If you have to move your head significantly, rotate the mirror slightly inward.
Pro Tip: Use a small piece of tape to mark the mirror stem position before your first test ride. If the mirror shifts, you can return it to the correct angle instantly.
The table below shows the three mirror zones and what each should display for a correctly adjusted setup.
| Mirror zone | What you should see | Why it matters |
|---|---|---|
| Inner edge | Small sliver of arm or shoulder | Provides spatial reference for distance judgment |
| Center | Lane directly behind you | Core rear visibility for traffic awareness |
| Outer edge | Adjacent lane to the left | Lets you spot overtaking vehicles early |
How to test and fine-tune your mirrors after adjustment
A mirror that looks correct while stationary can feel completely wrong once the bike is moving. Testing mirror angles with a slow ride in a quiet area is necessary to confirm stability and proper visibility in motion. Vibrations, body movement, and road texture all reveal adjustment flaws that are invisible at rest.
Run through this checklist on your first test ride:
- Check for vibration. Watch the mirror image at low speed on a slightly rough surface. If the image shakes so much that you cannot read traffic behind you, the mount is too loose or the mirror arm is too long.
- Assess arm and shoulder interference. Pedal through a full stroke and watch whether your arm or jacket sleeve moves into the mirror view. If it does, rotate the mirror slightly outward.
- Confirm the Golden Triangle holds. At riding speed, glance at the mirror. You should still see the shoulder sliver, the lane behind, and the adjacent lane. If the view has shifted, the clamp loosened during the ride.
- Test your glance time. Count how long your eyes leave the road to check the mirror. A well-adjusted mirror requires under one second. If you need longer to interpret what you see, the angle needs refinement.
- Make incremental changes. Adjust the mirror by small amounts, no more than a few degrees at a time. Large corrections overshoot the target and create a cycle of re-adjustment.
Pro Tip: Ride the same short loop twice: once to observe, once to adjust. Trying to adjust while riding is unsafe and produces imprecise results.
For more detail on mirror setup for safer rides, Thebeamofficial has a dedicated guide covering positioning for different bike types and riding styles.
Common mistakes when adjusting bicycle mirrors
Most mirror problems trace back to a short list of repeatable errors. Recognizing them saves time and prevents safety gaps.
- Adjusting while standing. This is the single most common error. The view shifts the moment you sit down. Always adjust from the saddle.
- Too much arm in the frame. Filling the mirror with your own body blocks the road view. The shoulder reference should be a sliver, not a dominant feature.
- Loose mounting clamps. Mounting mirrors too loosely causes vibration and view shifting after bumps. Tighten clamps fully after every adjustment.
- Wrong handlebar position. Placing the mirror too close to the brake lever or shifter creates interference with hand position. Mount the mirror at the outermost point of the handlebar where it does not conflict with controls.
- Mirror arm too long. A long arm amplifies vibration. Shorter arms with stiffer joints produce a steadier image, especially on gravel or rough urban roads.
- Ignoring riding posture changes. If you switch from a flat bar to drop bars, or add a handlebar bag that shifts your hand position, your mirror alignment needs to be reset from scratch.
The role of rear-view mirrors in cycling safety goes beyond convenience. A mirror that vibrates or shows the wrong view gives false confidence, which is more dangerous than no mirror at all.
Maintaining your bike mirrors for sustained visibility
Mirror maintenance takes less than five minutes and prevents the gradual degradation that makes mirrors useless over time.
- Clean the mirror surface regularly. Road grime, fingerprints, and water spots scatter light and reduce clarity. Wipe the mirror with a soft cloth before every ride in wet or dusty conditions.
- Check mounting clamps after long rides. Vibration from extended rides loosens clamps incrementally. Regular clamp checks and tightening prevent mirror movement and preserve the adjustment you set.
- Re-adjust after any bike setup change. New handlebars, a different saddle height, or a new riding position all change your eye height and posture. Treat any bike fit change as a trigger for a full mirror re-adjustment.
- Replace mirrors showing cracks or persistent vibration. A cracked mirror surface distorts the image. A mirror that vibrates despite tight clamps has a worn joint and needs replacement.
For cyclists who want to review the best bike mirrors before upgrading, Thebeamofficial’s guide covers options across handlebar-end, bar-clamp, and helmet-mounted styles.
Key takeaways
Correct bike mirror alignment requires adjusting from your seated riding posture, applying the Golden Triangle view, and confirming the setup with a real test ride before trusting it in traffic.
| Point | Details |
|---|---|
| Adjust from the saddle | Always set mirror angles while seated in your full riding posture, not while standing. |
| Use the Golden Triangle | Position mirrors to show a shoulder sliver, the lane behind, and the adjacent lane. |
| Test in motion | A slow ride in a quiet area reveals vibration and view shifts invisible at rest. |
| Tighten clamps fully | Loose mounts cause view drift after bumps; tighten after every adjustment session. |
| Maintain regularly | Clean surfaces and check clamps after long rides to preserve clarity and alignment. |
Why I stopped adjusting my mirrors at the curb
I spent two years adjusting my mirrors the wrong way. Every time I mounted a new mirror, I would stand next to the bike, angle it until the road looked roughly centered, and call it done. Then I would ride and wonder why the view felt off, why I kept seeing more of my own arm than the lane behind me.
The shift happened when I started treating mirror setup the same way I treat saddle height: something you dial in from the riding position, not from the ground. The moment I sat down, leaned into my normal posture, and adjusted the mirror from there, the Golden Triangle clicked into place. I could see the lane behind me, a sliver of my shoulder for reference, and the adjacent lane where cars pass. That view gave me something I had not had before: genuine situational awareness without turning my head.
The other habit that changed everything was the test ride. I used to skip it. Now I always do a short loop on a quiet street before taking a newly adjusted mirror into traffic. Twice, that test ride revealed a clamp that had not been tightened enough. The mirror had shifted by the second corner. Without the test, I would have ridden into a busy road with a mirror pointing at the ground.
Mirrors only work when they are set correctly and checked consistently. Build the adjustment and test ride into your pre-ride routine, and you will notice the difference within the first week.
— Sophie
Gear that works with your mirrors, not against them
A well-adjusted mirror is one part of a complete safety setup. The other part is a helmet that does not block your peripheral vision or interfere with your mirror glance angle.

Thebeamofficial designs cycling helmets with rear visibility in mind, including the VIRGO integral helmet with MIPS technology. The fit and profile of a helmet affects how freely you can glance at your mirrors without moving your whole head. Thebeamofficial’s full range of cycling accessories also includes rear-view mirrors and high-visibility reflectors built for road, gravel, urban, and e-bike riders. If your current setup is due for an upgrade, the full product range is available at thebeamofficial.com.
FAQ
Why does my mirror look wrong once I start riding?
A mirror adjusted while standing shifts out of alignment when you sit and lean into your riding posture. Always adjust from the saddle in your normal riding position.
What is the Golden Triangle in bike mirror adjustment?
The Golden Triangle is a positioning method where your mirror shows a small sliver of your arm or shoulder, the lane directly behind you, and the adjacent lane beside you. This three-part view reduces blind spots and allows quick glances without head movement.
How do I stop my bike mirror from vibrating?
Tighten the mounting clamp fully after every adjustment. If vibration persists, the mirror arm may be too long. A shorter, stiffer arm reduces movement on rough roads.
How often should I re-adjust my bike mirrors?
Re-adjust any time you change your bike fit, switch handlebars, or alter your riding posture. Also check alignment after long rides, since clamps can loosen gradually from road vibration.
Where should I place my mirror on the handlebar?
In the United States, mount the mirror on the left handlebar to monitor passing traffic. Position it at the outermost point of the bar, away from brake levers and shifters, to avoid interference with hand controls.


