
TL;DR:
- Effective urban cycling safety relies on a layered system of gear, behavior, and route planning.
- Properly aimed lights, passive reflectors showing biomotion, and smart positioning increase visibility.
- Combining active, passive, and behavioral strategies creates redundancy and maximizes commuter safety.
Essential bike commuter visibility guide: stay safer on urban roads
Every urban cyclist knows the feeling: a car door swings open, a driver cuts across your lane, or headlights flood your mirror from ten feet back. The margin between a routine commute and a serious crash is often just how visible you are. Functional front and rear lights alone reduce accident risk by roughly 17%, yet fewer than half of U.S. cyclists use them consistently compared to 74% in the Netherlands. This guide lays out every proven strategy, from gear and lighting to road positioning and habits, so you can stack every advantage in your favor.
Table of Contents
- Essential gear for maximized visibility
- Bike lights: choosing and using for best performance
- Reflectors and the power of biomotion
- Route choice, road positioning, and smart habits
- What most visibility guides get wrong: layered safety isn’t optional
- Upgrade your commute: gear for next-level visibility
- Frequently asked questions
Key Takeaways
| Point | Details |
|---|---|
| Layered visibility is vital | No single strategy is enough—combine lights, reflectors, apparel, and habits for true safety. |
| Light and reflector placement matters | Proper gear positioning—especially moving reflectors—makes a measurable difference in how soon drivers see you. |
| Route and positioning save lives | Smart navigation and lane choices work with your gear to prevent the most common commuter accidents. |
| Flash vs. steady modes | Use flashing lights to get noticed in the city, but switch to steady for better judgment at night or in rural areas. |
Essential gear for maximized visibility
Visibility gear is not a single product. It is a system, and the weakest link in that system is what puts you at risk. Before anything else, you need to understand what belongs in your setup and exactly when and where each item does its job.
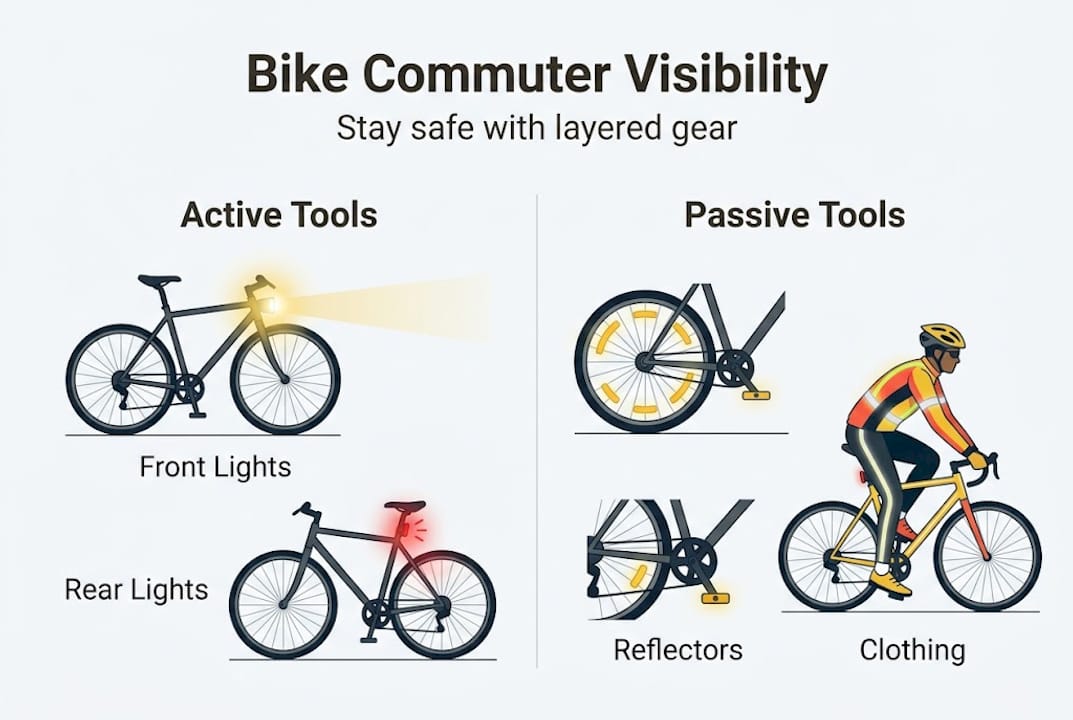
Lights are the foundation. Front lights for urban commuting should be at least 400 lumens, mounted on your handlebars and angled slightly downward to illuminate the road 10 to 15 meters ahead without blinding oncoming traffic. Rear lights need a minimum of 100 lumens, ideally in flashing mode, to catch the eye of drivers approaching from behind. Relying on a cheap 20-lumen blinky is not an option in modern city traffic.
Reflectors play a completely different role. Unlike lights, they require an external light source, which means they work best when street lights or vehicle headlights are already present. Placement matters enormously here, and we will cover it in depth in the section on biomotion below.
High-visibility clothing rounds out the core setup. Use lights day and night paired with fluorescent yellow or orange clothing for daytime rides, and switch to reflective outerwear after dark. Fluorescent tones absorb UV light and re-emit it as visible color, making you dramatically more conspicuous in overcast daylight when most commuters actually feel safest and let their guard down.
Here is a quick overview of the key tools and when they matter most:
| Gear item | Minimum spec | Best use scenario |
|---|---|---|
| Front white light | 400+ lumens | Dusk, night, tunnels, overcast days |
| Rear red light | 100+ lumens, flashing | All rides, especially high-traffic streets |
| Spoke or pedal reflectors | Standard EN or CPSC-rated | Low-light urban streets, parking areas |
| Fluorescent vest or jacket | Class 2+ high-vis | Daytime overcast, dawn, dusk |
| Reflective ankle bands | Wide-angle reflective tape | Night rides, wet weather, any low-light scenario |
| Helmet reflective tape | Self-adhesive, wide-angle | Night, tunnels, dark bike paths |
A few specific upgrades stand out for commuter cycling safety:
- Mount a rear light both on your seat post and on your helmet for two independent rear visibility points
- Add reflective tape to your panniers or rack bag since these are often at the exact eye level of car drivers
- Wear gloves with reflective patches so your hand signals actually register at night
- Choose shoes with a white or reflective heel panel if you ride regularly after dark
Pro Tip: Your helmet is one of the most visible parts of your body because it sits at the top of your profile. Adding reflective stickers or choosing a helmet with integrated rear lighting, like options available in the urban cycling helmet category, turns your head into a high-mounted rear visibility system that drivers see above parked car rooflines.
Bike lights: choosing and using for best performance
Gear gets you started, but your lights need to be set up correctly to deliver on their promise. A 1000-lumen light aimed at the sky or pointed directly at eye level is actually worse than a correctly aimed 400-lumen light. Here is how to get this right.
Comparing front and rear light features:
| Feature | Front light | Rear light |
|---|---|---|
| Minimum output | 400 lumens | 100 lumens |
| Recommended mode | Steady (night), flashing (day) | Flashing or pulse |
| Best mount position | Handlebars, centered | Seat post or helmet |
| Beam angle | Narrow forward, angled down | Wide-angle horizontal |
| Battery runtime target | 4+ hours on main mode | 6+ hours on flash mode |
Rear lights should be at least 100 lumens in flashing or pulse mode, and research consistently shows flashing patterns are more attention-grabbing than steady beams in urban settings. That said, flashing is better for daytime and urban attention while steady is better for nighttime distance and speed judgment. Both modes have a purpose, and most quality lights let you switch between them easily.
Step-by-step light installation:
- Mount the front light centered on your handlebars at the widest point for maximum stability.
- Angle the beam slightly downward so the brightest spot hits the road about 10 meters ahead, not the horizon.
- Mount the rear light on your seat post at a height above 40 cm from the ground, ensuring it is unobstructed by panniers or a seat bag.
- Test both lights at arm’s length before each ride: check that they are fully charged and securely clipped.
- Carry a compact backup light in your commuter bag. Even premium lights fail, and being caught without any rear light after dark is both illegal in most jurisdictions and genuinely dangerous.
For those who commute through urban environments at night, consider switching your front light to steady mode. In bright city streets, a flashing front light can actually be disorienting for pedestrians and other cyclists at close range, while a steady beam provides consistent road illumination for you.
Pro Tip: In rain or fog, reduce your front light output slightly and switch to a wider beam mode if your light supports it. Narrow high-intensity beams reflect off wet pavement and cause glare that works against you. A diffused, moderate output cuts through fog better and still shows drivers where you are.
Safety note: Over-illumination is a real issue. Pointing a 1000+ lumen light directly at drivers’ eye level on narrow paths or cycle lanes creates a blinding effect that can cause them to swerve into your path. Match your output to your environment. Powerful lights exist for dark rural roads, not city streets with functioning streetlights.
Reflectors and the power of biomotion
Lights are active tools. Reflectors are passive, but when placed correctly, they trigger something in the human visual system that lights alone cannot replicate. That something is called biomotion.
Biomotion refers to the way the human brain instinctively recognizes biological movement. When reflective elements are placed on body parts that move in a rhythmic, organic pattern, like ankles and knees pedaling, drivers’ brains process the moving light pattern as a person, not just a stationary obstacle. Reflective elements on moving parts like ankles, knees, and pedals create this biomotion effect, allowing drivers to recognize you from significantly greater distances than static reflections on your frame or bag.
The numbers back this up. Biomotion-based reflective ankle and pedal setups are detectable from over 500 feet away in low light, while a non-moving reflector on your frame might only be spotted at a fraction of that distance. For a driver traveling at 30 mph, 500 feet translates to roughly 11 seconds of reaction time. That difference saves lives.
Quick biomotion upgrades for commuters:
- Reflective ankle bands are the single easiest biomotion upgrade; they cost almost nothing and work immediately
- Pedal reflectors in yellow or clear come standard on many bikes but are often removed; put them back on
- Reflective knee warmers or cycling tights with reflective strips serve double duty in cold weather
- Spoke reflectors on both wheels create two constantly moving rings of light that are hard to miss
- Clip small reflective tags to your shoelaces or shoe heel for a moving focal point at the lowest visible height
For a full breakdown of how to choose reflectors for your commute, it is worth going beyond the basics and understanding width-angle ratings and retroreflective standards.
Pro Tip: Pair biomotion reflectors with a rear flashing light for layered passive and active rear visibility. The light catches attention at a distance, and the reflectors confirm your shape and motion as drivers get closer. This combination is far more effective than either tool alone. You can also explore reflective apparel designed for urban safety that integrates these principles directly into clothing.
Route choice, road positioning, and smart habits
Your gear creates the foundation. Your behavior on the road determines how well that gear actually protects you. Two cyclists with identical setups can face completely different risk levels based on where and how they ride.
Factors to weigh when choosing your bike route:
- Street lighting density: a well-lit arterial road is generally safer at night than a dark shortcut through a park path
- Posted speed limits: drivers on 25 mph streets have dramatically more reaction time than those on 45 mph roads
- Dedicated bike infrastructure: protected lanes remove the most dangerous conflict points between cyclists and turning vehicles
- Parking lane presence: avoid routes where you must ride within door-zone distance of parked cars without a buffer
- Traffic volume and peak timing: some routes are safe at 7 a.m. and hazardous at 5 p.m. when delivery trucks dominate
Prioritize lit routes and lower-speed roads, and take a stronger lane position at night to avoid gutter hazards like drain grates, broken glass, and debris that are invisible in the dark. Riding a full meter out from the curb at night is not aggressive behavior; it is the correct response to reduced visibility for both you and drivers.
Situational positioning steps:
- At intersections, move to the center of the lane to make yourself visible from multiple approach angles and prevent being cut off on a right turn.
- On multi-lane roads, ride in the rightmost travel lane rather than the shoulder when the shoulder is narrow, cracked, or debris-filled.
- In heavy traffic, maintain a steady, predictable line rather than weaving between gaps; erratic movement is harder for drivers to process.
- At night, adjust your speed downward on unlit paths so your stopping distance always stays within your light’s illumination range.
- On new routes, always scout them during daylight first to identify hazards you would miss after dark.
Expert guidance consistently reinforces that the most dangerous habit commuters develop is over-reliance on any single safety measure. Visibility gear is not a substitute for good urban cycling security habits, and those habits are not a substitute for gear.
Visibility gear does not replace road awareness. A perfectly lit cyclist who rides unpredictably at intersections is still at high risk. Combine your equipment with deliberate, consistent road behavior and you multiply the protection both provide.
Finally, build a quick pre-ride checklist into your commuter safety habits: lights charged, rear light activated, reflectors in place, high-vis layer on. Thirty seconds before every ride is far less time than recovering from a crash.
What most visibility guides get wrong: layered safety isn’t optional
Most visibility articles pick a lane. They either focus entirely on gear, listing lumens and reflector specs, or they focus entirely on behavior, talking about lane positioning and intersection awareness. Very few treat both as genuinely inseparable. That is the real problem.
In our experience working with urban cyclists across France, the U.S., and Germany, the riders who have close calls are almost never missing just one thing. They are missing the connection between things. A commuter with great lights who always rides in the gutter. A rider in a full high-vis vest who runs red lights and cuts unpredictably. Neither is actually safe.
A layered approach combining active lights, passive reflectors, bright clothing, and smart route choice is the only method that holds up across varied conditions, weather, and times of day. No single solution is enough. We have seen riders confidently rely on a single rear blinky through winter commutes in near-total darkness, and we have seen close calls that would have been prevented with two more minutes of setup.
The goal is redundancy, not perfection. Build a setup where if one element fails, two others still keep you visible. Explore what a full optimized visibility system looks like in practice, and revisit your setup every season as conditions change.
Upgrade your commute: gear for next-level visibility
You now have the knowledge. The next step is making sure your physical setup matches the strategies you have just learned.

At THE BEAM, we design high-end cycling safety gear specifically for commuters who take urban riding seriously. Our VIRGO integral helmet with MIPS technology offers superior impact protection combined with a profile built for city riding, and it pairs directly with our range of high-visibility reflectors and connected safety accessories. Whether you are looking for wide-angle reflectors to boost your biomotion setup or a helmet that works as a high-mounted rear visibility point, our full catalog is built around the layered safety principles covered in this guide. Browse the complete range at thebeamofficial.com and put every strategy into practice starting with your next ride.
Frequently asked questions
What is the minimum brightness for bike commuter lights?
Front commuter lights should be at least 400 lumens, mounted on the handlebars and angled downward, while rear lights should be at least 100 lumens to ensure you are visible in urban traffic conditions.
Is it better to use flashing or steady bike lights in the city?
Flashing lights are more effective for daytime urban attention, while steady beams are better at night when drivers need to accurately judge your speed and distance. Using the right mode for the right conditions maximizes your safety in each scenario.
How far away can drivers see reflective pedals or ankle bands?
Biomotion reflective elements like pedals and ankle bands are detectable by drivers from over 500 feet away in low light, giving motorists more than 10 seconds of reaction time at typical urban speeds.
Does layering multiple visibility tools actually keep me safer?
Yes. Combining active lights, passive reflectors, bright apparel, and smart routing creates redundancy so that if any single element is compromised, others continue to protect you across varied urban conditions.
What else improves bike commuter safety besides visibility?
Prioritizing lit, lower-speed routes and taking a stronger lane position at night significantly reduces your risk exposure beyond what gear alone can achieve, especially at intersections and on roads with fast-moving traffic.


