
TL;DR:
- Proper cycling mirror setup involves three phases: preparation, installation and adjustment, and real-world verification. Correct alignment ensures reliable rear visibility without sacrificing control, safety, or comfort during rides.
A cycling mirror positioning workflow is the step-by-step process cyclists use to install, angle, and verify rear-view mirrors for the clearest possible view behind them without losing control or comfort. Getting this process right separates a mirror that actually improves safety from one that just rattles on your handlebar. Thebeamofficial, a French cycling safety brand, builds its mirror accessories around this exact principle: visibility must be deliberate, not accidental. The standard industry term for this practice is mirror alignment and verification, and when done correctly, it gives you a reliable rear sightline on every ride, whether you’re commuting through city traffic or grinding out miles on a rural road.
What is the cycling mirror positioning workflow?
The workflow covers three phases: preparation, installation and angle adjustment, and real-world verification. Each phase builds on the last. Skip the preparation phase and you risk mounting a mirror that conflicts with your brake lever or blocks your hand position. Skip verification and you won’t know the mirror is useless until you’re already in traffic.
Proper mirror placement allows quick glances without excessive wrist or hand movement, which keeps you in control during checks. That single ergonomic principle should guide every decision in the workflow, from which mirror type you choose to where you clamp it on the bar.
What tools and mirror types do you need before starting?
Preparation is the phase most cyclists skip, and it’s the one that causes the most problems later. Before you touch a mirror, you need to know what type of mount your bike can accept and what tools the installation requires.
Mirror types and mount options
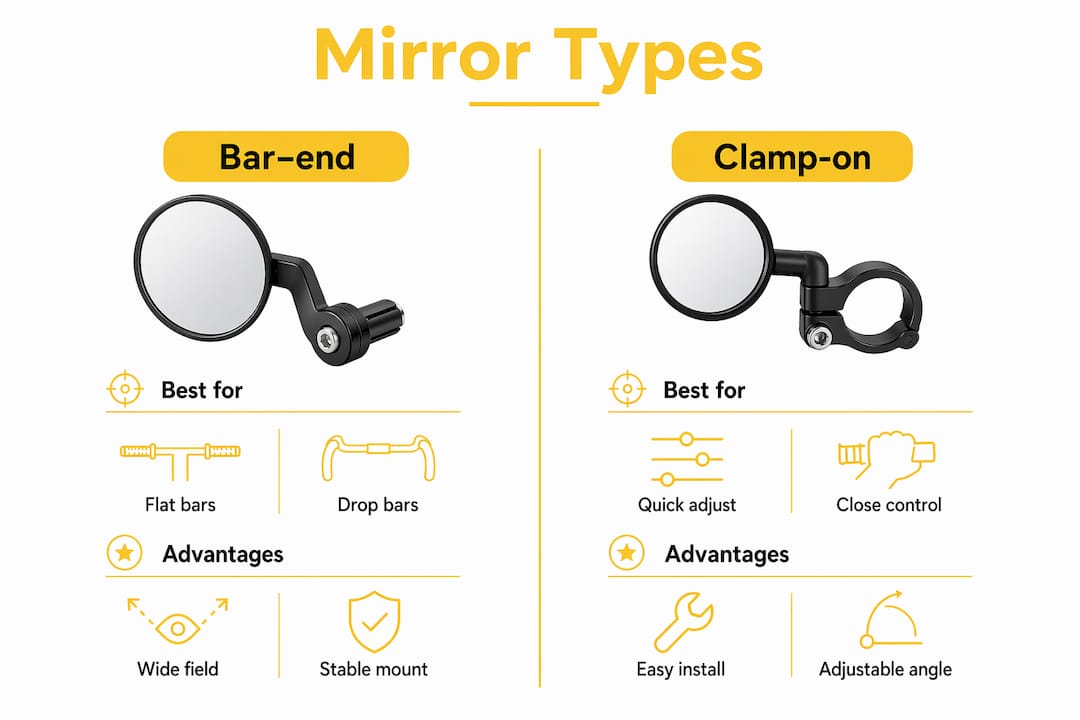
The two main mount categories are bar-end mirrors and clamp-on mirrors. Bar-end mirrors sit at the tip of the handlebar, which places them slightly farther out for improved visibility. They work well on flat bars and drop bars with plugged ends, and they’re a popular choice for e-bike setups because they don’t crowd the control zone. Clamp-on mirrors attach directly to the handlebar tube and offer more flexibility in placement, but they require careful positioning to avoid blocking your grip or brake lever.
| Mirror type | Best for | Key advantage |
|---|---|---|
| Bar-end mount | Flat bars, drop bars, e-bikes | Wider field of view, less bar clutter |
| Clamp-on mount | Most handlebar styles | Flexible placement, easy to reposition |
| Helmet-mounted | Any bike, any bar style | Moves with your head for dynamic view |
Tools and compatibility checks
Most mirror installations require only a 4mm or 5mm Allen key and occasionally a Phillips screwdriver. Check your handlebar diameter before buying a clamp-on mirror. Road bikes typically use 23.8mm bars at the clamp zone, while mountain and e-bike bars often run 22.2mm or 31.8mm. A mismatch means the clamp won’t seat properly, which causes vibration and view instability.
- Confirm handlebar diameter with a caliper or the bike’s spec sheet
- Check that bar-end plugs are removable if you’re going the bar-end route
- Verify that the mirror arm length reaches past your hand without forcing an awkward angle
- Make sure the mirror doesn’t conflict with any existing accessories like GPS mounts or lights
How to install and position your cycling mirrors correctly
This is the core of the mirror alignment and verification process. Follow these steps in order. Doing them out of sequence, especially adjusting the angle before you’re seated on the bike, produces a setup that looks right in the garage and fails on the road.
-
Mount the clamp or bar-end insert loosely. Snug it just enough to hold position. You need freedom to rotate and slide the mirror during adjustment. For clamp-on mirrors, position the clamp 2–3 cm from your grip or brake lever. That gap keeps the mirror out of your control zone while keeping it within your peripheral view.
-
Sit on the bike in your normal riding posture. This step is non-negotiable. Adjusting mirror angle while seated in your typical riding posture gives you accurate sightline alignment. Adjustments made while standing beside the bike almost always produce a view that’s too high or angled toward the sky once you’re actually riding.
-
Rotate the mirror face until the road behind you is centered in the glass. Your shoulder should occupy no more than 20–25% of the inner mirror field. More shoulder than that means you’re losing lane coverage. Less shoulder means the mirror is angled too far outward and will miss close-passing vehicles.
-
Check for body obstruction. Look through the mirror and move your elbow slightly. If your arm blocks the view at any point in a normal pedaling motion, rotate the mirror outward by 5–10 degrees and recheck.
-
Tighten the mount to its specified torque. Most mirror clamps spec between 2–4 Nm. Over-tightening cracks plastic mounts; under-tightening lets the mirror drift during rides. If the manufacturer doesn’t list a torque spec, tighten until firm and check again after your first ride.
-
Turn the handlebars lock to lock. Confirm the mirror doesn’t strike the frame, fork, or any cables at full steering lock. A mirror that hits the frame during a tight turn is a crash waiting to happen.
Pro Tip: Set the mirror angle with your hands in the exact grip position you use most often. If you ride on the hoods 80% of the time, adjust the mirror from the hoods, not the drops. Your sightline shifts with your hand position, and the mirror needs to match your actual riding style.
How do you verify and fine-tune your mirror setup?

Installation is only half the job. Real-world testing reveals problems that a stationary setup never will, especially vibration blur and body obstruction at speed.
Perform a low-speed test ride in a quiet, open area before taking the mirror into traffic. Quiet parking lots or empty side streets work well. At low speed, check whether the mirror image is stable or shaking. A blurry image at low speed will be unusable at 20 mph.
During the test ride, run through this checklist:
- Stability check: Does the mirror image hold steady over small road imperfections, or does it vibrate excessively?
- Coverage check: Can you see the full lane behind you, or does your shoulder block more than a quarter of the view?
- Glance check: Can you read the mirror with a brief, natural eye movement, or do you have to turn your head significantly?
- Turn check: Does the mirror stay clear of the frame and cables through normal steering inputs?
If the image shakes, tighten the mount incrementally and retest. If coverage is poor, rotate the mirror face outward by small increments, 5 degrees at a time, until the lane fills the glass. Repeat this refinement process after your first two or three full rides, because mounts can settle slightly as they break in.
Mirrors supplement your awareness. They do not replace it. Cycling safety standards are clear: mirrors are supplemental tools, and shoulder checks remain essential before any lane change or merge. Use the mirror to spot approaching traffic early, then confirm with a shoulder check before acting.
Common mistakes that ruin mirror performance
Most mirror problems trace back to a small set of repeatable errors. Knowing them in advance saves you from redoing the entire setup.
Mounting too close to controls. A mirror clamp placed directly against the brake lever forces you to choose between a clear view and a comfortable grip. The 2–3 cm rule exists for this reason. Crowding the control zone also means the mirror arm can interfere with brake cable routing on some bikes.
Adjusting the angle while standing. This is the single most common mistake. Standing beside the bike changes your eye height by several inches compared to your seated riding position. The angle that looks perfect while standing will point at the sky once you’re on the saddle.
Ignoring motion blindness. Motion blindness can reduce the perceived usefulness of mirrors, particularly in fast-moving traffic where everything in the mirror appears to be moving at the same rate. Pairing your mirror with a rear flashing light increases your rearward awareness beyond what the mirror alone provides.
Skipping maintenance. Mirror mounts loosen over time, especially on rough roads or gravel. Check clamp tightness every two to four weeks. Clean the mirror face with a soft cloth; scratched or dirty glass degrades the image faster than vibration does. After any impact or crash, recheck both the mount position and the mirror angle before riding again.
Pro Tip: Pair your mirror with a rear-facing flashing light mounted to your seatpost or helmet. The light makes you visible to drivers before they’re even in your mirror’s field of view, which gives you more reaction time when a vehicle does appear.
Key takeaways
A correctly executed mirror alignment and verification workflow gives you reliable rear visibility on every ride without compromising handlebar control or riding comfort.
| Point | Details |
|---|---|
| Adjust while seated | Always set mirror angle from your normal riding posture, not while standing beside the bike. |
| Follow the 2–3 cm rule | Mount clamp-on mirrors 2–3 cm from your grip or brake lever to protect control access. |
| Limit shoulder obstruction | Your shoulder should cover no more than 20–25% of the mirror field to maximize lane coverage. |
| Test before traffic | Verify stability and coverage with a low-speed ride in a quiet area before riding in traffic. |
| Mirrors supplement, not replace | Always follow a mirror glance with a shoulder check before changing lanes or merging. |
What I’ve learned from years of watching cyclists set up mirrors wrong
Cyclists who set up mirrors correctly the first time are the exception, not the rule. The most common thing I see is riders adjusting the mirror angle while straddling the bike with both feet flat on the ground, which puts their torso several inches higher than it sits during actual riding. The mirror ends up pointing at the road 10 feet behind them instead of the lane 50 feet back. One small posture error produces a completely useless setup.
The other thing I’ve noticed is that riders treat the mirror as a standalone fix. They mount it, confirm they can see something behind them, and consider the job done. But a mirror without a rear light is only half a system. You can see what’s coming, but drivers can’t see you until they’re already close. The combination of mirrors and visibility aids is what actually changes your safety margin, not either one alone.
My honest recommendation: spend 15 minutes on a proper test ride after every new mirror installation. Ride over a speed bump, make a few turns, and check the image at different speeds. That 15 minutes tells you more about your setup than 30 minutes of stationary adjustment ever will. And if you ride different bikes or switch between road and gravel setups, treat each bike as a separate calibration. The geometry is different, your posture is different, and the mirror angle needs to match.
— Sophie
Thebeamofficial’s gear for safer rides
Thebeamofficial designs cycling safety equipment specifically for riders who take visibility seriously, from road and gravel cyclists to daily commuters and e-bike riders. The brand’s rear-view mirrors and high-visibility accessories are built to work together as a system, not as isolated add-ons.

If you want to put your mirror setup to a real test, Thebeamofficial’s ultracycling event brings together safety-focused cyclists for long-distance rides where proper equipment setup is non-negotiable. It’s the kind of environment where a poorly positioned mirror becomes obvious fast. Check out the full rear-view mirror guide on the Thebeamofficial site for detailed setup instructions paired with the brand’s own mirror lineup.
FAQ
What is the correct mirror angle for cycling?
Aim the mirror so the road behind you is centered in the glass, with your shoulder covering no more than 20–25% of the inner field. Always set the angle while seated in your normal riding posture.
Where should a clamp-on mirror be mounted on the handlebar?
Mount the clamp 2–3 cm from your grip or brake lever. That spacing keeps the mirror out of your control zone while maintaining a clear sightline.
Do cycling mirrors replace shoulder checks?
No. Cycling safety standards classify mirrors as supplemental tools. Always confirm with a shoulder check before changing lanes or merging, regardless of what the mirror shows.
How do I stop my cycling mirror from vibrating?
Tighten the mount incrementally and retest at low speed in a quiet area. If vibration persists after tightening, check that the clamp is seated correctly on the handlebar and that the mirror arm isn’t too long for the mount design.
Should I use a bar-end or clamp-on mirror?
Bar-end mirrors offer a wider field of view and less bar clutter, making them a strong choice for e-bikes and flat-bar setups. Clamp-on mirrors give more placement flexibility and suit riders who need to work around existing accessories.


