
TL;DR:
- Safe night cycling relies on a layered system of front and rear lights, reflective gear, and cautious riding habits to ensure both visibility and driver awareness. It is essential to match lumens and beam angles to specific environments, use multiple lights on different bike parts, and incorporate reflective materials at various heights for maximum safety. Behavioral adjustments like reduced speed and route planning further enhance night riding safety, regardless of urban or rural settings.
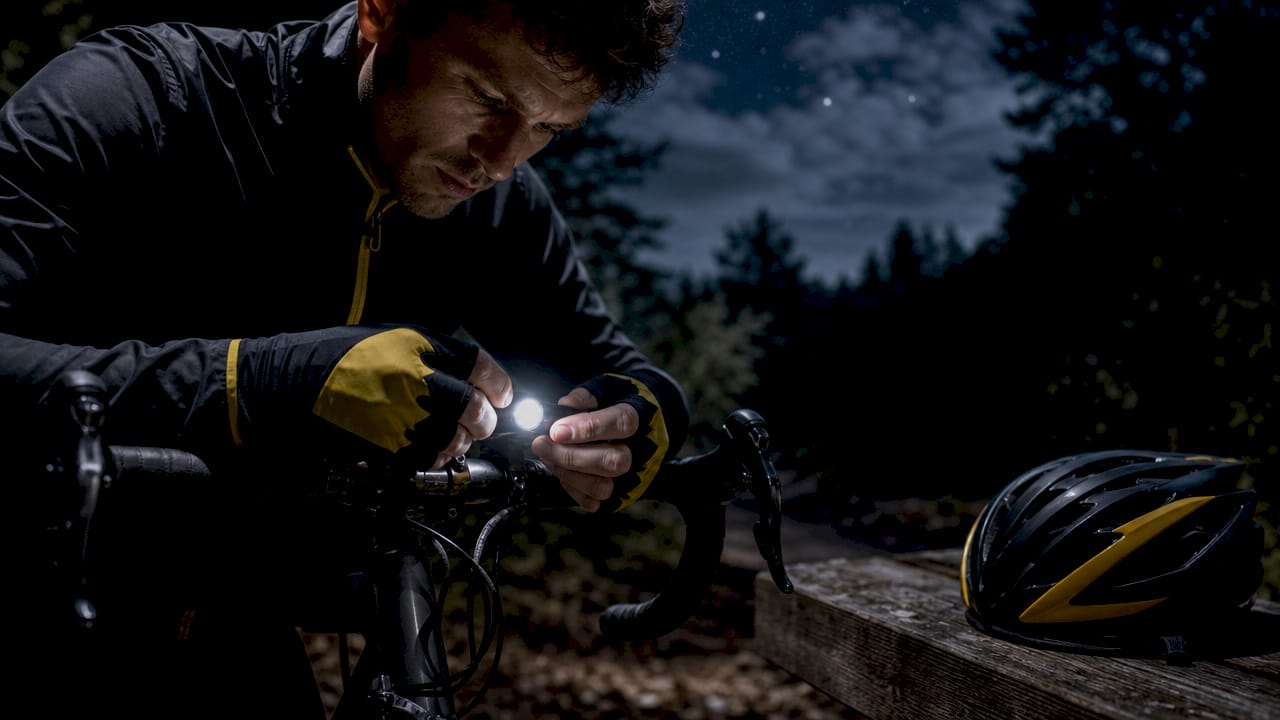
Safe night cycling is defined by one principle: you must both see the road clearly and be seen from every angle by every driver around you. Cycling night riding best practices go far beyond strapping on a single headlight. They require a layered system of front and rear lighting, reflective gear, and deliberate riding habits that work together after dark. REI cycling experts recommend a three-light minimum setup covering handlebar, helmet, and rear positions. This guide breaks down each layer of that system, from lumen counts and beam angles to behavioral tactics that reduce collision risk in urban and rural environments alike.
1. Front lighting setups for optimal night visibility
The right front light does two jobs simultaneously: it illuminates the road surface ahead of you and signals your presence to oncoming drivers. Front light brightness should be 400 to 600 lumens for urban streets and 600 to 1,200 lumens for unlit roads. That range matters because over-lighting a city street creates glare that blinds pedestrians and drivers, while under-lighting a rural road leaves you unable to spot potholes or debris in time.
Beam shape is just as important as raw brightness. A flat-top or cutoff beam pattern concentrates light on the road surface without projecting upward into oncoming eyes. Mount your handlebar light aimed slightly downward so it illuminates the pavement roughly 10 to 15 feet ahead without blinding anyone approaching you. This single adjustment prevents the most common complaint drivers have about cyclists at night.
A helmet-mounted light adds a dimension that no handlebar light can provide. Helmet lights improve visibility by letting you aim light directly at drivers at intersections, creating genuine eye contact and confirming they see you before you proceed. USB rechargeable lights from brands like Cygolite, Lezyne, and Bontrager cover most urban and rural needs. Always carry a backup portable charger or a spare light to prevent unexpected failures mid-ride.
Pro Tip: Run two front lights simultaneously: one handlebar-mounted on steady mode for road illumination, and one helmet-mounted on a lower flash setting for driver awareness. This combination covers both visibility functions without requiring a single ultra-bright light that might blind other road users.
2. Rear lights and side visibility gear
Rear lighting is where many cyclists underinvest, and that gap creates real danger. Rear lights require at least 50 lumens, with 100 to 200 lumens representing the current safety standard for roads with any traffic. A dim rear light that looks adequate in your garage becomes nearly invisible against the ambient glow of city streetlights.
Light mode selection depends directly on your environment:
- Steady mode on unlit rural roads helps drivers estimate your distance and speed accurately
- Flash mode on lit urban streets grabs attention more effectively than a steady glow
- Two rear lights at different heights cover eye-level visibility for both car drivers and truck drivers simultaneously
Side visibility is the most overlooked gap in most cyclists’ setups. Side visibility failures account for a significant share of nighttime collisions, particularly at intersections where drivers approach from 90-degree angles. Spoke lights, reflective ankle bands, and frame-mounted reflective tape each address this blind spot from a different position on the bike.
| Visibility layer | Best product type | Primary benefit |
|---|---|---|
| Rear active light | 100-200 lumen tail light | Distance estimation for following drivers |
| Side passive | Spoke lights or frame tape | Intersection cross-traffic detection |
| Side biomotion | Reflective ankle bands | Moving-part recognition by driver brain |
| Rear passive | Seat stay reflectors | Fail-safe backup when battery dies |
Pro Tip: Mount one rear light on your seat post and a second on your helmet or backpack. The height difference means at least one light sits at eye level for drivers in both low cars and high SUVs.
3. Reflective clothing and gear strategies
Retroreflective materials work by bouncing a driver’s headlight beam directly back toward the source, making you appear to glow from their perspective. Reflective gear works best as a complement to active lighting, not a replacement, especially in urban areas where ambient light reduces the effectiveness of passive reflectors alone.
Zone-based placement maximizes the return on every reflective element you add:
- Low zone (ankles and spokes): Reflective ankle bands and spoke reflectors create the biomotion effect that drivers recognize fastest
- Mid zone (frame and torso): Reflective jacket panels and frame tape create a larger visible silhouette
- High zone (helmet and backpack): Reflective strips at head height confirm your human shape to approaching drivers
The biomotion effect is the single most underrated concept in night cycling safety. Reflective gear on moving parts helps the brain recognize cyclists up to 7 seconds sooner than static reflectors. Seven seconds at 30 mph is over 300 feet of additional stopping distance. Ankle bands and shoe covers deliver this effect at minimal cost.
Color choice matters by condition. Fluorescent yellow-green is highly visible in low-light dusk conditions but offers no advantage in full darkness. Retroreflective silver and white materials perform better at night because they require an active light source to activate. Combining both types covers the transition period between dusk and full dark, which is statistically the most dangerous window for cyclists.
Pro Tip: Reflective tire sidewalls from brands like Schwalbe and Continental add passive side visibility that requires zero maintenance and never needs charging. They are one of the highest-value, lowest-effort upgrades available for urban night riders.
4. Riding techniques for safer nights
Equipment alone does not make you safe after dark. Behavioral adjustments are the other half of every sound cycling night riding process. Experienced riders recommend reducing night cycling speed by 10 to 20 percent to compensate for reduced visibility. This “80% Rule” gives you the reaction time your eyes cannot provide in darkness.
Intersection behavior requires a specific protocol:
- Approach every intersection assuming you are invisible until proven otherwise
- Use your helmet light to signal drivers actively by pointing it toward their windshield
- Make direct eye contact before proceeding through any crossing
- Avoid the right-side blind spot of turning trucks and buses
Route familiarity is a genuine safety asset at night. Choosing well-lit, familiar routes reduces the chance of encountering unexpected hazards like construction debris, unmarked speed bumps, or sudden lane changes. Save route exploration for daylight hours.
Night vision takes time to develop after leaving a lit environment. Cyclists have roughly 20 to 30 minutes of diminished night vision when transitioning from lit to dark environments. Avoid staring at your phone screen before or during the ride. Riding with a companion adds both visibility mass and a second set of eyes for hazards.
Pro Tip: Tell someone your planned route and expected return time before every solo night ride. This single habit costs nothing and creates a safety net that no amount of lighting equipment can replicate.
5. Urban versus rural night riding adaptations
Urban and rural night riding share the same core principles but demand different equipment configurations and behavioral priorities. Getting this distinction wrong means either over-lighting a city street or under-lighting a country road.
Urban settings call for:
- Front lights in the 400 to 600 lumen range to avoid blinding pedestrians and drivers
- Flash modes on rear lights to cut through ambient streetlight noise
- Route selection prioritizing well-lit bike lanes over shortcuts through unlit parks or alleys
- Heightened awareness of car doors, delivery vehicles, and pedestrians stepping off curbs
Rural and unlit roads require a different approach entirely:
- Front lights at 600 to 1,200 lumens or higher to illuminate road surfaces, wildlife, and debris
- Steady rear light modes so following drivers can judge your speed and distance accurately
- Backup lights and a portable USB battery because the nearest bike shop may be miles away
- Reduced speed on unfamiliar surfaces where potholes and gravel patches are invisible until you are on top of them
Battery life planning separates prepared rural riders from unprepared ones. A light rated for two hours at maximum brightness may last six hours at medium output. Know your light’s runtime at each setting before committing to a long rural ride. Wildlife crossings, particularly deer in North America and foxes in Europe, add a hazard that urban riders rarely face. A high-lumen front light gives you the reaction time to brake safely.
Pro Tip: Adjust your reflective layering per environment. In rural darkness, add a reflective vest over your jersey to maximize passive visibility from all angles. In urban settings, a single reflective jacket panel is often sufficient alongside your active lights.
Key takeaways
Effective cycling night riding best practices require a multi-layered visibility system combining front and rear lighting, reflective gear, and defensive riding habits tailored to your specific environment.
| Point | Details |
|---|---|
| Layer your lighting | Use front, rear, and helmet lights together for all-angle visibility, not just a single headlight. |
| Match lumens to environment | Use 400 to 600 lumens in cities and 600 to 1,200 lumens on unlit roads for safe illumination. |
| Add biomotion reflectors | Reflective ankle bands on moving parts help drivers recognize you up to 7 seconds sooner. |
| Apply the 80% Rule | Reduce your normal riding speed by 10 to 20 percent at night to compensate for limited visibility. |
| Plan routes deliberately | Choose lit, familiar roads at night and carry backup power for any ride longer than one hour. |
What I’ve learned from years of riding after dark
The most common mistake I see cyclists make is treating night riding as a lighting problem with a single product solution. They buy one bright headlight, assume the job is done, and then wonder why drivers still cut them off at intersections. The real issue is almost always side visibility. Drivers approaching from the left or right at a crossing have zero benefit from your front or rear light. They need spoke lights, ankle bands, or frame reflectors to register your presence at all.
The second thing most guides skip is the mental shift required. Riding at night demands a genuinely different mindset, not just different gear. You have to assume invisibility as your default state and treat every intersection as a negotiation rather than a right of way. That sounds pessimistic, but it is actually liberating. Once you stop expecting drivers to see you automatically, you start riding in ways that make being seen your active responsibility.
I also recommend testing your full setup before relying on it. Ride a familiar loop at night, then ask a friend to observe you from a car at an intersection. The gaps in your visibility system become obvious immediately. Most riders discover their side visibility is nearly zero from 50 feet away. That test takes 20 minutes and is worth more than any gear review.
Build your night riding skills incrementally. Start with short, well-lit urban routes. Add distance and darker roads as your confidence and equipment improve. Overnight transformation is not the goal. Consistent, layered improvement is.
— Sophie
Gear up for night rides with Thebeamofficial

Thebeamofficial designs helmets and accessories built specifically for the visibility demands of night cycling. The VIRGO integral helmet with MIPS technology integrates rear lighting and signaling features directly into the shell, covering the high-zone visibility that standard helmets ignore. Browse the full range of adults’ cycling helmets engineered for real-world night safety, or explore high-visibility bike reflectors and helmet add-ons that complete your layered visibility system. Every product ships internationally through the Thebeamofficial e-commerce platform, with USB charging convenience and a design standard that does not compromise on either protection or aesthetics.
FAQ
How many lumens do I need for night cycling?
Front lights should output 400 to 600 lumens for urban streets and 600 to 1,200 lumens for unlit rural roads. Rear lights require a minimum of 50 lumens, with 100 to 200 lumens as the current safety standard.
What is the best rear light mode: steady or flashing?
Use steady mode on unlit rural roads so drivers can accurately judge your distance and speed. Use flash mode on lit urban streets where the pulsing light cuts through ambient streetlight and grabs driver attention more effectively.
Do reflective vests replace active lights at night?
Reflective gear complements active lighting but does not replace it. Retroreflective materials only activate when a driver’s headlight hits them directly, making them unreliable as a standalone visibility solution in complex urban traffic.
Why does ankle placement matter for reflective gear?
Reflective material on moving parts like ankles triggers the biomotion effect, which helps the driver’s brain recognize a cyclist up to 7 seconds sooner than a static reflector. That recognition time translates directly into additional stopping distance.
How should I adjust my riding speed at night?
Reduce your normal riding speed by 10 to 20 percent after dark to compensate for reduced visibility range. This buffer gives you the reaction time to respond to hazards your lights reveal at shorter distances than daylight allows.


