

Fit a dedicated, weather-resistant red rear light to the trailer itself, not just the bike towing it. The trailer sits low and often blocks your own bike light from view, so cars approaching from behind lose the one signal that says “slow down, something’s back there.” Look for a light with both flashing and steady modes and a bracket that won’t shake loose on rough pavement. Visibility accessories exist that are designed specifically for this purpose.
TL;DR:
- A dedicated, weather-resistant rear light on the trailer is essential because bike tail lights often get blocked and cannot adequately signal trailing children to drivers.
- Choose a unit with multiple modes, such as flashing and steady, with a secure mount suitable for vibrations, rain, and impacts common in trailer use.
- Proper mounting and aiming are crucial; position the light near eye level of drivers, test visibility from 10-15 meters behind before each ride, and avoid aiming downward.
- Battery maintenance, regular checks, and choosing between rechargeable or battery-powered lights affect reliability and ongoing safety.
- Combining active trailer lights with passive reflectors, flags, and reflect dressings enhances overall visibility, especially in poor weather, dusk, or obstructed sightlines.
Table of Contents
- Why Éclairage Remorque Enfant Vélo Matters More Than People Think
- The Recommended Fix: A Dedicated LED Rear Light On the Trailer
- What to Look for When Choosing Rear Lights for a Child Trailer
- How to Mount and Aim a Trailer Rear Light the Right Way
- Keeping the Light Working: Battery and Maintenance Basics
- What French Safety Guidance Says About Trailer Lighting
- Who’s Behind This Guidance
- Types of Trailer Rear Lights and What They Actually Offer
- Matching the Light to Your Trailer’s Size and Design
- Reflective Tape, Flags, and Other Visibility Layers Worth Adding
- Adjusting Visibility Gear for Time of Day and Weather
- What Actually Moves the Needle on Trailer Safety
- Get Your Trailer Visibility Sorted With Thebeamofficial
- Sources
Why Éclairage Remorque Enfant Vélo Matters More Than People Think
The gap in trailer lighting is a visibility gap, not a legal technicality. A rear-mounted trailer for a child sits roughly a foot lower and several feet behind the bicycle’s own rear light, and in traffic, that light gets swallowed by the trailer’s own frame and fabric. A car pulling out of a driveway or approaching at dusk sees the cyclist ahead but often misses the low, narrow shape trailing behind at child height.
This is the real reason “éclairage remorque enfant vélo” gets searched so often by parents shopping for trailers or gear. It’s not an abstract safety concept. It’s the specific, physical problem of a child riding at bumper height on public roads with nothing behind them save a reflector. A dedicated light closes that gap, and it does it for less than the cost of a bike lock.
The Recommended Fix: A Dedicated LED Rear Light On the Trailer
The simplest fix is a clip-on or bolt-on LED rear light mounted directly on the trailer frame, ideally at the height a driver’s eyes would naturally scan. This isn’t a nice-to-have accessory category. Some trailers ship with a small built-in rear light, but buying guides consistently note that an added dedicated light is still worth fitting, especially on hand-me-down or budget models where the factory light is dim or poorly placed.
A trailer light earns its spot on your gear list for one reason: your bike’s own tail light physically cannot do this job once a trailer is hitched behind it.
Three things to check before buying:
- Mount type. Does it clip onto a light loop, bolt through an existing hole, or need a separate bracket? Match it to your trailer frame before you order.
- Weather resistance. A rating or robust sealed casing matters more than lumens. Rain and road spray hit a trailer light constantly.
- Visible modes. Flashing catches attention from a distance; steady mode helps drivers judge your exact position and speed. You want both.
Thebeamofficial’s FRAME FLASH reflectors sit in this same visibility category and were designed around that mounting and durability logic.
Pro Tip: Buy the light before the trailer if you can. A $15 light with a bad mount for your specific frame is worse than no light at all, because you’ll stop using it within a month.
What to Look for When Choosing Rear Lights for a Child Trailer
Not every rear light sold for bikes works well on a trailer. Trailers vibrate differently, sit closer to splash zones, and get bumped against curbs and door frames during loading. A few criteria separate a light that lasts a season from one that dies in a month.
Visibility features. Check the LED count, the modes available, and the lens size. The Burley Light Kit, a common example on the market, runs five LEDs across four modes: flashing, constant, chasing, and random. That range matters because flashing draws the eye from a distance while a steady beam helps a driver gauge your exact position as they close in.
Durability and build. A trailer light lives outside in rain, mud, and vibration for years, and its housing needs to handle all three. Weather-resistant casing and a secure mount matter more than raw brightness, since a cracked lens or a light that shakes loose on the first gravel path defeats the purpose entirely.
Mounting compatibility. Most trailers have either a light loop, a mounting bracket, or a flat surface suited to a bolt-on kit. Measure or photograph your trailer’s rear frame before ordering, since a light built for a round tube won’t clamp onto a flat aluminum bar.
Power source. AA battery units are easy to swap on the road but need a spare-battery habit. Rechargeable USB units cost less over time but require you to remember to charge them, which is its own kind of maintenance.
Here’s a quick way to compare the trade-offs:
| Factor | AA battery light | Rechargeable USB light |
|---|---|---|
| Swap speed | Instant with a spare | Needs outlet access |
| Long-term cost | Higher (batteries add up) | Lower |
| Failure risk | Corroded contacts over time | Forgotten charge before a ride |
Reliability signals. Prefer lights sold with clear manufacturer documentation and a warranty. A product with an actual installation manual, like Burley’s light kit instructions, tends to be built by a company that also tested the mount under real conditions rather than just the LED chip.
How to Mount and Aim a Trailer Rear Light the Right Way
Installation on most trailer light kits follows the same basic sequence, and manufacturer manuals confirm this pattern consistently:
- Find your mounting point. Locate the light loop, grommet, or frame nut on the trailer’s rear frame, often behind a small cover screw.
- Align the bracket. Set the bracket flush against the frame before tightening anything, matching the documented alignment steps most kits share.
- Hand-tighten first, then torque. Snug the bracket by hand, check the angle, then finish with a hex wrench or screwdriver so you can still adjust before locking it down.
- Angle the light slightly upward, roughly toward eye level of a following driver, not straight down at the pavement.
- Test it hitched. Attach the trailer to the bike and check the light’s angle under real riding position, not just on a workbench.
The most common mistake is aiming the light down at the ground to “protect” the lens, which kills its visibility to anyone behind you. A close second: tightening the bracket without checking whether it now blocks the trailer’s built-in reflector.
Pro Tip: Stand 10 to 15 meters behind the hitched trailer, roughly driver eye height, and have someone else check the light from that spot. If you can’t tell if it’s flashing or steady from there, re-angle it before your next ride.
One manual note worth flagging: some kits recommend reversing the light’s side placement depending on whether you ride in right-hand or left-hand traffic, so check the manufacturer’s guidance for your specific setup.
Bolt-on mounts hold up better for daily commuters riding rough terrain; clip-on units are faster for families who trailer only on weekends. For a full accessory installation walkthrough, Thebeamofficial’s safety gear installation guide covers the same principles across other visibility products.
Keeping the Light Working: Battery and Maintenance Basics
A rear light only protects your child when it’s actually working, which means a quick check before heavy-use rides and a real inspection weekly if you ride often.
- Check battery level before every longer ride, not just when it looks dim.
- Keep one spare AA set in your pannier or diaper bag if you’re not on a rechargeable unit.
- Charge rechargeable units fully before storing them over winter, then top off again before the first spring ride.
- Wipe the lens and check the seal gasket after muddy or rainy rides to preserve weather resistance.
- Replace the unit if you see dimming that battery swaps don’t fix, any water fogging inside the lens, or a cracked housing.
A cracked lens isn’t cosmetic. Once water gets past a broken seal, corrosion sets into the contacts fast, and the light will fail exactly when you need it most.
What French Safety Guidance Says About Trailer Lighting
Trailers used on public roads in France should carry rear red reflectors, and official guidance from Sécurité Routière on transporting children by bike sets out the broader safety expectations for this kind of setup. When the trailer’s shape blocks the towing bike’s own rear light, as most do, adding a dedicated light on the trailer itself is strongly advised rather than optional.
ProVelo’s buying guide for child trailers makes the same point from a consumer angle: reflectors are the baseline, but they’re passive. They only work when another light source hits them. A powered light works in conditions where a reflector goes dark, like an overcast afternoon or a headlight angle that misses it entirely. Choose components with clear manufacturer documentation, and when in doubt about your specific trailer model, check both sources above before assuming your setup already meets expectations.
Who’s Behind This Guidance
This guide is written by Sophie, who focuses on child visibility and everyday cycling safety for Thebeamofficial. Her recommendations here draw on the brand’s work designing visibility accessories like FRAME FLASH reflectors, which map directly onto the same problem trailer lights solve: making a low, easy-to-miss shape visible from behind. The guidance reflects product design experience and real-world usability testing rather than lab specs alone.
Types of Trailer Rear Lights and What They Actually Offer
Most rear lights sold for trailers fall into two camps: simple single-mode units and multimode LED kits. Single-mode lights are either on or off, cheap, and fine as a backup, but they don’t give a driver much information about your speed or distance.
Multi-mode kits are the better default for a child trailer. The Burley Light Kit example mentioned earlier packs five LEDs across four modes: flashing, constant, chasing, and random, which lets you switch between a steady beam for open roads and a flashing pattern for cluttered urban traffic where you need to stand out against streetlights and headlights.
Mounting style is the other major split. Clip-on units attach to an existing light loop or strap and come off in seconds, useful if you swap the light between the trailer and a backpack. Bolt-on units thread through a drilled or pre-existing hole and stay put permanently, better suited to daily commuters who don’t want to remember to reattach anything.
Lens size and shape affect side visibility too. A wide, slightly domed lens throws light at an angle, so drivers approaching from an angled side street still catch it, not just cars directly behind you. A flat, narrow lens looks brighter head-on but disappears fast once a car isn’t dead center behind the trailer.
Matching the Light to Your Trailer’s Size and Design
A single-seat trailer, a double-wide trailer, and a cargo-style child trailer don’t need the same lighting setup, mostly because of width and how far the taillight sits from the wheels.
Single-seat trailers are narrow enough that one centered rear light usually covers the visibility need, especially when paired with the trailer’s factory reflector.
Double-wide trailers benefit from either a wider single light or two smaller lights at each rear corner, since a car overtaking at an angle needs a visual cue closer to the trailer’s actual outer edge, not just its center.
Cargo-style and higher-sided trailers sometimes have enough rear surface area to mount a light higher up, closer to driver eye level, which beats a light stuck low near the wheel well where road spray and mud collect fastest.
If you’re outfitting more than one trailer, or switching between a commuter setup and a weekend cargo trailer, Thebeamofficial’s family gear guide rounds up the broader accessory list worth checking against your specific frame.
Reflective Tape, Flags, and Other Visibility Layers Worth Adding
A rear light does the most work, but it works best alongside passive gear that doesn’t rely on batteries at all. Reflective tape applied along the trailer’s rear and side panels catches headlights from angles a single point light misses, and it never runs out of charge.
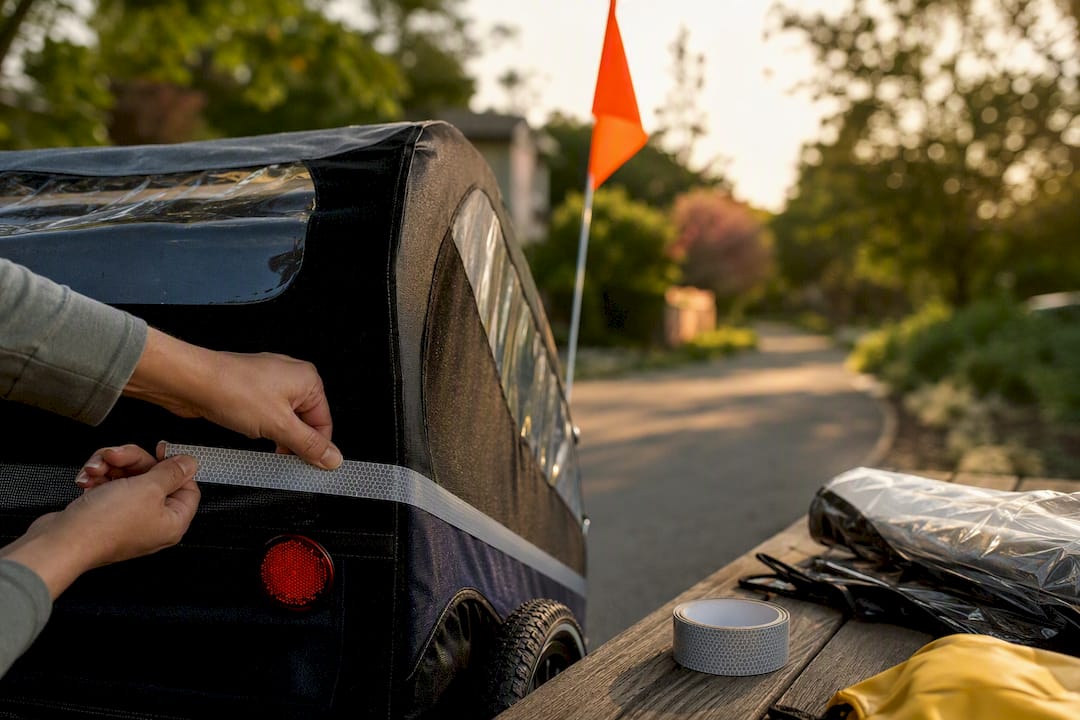
A tall safety flag, often orange or bright yellow, raises your child’s visual footprint several feet above the trailer body, which matters most at intersections where a driver’s sightline gets blocked by parked cars or hedges. Combining a flag, reflectors, and a dedicated light covers different distances and different lighting conditions in a way no single item does alone: the flag works at a distance in daylight, the reflectors work whenever a headlight sweeps across them, and the powered light works when nothing else would catch a driver’s eye.
For a broader look at how these layers stack together, Thebeamofficial’s high-visibility gear guide walks through combining reflective materials with active lighting across different ride types.
Adjusting Visibility Gear for Time of Day and Weather
Daylight riding still benefits from a flashing rear light, particularly in dappled shade under trees or against a low afternoon sun where a driver’s eyes are already struggling to adjust. Dusk is the highest-risk window of the day, since ambient light drops fast but many riders wait too long to switch lights on.
Rain and fog cut visibility distance sharply, which is exactly when a weather-resistant casing earns its keep instead of fogging up or shorting out. Wipe the lens clear before a wet ride, since mud spray builds up fast on a trailer riding low and close to the road surface.
Winter riding adds another wrinkle: cold weather drains standard batteries faster, so a light that reads as fully charged at home can dim noticeably an hour into a cold ride. Carrying a spare set, or checking a rechargeable unit’s charge the night before, avoids getting caught with a fading light halfway through a commute. Packing a spare set alongside other trailer essentials is worth building into your routine the same way you’d pack any other travel gear checklist before heading out.
What Actually Moves the Needle on Trailer Safety
Most advice on child trailer safety spends too much time on helmets and harness straps and not nearly enough on what happens behind the trailer. That’s backwards. Your child is strapped in and protected from a fall long before a light ever matters, but a fall isn’t the risk that keeps me up at night. A driver not seeing the trailer at all is.
The conventional wisdom treats a factory reflector as sufficient because it’s cheap, legal, and already there. It isn’t sufficient. Reflectors are passive and only work when another light source hits them at the right angle, which doesn’t happen reliably at dusk, in fog, or on an overcast afternoon when headlights aren’t on yet. A powered light doesn’t have that blind spot.
If you take one thing from this guide, prioritize the light before anything else on your accessory list, flags, reflective tape, upgraded harnesses. Fit it low enough to clear obstacles but high enough to sit near a driver’s natural eye line, test it hitched to the bike before you rely on it, and treat the battery check as part of your pre-ride routine, not an afterthought. Everything else is a layer on top of that first, essential fix.
— Sophie
Get Your Trailer Visibility Sorted With Thebeamofficial
Thebeamofficial builds visibility gear around the same problem this guide just walked through: a trailer sitting low and blocking the bike’s own light. FRAME FLASH is a minimalist high-visibility reflector designed for exactly this kind of easy, secure mount, built with weather-resistant materials so rain and road spray don’t compromise it mid-season.

It’s designed to mount without special tools, which matters when you’re fitting gear onto a trailer frame in a driveway with a toddler waiting to go. Check the product page for current mounting options and battery details, and browse official photos to see exactly how it sits on a trailer or bike frame before you order. If you’re outfitting a full family setup, Thebeamofficial’s ultracycling and safety event page also shows the brand’s broader visibility lineup in action. Head to the FRAME FLASH product page to check sizing and place an order before your next ride.
Sources
- Transporter des enfants à vélo | Sécurité Routière
- Les remorques vélos pour enfants, nos conseils avant achat
- Burley Light Kit product manual (installation excerpt)


