

Yes, a sunglasses-mounted rear-view mirror gives most cyclists genuinely useful rear awareness, and it earns its spot on your face fastest if you commute, ride urban streets, or just want to check traffic without a full shoulder check. It works best paired with a taillight or radar unit, not instead of one, and THE BEAM’s own testing suggests you’ll need a few rides before the glance feels automatic.
TL;DR:
- Integrated-lens mirrors offer consistent alignment with your eye because they are built into the frame, unlike clip-on modules that can shift over time.
- Small field of view and weather distortions limit the mirror’s effectiveness, making it essential to pair the mirror with other visibility tools like taillights and radar units.
- Optimal mirror size is at least 15 millimeters in diameter to reliably track approaching vehicles, especially on fast-moving rural roads.
- Proper fitting and on-bike adjustment are critical, as posture and helmet changes can throw off mirror alignment if not rechecked regularly.
- Cost varies from under $30 for clip-ons to over $100 for premium integrated options, with durability depending on the quality of mount materials and build.
Table of Contents
- What a Mirror for Sunglasses Actually Is (and the Main Types)
- What the Research Says About Benefits and Blind Spots
- How to Choose the Right Mirror for Your Riding Style
- Fitting and Adjusting Your Mirror on the Bike
- Real-World Use and the Learning Curve
- Care, Maintenance, and When to Replace Your Mirror
- Mirror Shapes, Sizes, and What They Do to Your Field of View
- Comparing Mirror Options and What They Cost
- Material and Build Quality: What Actually Affects Durability
- Compatibility With Different Sunglass Styles and Frames
- Why Field Testing Changes How You Build a Mirror
- See THE BEAM’s Mirror Options for Your Riding Style
- Sources
What a Mirror for Sunglasses Actually Is (and the Main Types)
A mirror for sunglasses is a small reflective optic attached to or built into eyewear so a cyclist can glance sideways and catch a view of the road behind without turning the head. That is a different product from mirror-coated lenses that just reflect light for glare reduction. This is a functional safety tool, not a lens finish.
There are two dominant formats:
- Integrated-lens mirrors are built into the sunglasses at the factory, usually sitting in the upper corner of one lens. The optic moves with your head, which keeps the reflected image consistently aligned once you’ve set it. That consistency is a real advantage over helmet or handlebar mirrors, which shift relative to your eyes every time you move.
- Clip-on mirror modules attach to whatever glasses you already own, including prescription frames. This makes them the practical choice if you don’t want to buy new sunglasses or if your prescription frames aren’t sold with a mirror version, according to TriEye’s breakdown of how the lens mirror works.
Both formats place the reflected image into your peripheral vision rather than your direct line of sight, so a quick eye flick brings up the rear view while your head stays forward and your attention stays on the road ahead. The trade-off is size: a bigger mirror shows more road but adds weight and catches more wind and rain.
What the Research Says About Benefits and Blind Spots
Mirrors reduce the anxiety of not knowing what’s approaching from behind, and that lower anxiety tends to translate into steadier, more confident lane positioning. CyclingSavvy’s review of rear-view mirror options documents this psychological benefit directly: riders who can glance and confirm a car’s position, rather than guessing or fully turning around, ride more assertively and more safely in traffic.
A 2022 study on side mirrors and rearward safety confirmation backs this up from a different angle, finding that mirror use measurably supports cyclists’ ability to confirm what’s happening behind them before making a move.
But a mirror has real limits, and pretending otherwise sets you up for a bad surprise:
- Small field of view. Even a well-placed mirror shows a narrow slice of the lane, not the full lane and shoulder.
- Blind spots persist. A car tucked at certain angles simply won’t appear in the reflection.
- Weather kills performance. Water droplets and fog distort or block the image, and usefulness at night drops noticeably.
Because of those gaps, treat a mirror as one layer in a system, not a replacement for a shoulder check. Pairing it with a taillight and a radar unit, and reviewing THE BEAM’s bike commuter visibility guide, gives you a more complete picture of what’s approaching.
How to Choose the Right Mirror for Your Riding Style
Picking the right setup comes down to four decisions, and skipping any of them is how riders end up with a mirror they stop using after two weeks.
- Check your eye dominance first. Close one eye, then the other, and notice which eye keeps a distant object more centered when you point at it with both eyes open. Your dominant eye is usually the better side for the mirror, since your brain accepts the peripheral rear image more readily on that side, a point CyclingSavvy makes clear in its mirror comparisons.
- Match the format to your riding style. If you ride the same sunglasses every day and don’t wear prescription lenses, an integrated-lens pair gives you a cleaner, lighter setup with no extra part to lose. If you switch between glasses, wear prescription frames, or aren’t ready to commit to dedicated mirror sunglasses, a clip-on module retrofits what you already own.
- Run the fit and stability checklist. The mount should sit without pressing into your temple or the bridge of your nose after 30 minutes. The clip, if you’re using one, should hold firm over rough pavement without creeping out of position. Wobble under vibration is the single biggest complaint riders report.
- Don’t go too small to be useful. A mirror that’s too compact might look sleek, but it shrinks your rear confirmation down to almost nothing. Prioritize a mirror large enough to show a full vehicle at a glance over one that disappears into the frame.
Pro Tip: If you’re between two mirror sizes, size up. A slightly larger mirror costs you almost nothing in weight or wind resistance, but a too-small one costs you the whole point of wearing it.
Fitting and Adjusting Your Mirror on the Bike
Get this step wrong and even the best mirror on the market becomes useless glass. Adjust it while sitting on the bike in full riding posture, never standing in your kitchen, because your torso and head angle change the moment you clip into the pedals.
- Put on your helmet and sit in riding position. Your riding posture, whether upright commuter or aggressive road position, changes where your eyes naturally sit relative to the mirror.
- Mount the mirror, then tilt it while still seated on the bike. Small adjustments here matter more than they look like they should. A Road points out that posture shifts the effective mirror angle enough that adjusting off the bike almost never transfers cleanly.
- Confirm with something moving. Have a friend walk or drive past behind you, or use a parked car as a stationary reference point, and check that it appears clearly in the mirror without you moving your head.
Two mistakes show up constantly: adjusting the mirror while standing (it will be wrong once you sit down and pedal), and centering the mirror too close to your nose, which forces an awkward cross-eyed glance instead of a natural peripheral flick.
Pro Tip: Re-check your mirror angle every time you switch helmets or swap sunglasses frames, even if it’s the same brand. A half-inch shift in how the arms sit on your head is enough to throw off the alignment.
Real-World Use and the Learning Curve
Expect roughly three to five rides before checking the mirror feels automatic instead of deliberate. Hands-on testing from Bicycling Australia confirms this adjustment window, noting that early rides feel awkward before the glance becomes reflexive.
Once it clicks, most riders report fewer full shoulder checks and more relaxed, confident lane positioning, since you’re not craning your neck to confirm what’s behind you every time traffic picks up. The realistic limits: fogging on humid mornings, and sometimes needing a slight head tilt to bring a car fully into frame. On days when the mirror isn’t cooperating, fall back on a shoulder check. Layer it with a taillight or radar for the fullest picture of what’s approaching.
Care, Maintenance, and When to Replace Your Mirror
A mirror mounted inches from your face takes a beating from sweat, rain, and the occasional drop. Clean the reflective surface with a microfiber cloth only, since paper towels and shirt hems will scratch the coating over time. A hydrophobic treatment applied every few weeks helps water bead off instead of pooling into a blurry smear mid-ride.
- Wipe water droplets off with a quick swipe of a glove finger or cloth before they distort your view.
- Check the clip or mount tension monthly; a loosening clip is the top cause of mirror drift.
- Replace the mirror once scratches noticeably distort the reflection rather than just cosmetically marking it.
- Store glasses in a hard case during transport. A soft pouch in a jersey pocket is how most clip-on arms get bent.
Mirror Shapes, Sizes, and What They Do to Your Field of View
Mirror shape isn’t just cosmetic. Round mirrors tend to give the most even field of view across the whole reflective surface, which is why they show up most often on integrated-lens designs. Oval and rectangular mirrors pack in a bit more horizontal width for the same footprint, useful if you want to catch cars approaching at an angle rather than dead center.
Size drives the real trade-off. A mirror in the 10 to 13 millimeter range (roughly the diameter of a pencil eraser) delivers a quick, low-profile glance but shows a tighter slice of road, useful mainly for confirming “is something there” rather than judging exact distance or speed. Step up to 15 to 20 millimeters and you get enough surface area to actually track a vehicle’s position as it closes the gap, which matters more on high-speed rural roads than in slow city traffic.
Convex mirrors, common in this category, widen the field of view compared to a flat mirror of the same size, at the cost of making objects appear farther away than they actually are, the same optical trick used in car side mirrors. Flat mirrors show true distance but narrower coverage. Neither is objectively better. A commuter weaving through stop-and-go city blocks benefits more from a wider convex field, while a road cyclist on a fast descent may prefer a flat mirror’s accurate distance read. Dual-mirror setups, with one on each side, close the peripheral gap almost entirely but add weight and cost, and most riders find one mirror on their dominant-eye side covers the situations that matter most.
Comparing Mirror Options and What They Cost
Sunglasses mirrors span a wide price range depending on format and build. Basic clip-on modules that retrofit existing glasses sit at the budget end, typically running well under $30, and work as a low-commitment way to try the concept before buying dedicated mirror sunglasses.
Mid-range integrated-lens sunglasses, where the mirror is built into the frame at manufacture, usually land in the $50 to $100 band. This tier is where most serious commuters and road riders end up, since the factory-set mirror mount tends to hold alignment better than an aftermarket clip over the long run.
Premium options, often bundled with polarized or photochromic lenses, interchangeable tints, and more refined mirror optics, can push past $100. The added cost usually buys better optical clarity in the mirror itself, more UV protection across the lens, and hardware built to survive years of sweat and vibration rather than one riding season.
THE BEAM’s own rear-view mirror options for cyclists sit in the value-to-mid-range space, aimed at riders who want dependable rear confirmation without paying premium-tier prices for features like photochromic tinting most commuters never need. Whatever price point you land on, treat the mirror’s stability and optical clarity as the two things worth paying more for. Everything else is preference.
Material and Build Quality: What Actually Affects Durability
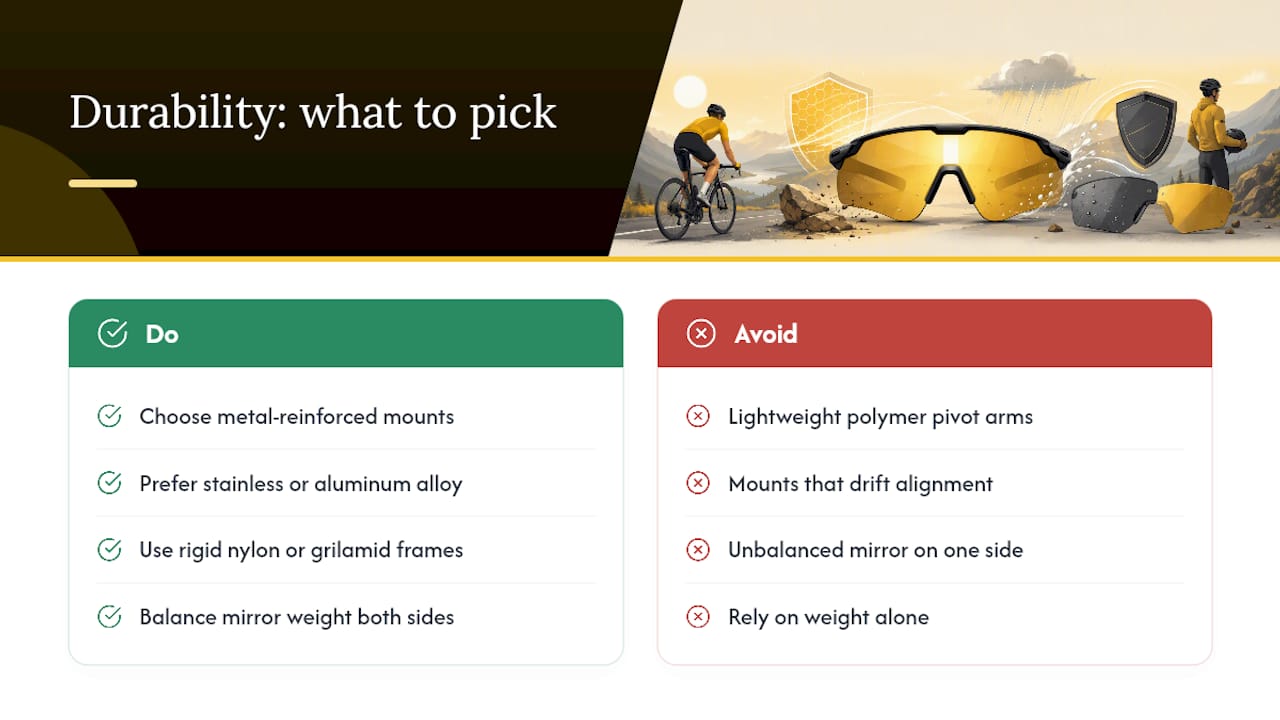
The mirror itself is usually a thin polymer or glass-coated optic bonded to a plastic or metal backing, and that backing material is what determines how well it survives a season of real riding. Cheaper clip-on units often use a lightweight polymer arm that flexes under vibration, which is convenient for adjustability but wears out faster at the pivot point.
Metal-reinforced clips and mounts, typically stainless steel or an aluminum alloy, hold their angle far longer under repeated bumps and temperature swings. That matters more than it sounds: a mount that’s drifted five degrees out of alignment by midsummer defeats the entire point of setting it up carefully in the spring.
Weight matters too, but less than people assume. A quality mirror module adds only a few grams to the sunglasses, not enough to cause discomfort even over a multi-hour ride. Where weight actually shows up is in perceived wind resistance and balance. A poorly weighted mirror on one side of the frame can make the glasses feel lopsided, especially on rougher gravel where every bit of the ride jostles the mount. Frame material matters just as much as the mirror hardware itself. A rigid nylon or grilamid frame holds the mirror’s angle better than a flexible sport frame that bends slightly with every head turn, undoing your careful adjustment one pothole at a time.
Compatibility With Different Sunglass Styles and Frames
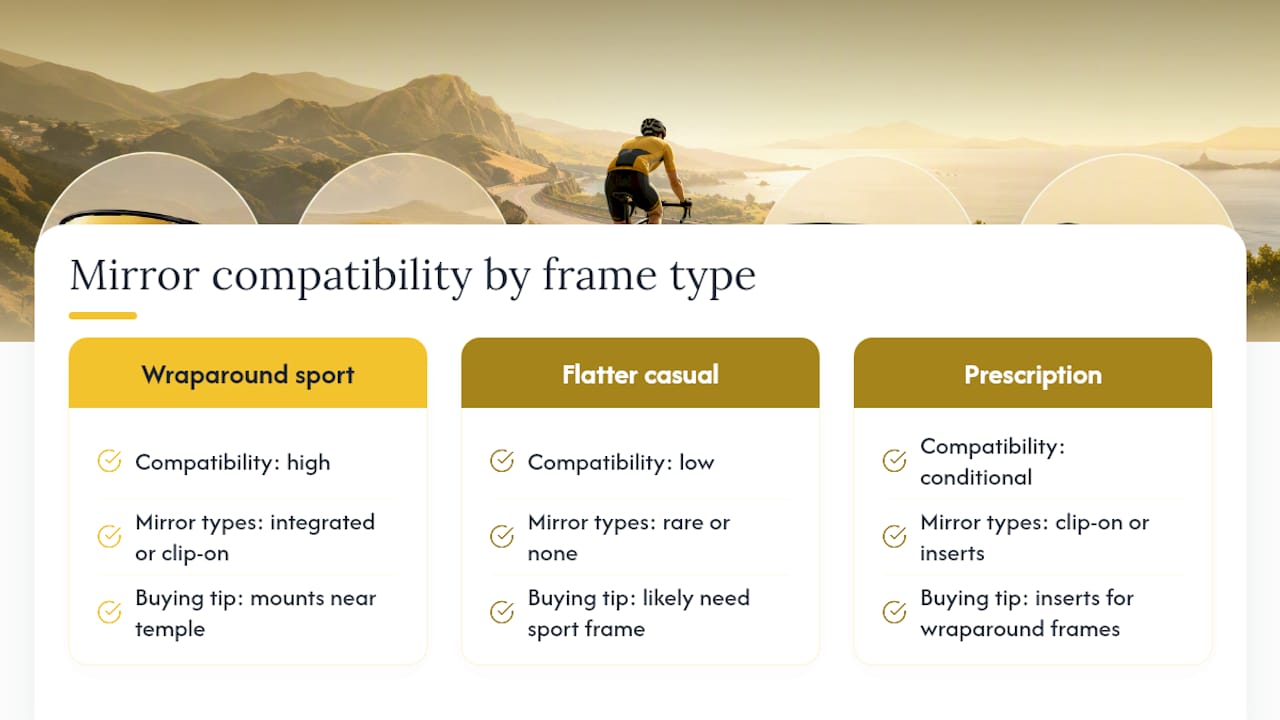
Not every pair of sunglasses accepts a mirror the same way, and this is where a lot of riders get frustrated after buying the wrong combination. Wraparound sport frames, the wide, curved style most road and gravel cyclists already wear, tend to be the easiest to fit with either integrated or clip-on mirrors, since the lens curve gives the optic a natural mounting point near the temple.
Flatter, more casual-style sunglasses, the kind closer to everyday fashion frames, often don’t have a compatible clip-on option at all, and manufacturers rarely offer integrated-mirror versions of them since the flat lens doesn’t hold the optic at a useful angle. If your daily sunglasses fall into this category, you’ll likely need to switch to a dedicated sport frame to use a mirror at all.
Prescription riders have two real paths. A clip-on module works on most prescription frames that have a temple arm thick enough to grip, which covers the majority of sport and semi-sport prescription glasses. The second path is prescription inserts, small corrective lenses that clip inside a wraparound sport frame, which then lets you use that frame’s integrated mirror exactly as a non-prescription rider would.
Frame size affects fit more subtly. Narrow frames built for smaller faces sometimes don’t leave enough lens real estate in the corner for a mirror without it encroaching on your direct field of view. If you’re shopping for mirror-compatible sunglasses and have a narrower face, check the mirror’s exact placement before buying rather than assuming it’ll sit clear of your line of sight.
Why Field Testing Changes How You Build a Mirror
THE BEAM builds cycling safety equipment on one premise: gear has to survive the ride it’s designed for, not just look good in a product photo. As a French brand focused on protection, design, and real-world usability, THE BEAM develops helmets and accessories across road, gravel, urban, e-bike, and everyday riding, including the VIRGO integral helmet with MIPS technology, our flagship product sold internationally.
Rear-view mirrors sit alongside reflectors and connected visibility products in that same safety lineup, and the lessons come from testing at ultracycling events, where riders cover hundreds of miles through shifting light and weather. Mounts that survive those distances make it into production; ones that drift or fog out don’t.
For commuters, an integrated-lens option gives the cleanest daily setup. For riders who already wear prescription frames, a clip-on module makes more sense than replacing glasses entirely. Our own setup guide walks through the adjustment process we recommend to every new rider.
— Sophie
See THE BEAM’s Mirror Options for Your Riding Style
THE BEAM builds its mirror lineup around three real situations: daily commuters who want a clean, low-profile setup, performance riders who need a mount that survives vibration at speed, and prescription wearers who need a retrofit that actually holds its angle. You get a mirror that’s already been through the adjustment and mounting problems this guide just walked you through, so you skip the trial-and-error most riders go through with their first setup.

Pair a mirror with a taillight or reflector for a fuller layered visibility setup, since no single piece of gear covers every blind spot on its own. Browse the full product lineup to find the mirror that matches your riding style, or check out the FRAME FLASH reflectors to round out your visibility kit before your next ride.
Sources
- What kinds of rear-view mirrors work for bicyclists? - CyclingSavvy
- Effects of Side Mirrors on Rearward Safety Confirmation While Riding a Bicycle
- Tested: Sunglasses with a built-in rearview mirror - gimmick or gold? - Bicycling Australia


