
Cycling injuries among children are far more common than most parents realize. In 2021 alone, ~120,000 nonfatal injuries were recorded among U.S. kids aged 0 to 19, yet helmets alone can prevent 66% of head injuries in children under 16. The encouraging truth is that most of these incidents are preventable. With the right gear, a well-maintained bike, and consistent skill-building, you can dramatically reduce your child’s risk before they ever hit a city street. This guide walks you through every step, from choosing a helmet to teaching traffic rules, so your kid can ride with real confidence.
Table of Contents
- Start with the right gear: Helmets and essentials
- Bike readiness: Adjust, check, and fit
- Teach traffic rules and urban cycling skills
- Practice makes perfect: Building skills and confidence
- A parent’s perspective: What really keeps kids safe on urban streets
- Ready for urban adventures? Go further with The Beam
- Frequently asked questions
Key Takeaways
| Point | Details |
|---|---|
| Helmet safety matters | A properly fitted helmet is the single most important way to prevent serious head injuries in children. |
| Routine bike checks | Simple checks like tire air, working brakes, and correct chain tension keep your child’s ride safe every time. |
| Urban rules save lives | Teaching traffic laws and safe riding habits prepares kids to navigate busy city streets with confidence. |
| Practice builds skills | Supervised riding and structured practice help kids develop lasting safe cycling habits. |
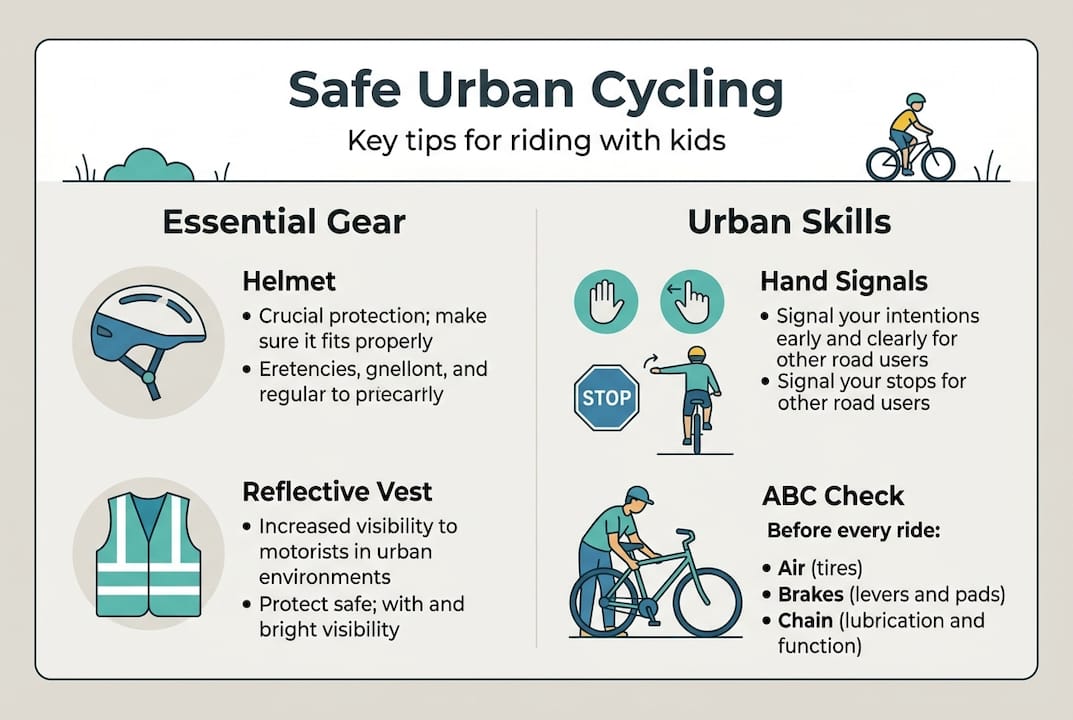
Start with the right gear: Helmets and essentials
Before your child rolls out of the driveway, the single most important thing you can do is make sure they’re wearing a properly fitted helmet. A properly fitted helmet reduces head injury risk by 60 to 88%. That’s not a marginal improvement. That’s the difference between a scraped knee and a serious trauma.
Fitting a helmet correctly takes about two minutes and makes all the difference. Follow these steps:
- Position: The helmet should sit level on the head, about two finger-widths above the eyebrows.
- Side straps: Form a “V” shape just below each ear.
- Chin strap: Buckled snugly. You should fit one finger between the strap and your child’s chin, not two.
- Shake test: Have your child shake their head side to side. The helmet should barely move.
Always look for the CPSC certification label inside the helmet. This is the U.S. Consumer Product Safety Commission standard, and any helmet sold legally in the U.S. for cycling must carry it. If you’re shopping online, double-check before buying.
Beyond the helmet, build out a basic safety kit:
| Essential item | Why it matters |
|---|---|
| Reflective vest or jacket | Increases visibility by up to 90 meters at night |
| Front and rear lights | Required by law in most U.S. states after dark |
| Knee and elbow pads | Absorb impact during falls, especially for beginners |
| Bright clothing | Helps drivers spot your child in daylight |
For a deeper look at what makes a great helmet for young riders, check out best kids bike helmets on The Beam’s blog.
Pro Tip: Let your child pick the color or design of their helmet. Kids who feel ownership over their gear are far more likely to wear it without a fight every single morning.
Bike readiness: Adjust, check, and fit
With your child’s gear sorted, it’s time to make sure their bicycle is just as ready and safe. A poorly fitted or poorly maintained bike is a hazard no helmet can fully compensate for.
Start with the ABC check, a quick pre-ride routine recommended by cycling safety organizations and outlined in the PennDOT Bicycle User’s Manual. Here’s how to run through it:
- Air: Squeeze both tires firmly. They should feel hard and resist pressure. Check the sidewall for the recommended PSI and inflate accordingly.
- Brakes: Squeeze each brake lever. The bike should stop immediately. If the lever touches the handlebar before stopping, the brakes need adjustment.
- Chain: Look at the chain. It should be clean, lubricated, and sitting properly on the gears. A rusty or skipping chain is a safety issue.
Beyond mechanics, fit matters enormously. When your child sits on the saddle, their feet should rest flat on the ground. This gives them control at stops and reduces the chance of tipping. Handlebars should be at a comfortable reach, not forcing your child to hunch or stretch.
Here’s a quick comparison of what to do versus what parents commonly miss:
| Correct approach | Common mistake |
|---|---|
| Seat height allows feet flat on ground | Seat too high for “room to grow” |
| Brakes tested before every ride | Brakes only checked after a problem |
| Helmet refitted as child grows | Same helmet used for years without rechecking fit |
| Chain cleaned and lubricated monthly | Chain ignored until it breaks |
For a broader overview of what to check before urban rides, the urban cyclist safety checklist is a great resource to bookmark.
Pro Tip: Do the ABC check together with your child at least once a week. When kids learn to run through these steps themselves, safety becomes a habit rather than a chore.
Teach traffic rules and urban cycling skills
With the bike and gear in order, parents must focus on teaching safe cycling behaviors for urban environments. Gear protects your child when things go wrong. Rules and skills help prevent things from going wrong in the first place.
The core rules every child cyclist needs to know:
- Ride on the right side of the road or bike lane, always moving with traffic.
- Obey all signs and signals, including stop signs, traffic lights, and yield signs.
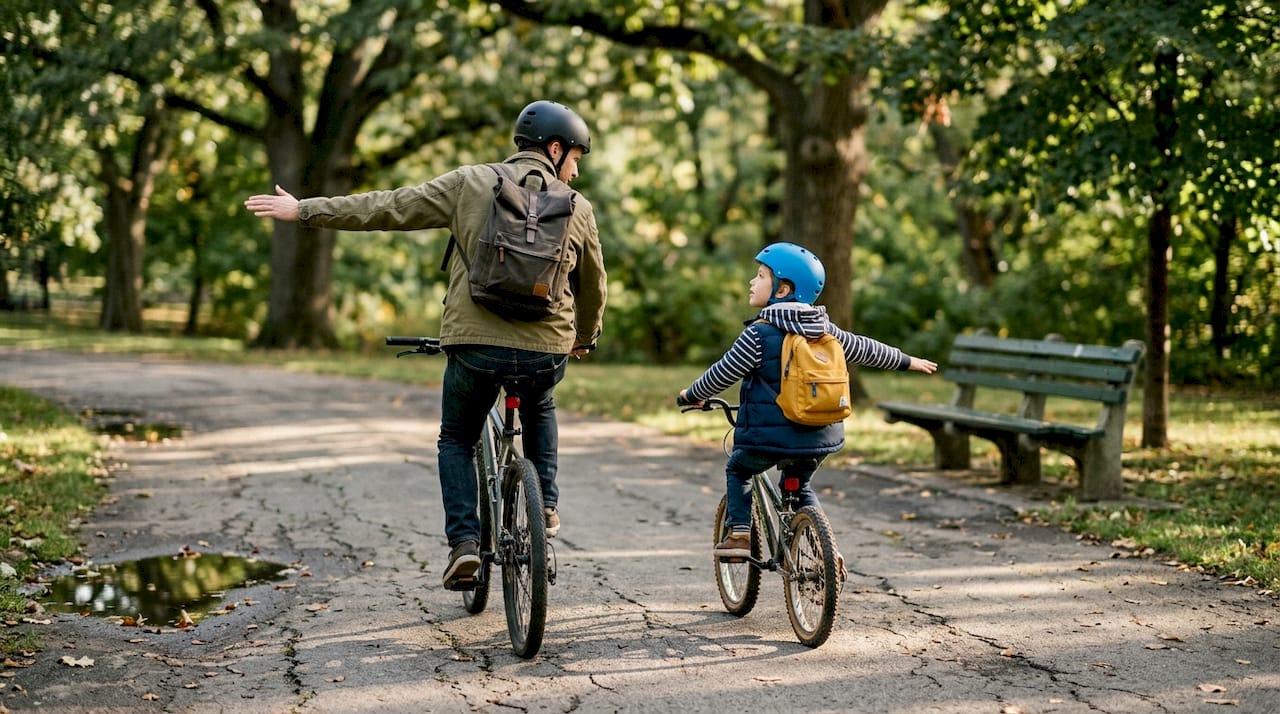
- Use hand signals before every turn or stop, giving drivers and pedestrians time to react.
- Look left, right, then left again before entering any road or crossing an intersection.
- Yield to pedestrians at crosswalks and shared paths.
These rules of the road form the foundation of safe urban riding. Practice them verbally at home before practicing them on wheels.
For younger children under 10, sidewalks are generally safer than roads. Once your child approaches age 10 and has developed the depth perception and reaction time needed for traffic, you can begin introducing bike lanes and quieter streets.
Key skills to practice in a controlled setting:
- Hand signals: Left turn (left arm out), right turn (left arm bent up or right arm out), stop (left arm bent down).
- Scanning: Looking over the shoulder without swerving. This takes real practice.
- Dooring distance: Staying at least one full door’s width away from parked cars to avoid being hit by a suddenly opened door.
- Eye contact with drivers: Teaching kids to make eye contact at intersections before proceeding, confirming the driver has seen them.
Safety warning: Never ride against traffic. Riding the wrong way is one of the leading causes of serious cycling accidents in urban areas, because drivers are not looking for cyclists coming from that direction.
For a full family-oriented breakdown of urban cycling rules, the cycling safety guide for families covers everything in one place.
Practice makes perfect: Building skills and confidence
Once kids know the rules, the next stage is putting knowledge into practice in safe, structured ways. Knowing what to do and actually doing it under pressure are two very different things.
Start every new skill in a traffic-free environment. A quiet park, an empty parking lot on a weekend, or a wide sidewalk away from intersections all work well. The goal is to remove the stress of real traffic so your child can focus entirely on the skill at hand.
One of the most effective tools for structured skill-building is a bike rodeo, a series of practice stations you can set up at home or in a nearby park. According to bicycle safety educators, supervised bike rodeos with clear stations help kids internalize safety habits far faster than unstructured riding.
Here’s how to set one up:
- Station 1: Helmet fit check. Before riding, your child checks and adjusts their own helmet.
- Station 2: ABC check. Run through air, brakes, and chain independently.
- Station 3: Balance and slow riding. Ride as slowly as possible between two cones without putting a foot down.
- Station 4: Hand signals. Signal left, right, and stop while riding a short loop.
- Station 5: Obstacle course. Navigate around cones to simulate parked cars, pedestrians, and curbs.
As a parent, your behavior is one of the most powerful teaching tools you have. When you ride with your child, model every behavior you expect from them. Signal before turning. Stop fully at signs. Check over your shoulder. Kids absorb what they see far more than what they’re told.
Pro Tip: Gradually increase independence as your child’s confidence grows. Start with you riding alongside, then transition to following a short distance behind, then let them lead a familiar route while you observe. Each step builds real-world judgment.
For more structured approaches to child cycling protection, The Beam’s resources offer practical frameworks that work for urban families.
A parent’s perspective: What really keeps kids safe on urban streets
Most cycling safety guides focus on gear and rules. Both matter. But after working closely with cycling families, we’ve noticed something most checklists miss: readiness is not an age. It’s a combination of cognitive awareness, physical coordination, and emotional confidence that looks different in every child.
Some 8-year-olds have the focus and spatial awareness to handle a quiet bike lane. Some 11-year-olds still need more time. Assessing your child’s individual readiness and scaffolding independence gradually, starting with supervised short rides before expanding their range, is a smarter approach than following a fixed age rule.
There’s also a bigger picture worth considering. Urban infrastructure directly affects how safe your child is, regardless of how well you’ve prepared them. Parents who advocate for protected bike lanes, lower speed limits near schools, and better crosswalk visibility are doing something no helmet can replicate. Check your local urban safety checklist and consider connecting with community groups pushing for safer streets. Your child’s safety doesn’t stop at your front door.
Ready for urban adventures? Go further with The Beam
You’ve covered the fundamentals. Now it’s time to make sure your family’s gear matches your commitment to safety.

At The Beam, we design safety equipment built for real urban conditions, not just ideal ones. Our RS1000 ride safety system combines smart visibility technology with practical usability, giving your child an extra layer of protection on every ride. For families who want to take cycling further together, our ultracycling event is a great way to build shared experience and confidence in a supported environment. Because the best safety investment you can make is one your child will actually use and enjoy.
Frequently asked questions
What age is safe for kids to start riding in the street?
Most experts recommend waiting until around age 10, when children have developed the depth perception and traffic awareness needed for road riding. Sidewalks are safer for children under 9 or 10.
How often should children’s bikes be checked for safety?
Perform the ABC check before every ride and do a full fit review whenever your child has a noticeable growth spurt.
Does wearing a helmet really make a difference?
Absolutely. A properly fitted helmet reduces head injury risk by 60 to 88% and brain injuries by up to 88% in children.
What are hand signals, and why do kids need to learn them?
Hand signals communicate your child’s intentions to drivers and other cyclists before a turn or stop. Using hand signals consistently is one of the simplest ways to prevent intersection collisions.
Where’s the best place for beginners to practice cycling?
Traffic-free spaces like parks or empty parking lots are ideal. Starting in safe areas lets kids build core skills without the pressure of real traffic.


